
Blog Posts

Mostrar mensagens com a etiqueta open source. Mostrar todas as mensagens

sábado, 1 de junho de 2019

Um Nano mais barato! E aprendam FreeCad, um braço-robot Open Source(!), convertam scad para stl, e um Kit Arduino,

Muita coisa para cobrir, por isso, vai ser rápido:

Eis a ùltima criação da Arduino, um Micro-Controlador Nano, e mais em conta, para facilitar ainda mais a vida dos Engenhocas:
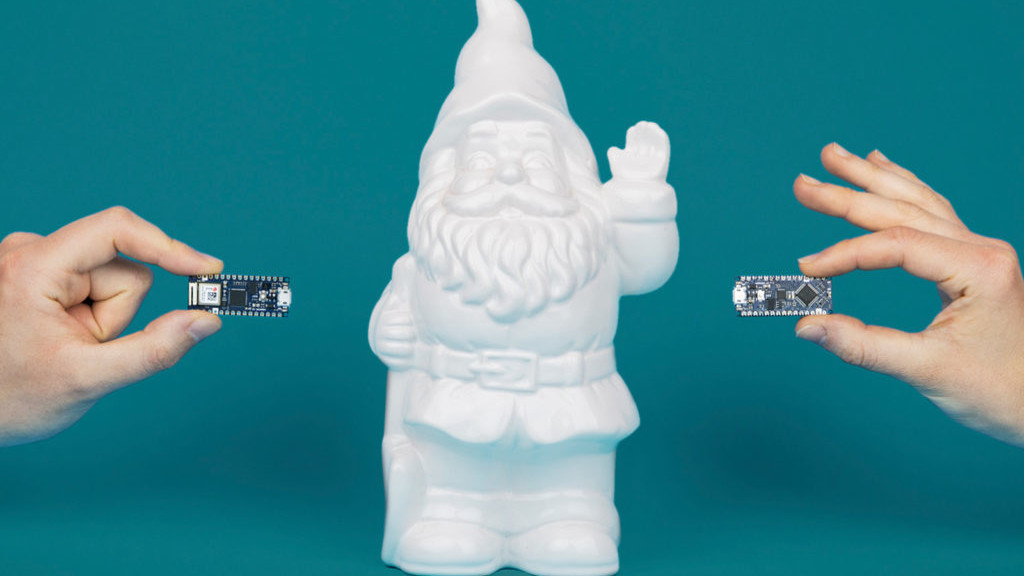


Arduino Launches New Affordable Nano Microcontroller BoardsHanna Watkin  
Arduino is the Italian open-source computer hardware and software company announced a new family of affordable, microcontroller boards at last weekend’s Maker Faire Bay Area 2019.
“The new Nanos are for those millions of makers who love using the Arduino IDE for its simplicity and open source aspect, but just want a great value, small and powerful board they can trust for their compact projects,” said Massimo Banzi, co-founder of the Arduino project.
The company’s press release explains that these boards offer high quality and reliability, with a cheaper price tag. The microcontroller boards are also compatible with classic Arduino boards and boast low energy consumption. They’re also equipped with powerful processors. 
https://all3dp.com/4/arduino-launches-new-affordable-nano-microcontroller-boards/


O FreeCad é a melhor opção para quem quer desenhar os seus Objectos 3D, e aqui vai um simpático Tutorial para aprenderem como dominar o Programa:


2019 FreeCAD Tutorial for 3D Printing – 5 Easy Lessons
Rocío Jaimes Gutierrez 

Welcome to our FreeCAD tutorial for 3D printing. FreeCAD is a 3D parametric modeler, designed to create and customize real-life objects. Its beauty lies on the easiness to modify your designs, together with the open-source principle, and of course, being for free.
In this 5-lesson FreeCAD tutorial, you will learn the basic commands and tools to visualize your ideas on screen for 3D printing. We will construct a seemingly simple object – step by step. After each instruction, you will find pictures highlighting the steps. By the end of this tutorial, you will be ready to print your first self-constructed CAD model.


Ora aqui está um Kickstarter a apoiar, um braço-robot OPEN-SOURCE!
Dito de outra maneira, CNC para o Povo!
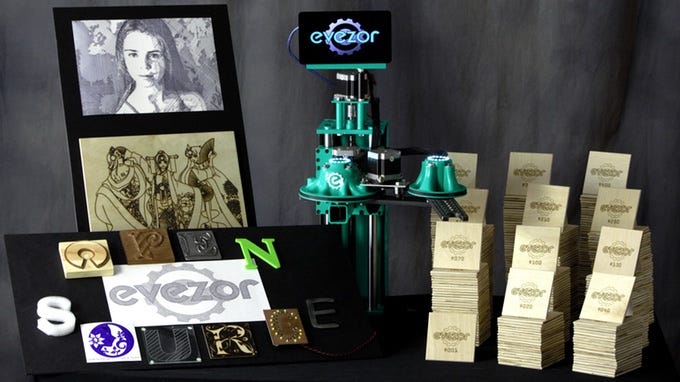


Evezor: Open Source SCARA Robot ArmJeremy S. Cook

Per this project’s Kickstarter video seen below, when 3D printing first jumped came into the mainstream, many people thought they could now make anything they wanted, perhaps even many of them to sell with no human interaction. While true in some sense, these machines do require human intervention between prints, and can take a very long time to produce useful parts. Additionally, some designs may require a different tool, such as a laser cutter or CNC router. That, of course, means more space and money, and still there is the issue of machine tending.

https://blog.hackster.io/evezor-open-source-scara-robot-arm-b955daac3d82


O programa SCAD tem muitos aderentes, por isso, podem aprender como transformar aqueles Sólidos criados em relações Matemáticas, em Objectos impresso em 3D:
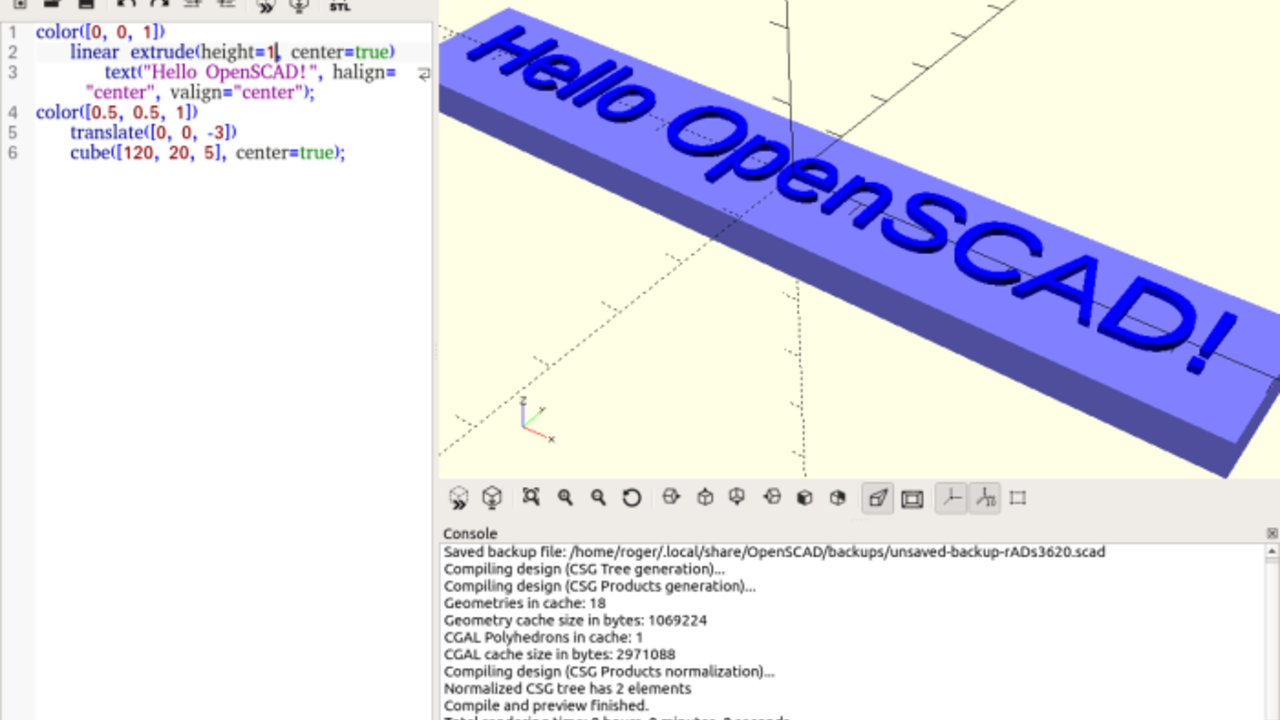


SCAD to STL – How to Convert SCAD Files to STLBenjamin Goldschmidt 

SCAD and STL files are two common file types for 3D design applications. SCAD stands for “Solid Computer Aided Design”, and the file format is used to describe 3D objects. It was pioneered by a software called “OpenSCAD,” which is a free CAD software for designing 3D objects. STL stands for “stereolithography” and is a popular file type to use with slicers for 3D printing.
The main difference between these two file types is in the way the models are described in code. In STL files, the 3D model is created using a “tiled” set of triangles along the surface of the object. This creates a fully 3D object. In contrast, SCAD files design an object using mathematical relationships. For example, a cube-like object can be described using its length, width, and height. This type of design can be useful for printing objects such as fractal art on objects.
Because the geometry used by STL files is more capable of conforming to complex designs, you may find you want to convert SCAD to STL. Lucky for you, there are two really easy ways to do this.

https://all3dp.com/2/convert-scad-files-to-stls/


Este nosso amigo tem-vos a oferecer um bastante exaustivo Instructable para aprenderem uma data de usos para o Arduino!
É bom!


Arduino Learner Kit (Open Source)taifur

If you are a beginner in Arduino World and going to learn Arduino having some hands-on experience this Instructables and this Kit is for you. This Kit is also a good choice for the teachers who like to teach Arduino to their students in an easy way.
If you want to learn Arduino you should include the following topics:
Digital Output:
Controlling multiple LEDs using Arduino
Generating Tone using Buzzer
Digital Input:
Interfacing button switch using Arduino
Interfacing DHT11 Sensor Using Arduino
Analog Input:
Reading Analog data from a potentiometer
Interfacing LM35 temperature sensor using Arduino
Analog Output (using PWM):
Generating multiple colors using the RGB LED.
SPI Communication:
Interfacing 74HC595 Shift Registerwith Arduino
Interfacing MAX7219CNG with Arduino for driving DOT Matrix display or multiple seven segment display using only 3 pins of Arduino.
I2C Communication:
Reading date and time from DS1307 real time clock
UART Communication:
Interfacing GROVE GPS and Bluetooth Module with Arduino
Display Interfacing:
Driving 16 X 2 Character LCD display using Arduino
Multiplexing:
Driving multiple seven segment display using a minimum number of Arduino pins.
You will be wondering to know that the Kit is designed to experiment with all the above-mentioned topics. So, it can be an Ideal Learner Kit for learning Arduino Programming.
[The Kit includes onboard 6 Green LED, 1 RGB LED, 1 Potentiometer, 1 LM35 Sensor, 1 DHT11 Sensor, 4 Button Switch, 4 Seven Segment Display, 1 8X8 Dot Matrix Display, 1 MAX7219CNG IC, 1 74HC595 Shift Register, 1 Buzzer, 1 16X2 LCD display, 1 DS1307 RTC, 3 Grove Universal Connector.]
No more separate shield or module, no more disgusting wiring on the way of learning Arduino.
https://www.instructables.com/id/Arduino-Learner-Kit/





sexta-feira, 20 de abril de 2018

Servo-Motores para todos! E um Sintetizador de mistura, Filamento de Borracha, aprendam OpenScad, e reparar Ficheiros 3D!

Qualquer motorzinho pode agora ser um Servo-Motor?
Com FEEDBACK?
E  com uso para motores lineares, e motores de todo o tamanho?
Uma muito boa Notícia...


New products: Jrk G2 USB Motor Controllers with Feedback
Jan

After many months or years of work (depending on how you look at it), I am happy to introduce our newest motor controllers, the Jrk G2 USB Motor Controllers with Feedback, which we are releasing today in four power variants:


Jrk G2
18v19

Jrk G2
24v13

Jrk G2
18v27

Jrk G2
24v21
Recommended max
operating voltage:
24 V(1) 34 V(2) 24 V(1) 34 V(2)
Max nominal
battery voltage:
18 V 28 V 18 V 28 V
Max continuous current
(no additional cooling):
19 A 13 A 27 A 21 A
Dimensions: 1.4″ × 1.2″ 1.7″ × 1.2″

The main purpose of the Jrk G2 family is to enable feedback-based control of DC brushed motors, simplifying closed-loop control of things like the position of an actuator. An example that is probably familiar to most of us is the common hobby servo that has an output shaft that can rotate to various positions as commanded over a simple interface. The Jrk motor controllers can be used for giant versions of those servos, and they can also be used in many other systems as long as you can somehow get feedback in the form of an analog voltage or a frequency. Analog voltage feedback is often easy to get from potentiometers that can serve as angle or position sensors.

https://www.pololu.com/blog/763/new-products-jrk-g2-usb-motor-controllers-with-feedback


Um Sintetizador que mistura amostras de som até 4 delas, e em várias percentagens das mesmas, é o que podem construír com um Raspberry Py, neste Projecto:


Building the Google Open Nsynth Super
Andrew Back

A Raspberry Pi and machine learning powered instrument for generating new unique sounds that exist between different sounds.
NSynth (Neural Synthesizer) is a machine learning or “AI” algorithm from Google and collaborators that uses a deep neural network to learn the characteristics of sounds, and then to create a completely new sound based on these. More than simply mixing sounds it actually creates an entirely new sound using the acoustic qualities of the original sounds.
Open NSynth Super is an experimental physical interface for NSynth that is based around a Raspberry Pi, custom PCB and a simple laser-cut enclosure. It comes provided with turnkey O/S images that bundle preconfigured software and firmware, along with sets of example sounds — meaning that you don’t have to go through the extremely resource-intensive process of generating audio files in order to start experimenting with the synthesizer.
The PCB design, microcontroller firmware, software and enclosure design are all published under open source licences, meaning that anyone is free to build their own Open NSynth Super.

https://www.rs-online.com/designspark/building-the-google-open-nsynth-super


Mais coisas boas da Hoffman Engeneering, um Filamento de Borracha, que se porta mesmo como Borracha, e tem a aparência de Borracha!
E ainda, uma armação para Ventoínha de arrefecimento, para descarregarem.


Filaflex - 3D Printable Rubber!
Hoffman Engineering

I try out some more flexible filament, this time Filaflex by Recreus. I also add a cooling fan, which makes a drastic difference in print quality!

https://www.youtube.com/watch?v=L1wHvG59bms


OpenScad é um poderoso Programa CAD, mas difícil de aprender.
Por isso, aprendam com quem sabe, que aqui vai um Tutorial:


OpenSCAD Tutorial for Beginners (5 Easy Steps)
Michael Jones


OpenSCAD is a powerful, free and open source modelling tool that lets you make precise 3D models with just a few lines of code. With the right setup, you can even make adaptable, "parametric" models. In this OpenSCAD tutorial, we'll get acquainted with the software, review a simple example and then discuss how to make parametric designs.

https://all3dp.com/2/openscad-tutorial-for-beginners-5-easy-steps/


É duro, ver um Objecto que idealizaram ser mal-impresso como num Pesadelo!
E se a culpa, não é da Máquina, mas do objecto, eis como podem reparar o ficheiro 3D, para ser transformado num Objecto Imprimível:


How to Repair STL Files with 3 Free STL Repair Software Tools
Dibya Chakravorty

Nothing is more frustrating than a 3D model that won’t print. STL files need to be watertight, have the right wall thickness and be properly optimized in order to be printable. Even the most experienced 3D designer will sometimes leave unprintable defects in the model. So you need software to repair your STL files.
If you have a broken STL file, your Slicer software will often warn you about the defects. But in the worst case, the slicer won’t complain at all. You will start printing as usual, spend time and money, and eventually land up with a failed print.
Another common scenario is when you try to upload an STL file in an online 3D printing service like i.materialize or Sculpteo, but get an error message saying that the file size is too big. In this case, you are dealing with a bloated STL file.
So what do you do in these situations? How do you repair STL files to get a printable version?
In this article, we introduce you to the best free software that can check your STL file for errors and also repair STL files automatically to produce a printable version.

 https://all3dp.com/1/best-free-str-repair-software-tutorial-netfabb-microsoft-3d-builder/


quarta-feira, 6 de julho de 2016

Printtable, Impressora 3D a partir de peças da IKEA! e Luzes para a Garagem, Um Purificador do Ar Open Source, uma Roda de Genevra, e um Grelhador a palitos

Isto é que é uma ideia bacana!
Ptinttalbe, de Print + Table, é uma Impressora 3D feita com Mobília IKEA, grande, impecável, e fácil de montar... Para além de ser de um Design limpo e funcional, sem ceder n aspecto estético, mesmo digno de nota.
Um portento. 


PRINTTABLE the Affordable, Attractive IKEA Lack Table Hack to create a 3D Printer

masondrust 
Being interested in 3D printers since 2011 after purchasing a
BFB 3D Touch (Now 3D Systems with the latest model being the Cube Pro costing over £2000) I wanted to build a stable Large build platform 3D Printer for a fraction of the price.
Many Enthusiast's entries into the 3D printer market comes from the purchase of the Prusa i3 kit and in keeping with the good work of the Joseph Prusa design I felt it would be great if the design could be simple.
One of the many drawbacks I noticed was the overall finished look of the DIY kits; i set upon the task of creating a product that not only was affordable and easy to build but one which had style and form a look in keeping with the futuristic possibilities 3D printing brings. 
http://www.instructables.com/id/PRINTTABLE-the-Affordable-Attractive-IKEA-Lack-Tab/


Um sem-fim de Engenhocas tem de fazer do Sótão, Cave, ou Garagem, a sua Oficina...
E trabalhar com Máquinas às escuras é, digamos, ALGO perigoso!
Por isso, é bem-vindo este Instructable, que vos permite ter uma Linha de LEDs que vai iluminar a Sala, e por pouco dinheiro:


Inexpensive garage lights from LED strips
happydupa

Hello all you happy people. Welcome to my first instructable.
This project came about as I recently rebuilt my garage and found myself in need of complete lighting throughout.
I had two main objectives: I wanted bright/even coverage and I wanted to do it as inexpensively as possible.
For a number of reasons I wanted to use all LED lighting for my project but the commercial products were cost prohibitive. At the time of this writing, 4 foot shop lights are going for $40 and higher. I did some research and before long came across inexpensive lighting strips from China. The strips are sold in 5m lengths (16.5 ft) and can be found on ebay for $5-7 each. But how to use them?
After a lot of thought, I came up with the idea of putting them directly onto my trusses. This would give me even lighting throughout and a clean modern look.
I found that one LED strip wasn't bright enough, so I added a second for more light. This is probably enough for general lighting but I wanted MORE POWER and added a third. Why not at this price, right? To give you an idea of the coverage, my garage is 24'x40'. I'm putting lights on 5 trusses and they are 8'6" off the ground.


Para um melhor Qualidade de Vida, eis uma oferta de peso...
O vosso próprio Purificador de Ar, que fazem em casa, porque é Open Source!
Obrigado, Ian van Mourik.


OPEN SOURCE AIR PURIFIER
ianvanmourik 
Hi y’all,
I'm Ian van Mourik a Product Designer from the Netherlands. This instructable is a brain child that I just had to share with the world. Bad air quality causes various health problems and purification solutions are often complex and expensive. The solution is an open source no nonsense air purifier: the OPEN AIR!
This instructable is based on my first experimental prototype of the OPEN AIR.
It’s meant to be a platform to build upon and improve. My personal goal is to test and improve the design and effectiveness. Collectively we can provide new and better solutions. The modular filter design makes it possible to change and test different kind of filters.
This Design is based on a carbon type filter in collaboration with two pressure optimized 120mm 12v PC fans. It´s controlled by an Arduino with a gas sensor and a LED panel for subtle visual feedback.
If you decide to build your own OPEN SOURCE AIR PURIFIER, be ready to roll up your sleeves, because this won't be an easy one. It will include laser cutting, 3D printing, prototyping, soldering, programming and a lot of other bits and bobs. It will be an advanced instructable. But don't let it scare you, because the reward is big, very big! Like thousands cubic meters of fresh pure clean air big.
Good luck! 


Para fazerem algo mais que pisa-papéis e bustos do Yoda, com a vossa Impressora 3D, eis algo de prático e Didáctico, a Roda de Genebra, que transforma uma rotação contínua em  6 passos pausados, algo que pode servir para muito Protótipo.


3D Printed Geneva Drive
robives 
This project was originally posted on notes.robives.com
The Geneva Drive is an elegant mechanism used to convert rotary motion into intermittent motion. There is a YouTube video above as well as on my Instagram feed.
I’ve designed the parts for this project in Autodesk Fusion 360. If you have access to a 3D you can follow these construction instructions to make your own 3D printed Geneva Drive.
Download the STL files from the geneva.zip link above. They should be suitable for most 3D printers. I printed the parts out in a variety of colours of PLA from rigid.ink using an Ultimaker 2. 


Para Churrascadas e Sardinhadas, eis algo que vos poupa uma boa maquia em Carvão, porque o Rocket Stove, do qual esta Grelhadora é uma variante, aproveita todo o Combustível, de tal maneira que nem sai Fumo!
O que também é bom, principalmente para quem sofre de Alergias, ou não quer problemas com a Vizinhança: 


Rocket Grill!
bennelson
 
Want a D.I.Y. way to cook food WITHOUT using fossil fuel L.P. or having to buy charcoal? I know I did. That's why I built a "Rocket Grill"!
This is just one variation of a "rocket stove" - a simple appropriate technology for cleanly burning bio-fuels.
The rocket grill is fired by twigs, wood scraps, wood chips, or nearly anything else you can put in it. It naturally drafts air to maximize combustion. Once the the grill is really going, NO smoke comes out the top, only heat, and the grill really does sound like a rocket!
The grill is designed to not only grill, but also boil, bake, braise, and roast!
Because of the simple design and robust construction, it is nearly maintenance free. Unlike an LP grill, the burner will never burn and rust away to nothingness. (And cost good time and money to replace.) There is no piezo-electric starter or other "modern" technology in the grill, which would be prone to failure. 


terça-feira, 2 de fevereiro de 2016

Um Torno para Madeira, um Gerador de Engrenagens, uma Onda Mecânica, e uma Mão Biónica!

O melhor trabalho até agora, que eu tenha visto, para transformarem um Engenho de furar num Torno de Madeira sólido e práctico!


Homemade Woodworking Lathe

WoodCrafts 67 

This My Homemade Lathe I made Last year. It consists of An old drill press and Off cuts I had Leftover in the shop. Rails are from An Old louvre door some pine and for the rotating centre I used the bit/ collet end from an old router that was broke. I use this quite often and it still works great. 


Já vos mostrei outros Geradores de Engrenagens, mas este é mais completo, com engrenagens complexas, de rodas dentadas múltiplas:


About
Gear Generator is a tool for creating involute spur gears and download them in SVG format. In addition it let you compose full gear layouts with connetcted gears to design multiple gears system with control of the input/output ratio and rotation speed. Gears can be animated with various speed to demonstrate working mechanism.
Why this tool was created? Just for fun. I'm working on a hobby project, a scale construction machine, which needed some spur gears, and i quickly made a simple spur gear creator script in Javascript with SVG output. As it was done, i couldn't stop, and i added more and more features, and finally i got this tool. It was a pleasure to code the whole thing, i'm a bit sad it is already done, so if you have any idea, what would be a helpful feature, just let me know by sending an e-mail (I couldn't have done this tool without Pageflip, my main project).
Notes about browser compatibility: all new major browsers are supported (i didn't tested IE), but unfortunately Chrome can't render SVG circle correctly. The winners are: Opera for the best performance (shame on me, i never use it) and Firefox for the best looking SVG render. 


Didáctica, simples, mas engenhosa, esta Onda Mecânica mostra-vos como funcionam as ondas, ou seja, o mecanismo ondulantário, e o que ancontece quando a Onda começa no meio, ou nas extremidades, etc:


Mini Wave Model
The Oakland Toy Lab 

A little wave goes a long way!
The mini wave model is small but mighty. With just a few minutes of set-up, it's just as good at demonstrating as its bigger siblings. This is a great model for waves that move, reflect, stand, and wiggle, perfect for a starter project in classrooms learning about waves and motion.
What: Mini Wave Model
Concepts: waves, propagation, physics
Time: ~15 minutes to set up
Cost: ~$1.50
Materials:
Bolts x 2 (with nuts that fit)
Nuts x 40 (or so)
Sticks (I used candy sticks, but cut dowel or other sticks work great, too)
String
Block of wood (2x4 works great)
Tools:
Drill
Hot glue gun / hot glue
Ruler
Scissors
Make
Hop on the wave! 


Uma ideia que nos faz sentir melhor com a Humanidade, aqui está Ada, uma Mão Protésica, que pode ser feita para qualquer um, em qualquer lado, tudo Open Source, Bravo, Inventores do Grupo Open Bionics! 


Ada Robotic Hand - Open Bionics

Open Bionics 
This is a step by step guide on how to make an Open Bionics Ada robotic hand. This is derived from the Dextrus robotic hand, by the Open Hand Project. It assumes you have either ordered the Ada robotic hand kit or have access to a 3D printer are planning to print 3D parts from YouMagine or thingiverse. The list of required 3D printed parts, components and tools are stated below. If you have ordered the Ada kit, you can skip the first step and start straight from step 2.
This hand would provide an excellent research platform for robotics or a test platform for prosthetics research. It has been designed to be easy to build and repair and should be a great project for someone with interests in robotics or prosthetics and wants their very own robotic hand! 


domingo, 29 de novembro de 2015

IMPORTANTÍSSIMO! E Open Source Ecology, e Colido DIY, mais uma Impressora fácil... E faça-voçê-mesmo! Mais um Scanner 3D feito em casa.

Isto não pode ser sobre-valorizado!
Com tantos temores, e bem-fundados, sobre o Futuro, nestes dias, ISTO é um Projecto sempre a crescer, para ter FERRAMENTAS Open-Source, tão completo, que serve tanto para tornar acessível uma Vida Melhor, mas mesmo a sério, para qualquer um...
Como para re-construír a Civilização se for preciso, e sem as sensaborias palonças dos Filmes à la Mad Max! 
Algo a seguir, apoiar e aplaudir! 


Open-sourced blueprints for civilization
Marcin Jakubowski: 
Using wikis and digital fabrication tools, TED Fellow Marcin Jakubowski is open-sourcing the blueprints for 50 farm machines, allowing anyone to build their own tractor or harvester from scratch. And that's only the first step in a project to write an instruction set for an entire self-sustaining village (starting cost: $10,000).


Descobri esta maravilha, numa incrível Fonte de Recursos, no Open Source Ecology, este Pin dedicado a tudo o que é Open-Source, claro: 


Open Source Ecology
The innovators of the world come together to collaborate, prototype, and advance 3D printing, open-source hardware, and DIY culture in order to lower the barriers of entry for anyone to be able to create a small-scale civilization from scratch. All of the blueprints are published online for free, accessible to everyone. Let's move closer to a world without poverty 


E eis mais uma Impressora, barata, 299 Dólares, e que vocẽs montam em casa, com todo o apoio da Colido:


COLIDO DIY 
It is fun and playful!  CoLiDo DIY is the best for learning and sharing more about 3D printing.
Assemble the 3D printer manually – best for educational use
Large build size – 7.9″ x 7.9″ x 6.7″ (20 x 20 x 17cm)
Clean and easy to use
Very high print quality and smooth build surface – up to 0.1 mm resolution
Small, light weight, quiet and odorless


Para terminar, eis como fazer um Scan 3D em casa... Com este Scanner que fazem vocês mesmo, também, com coisas de casa, e um Arduino:


DIY Arduino 3D Laser Scanner
Ardumotive_com 
FabScan is an open-source, do-it-yourself 3D laser scanner.It started out as a Bachelor's thesis by Francis Engelmann, supervised by René Bohne. You can find official project here.
I made my own box from MDF hood sheets and use different hardware parts.I decided to make this guide to show to you my work.
All credits for Arduino software and computer application goes to FabScan team, so thank you very much for this great open source 3D laser scanner!
Dev: Francis Engelmann Official page: hci.rwth-aachen.de/fabscan 


quinta-feira, 19 de março de 2015

3D com Pistola de Cola! E uma Impressora 3D por 100 dólares, 1 Fresa CNC, e tubo de PVC transformado em placa

Isto vai safar muito Inventor e Engenhocas, uma Engenhoca em Legomais uma Pistola de cola, e podem-se fazer muitas coisas, assim...
É uma caneta 3D de fazer em casa!
E o que é melhor, podem fazer o download dos Planos, são Open source.


Hot glue gun becomes handheld 3D printer with some help from Lego 

Paul Ridden

Given some biodegradable 3D printing filament and tasked with doing something creative with it, Vimal Patel built an extruder using Lego, attached it to a rather ordinary hot glue gun and ended up with a pretty funky 3D printing pen – a DIY 3Doodler if you will.
Before embarking on his Lego adventure, Patel did some preliminary work using the university's UP 3D printers to find out if he could incorporate zones of different stiffness into his single material objects. Though this proved possible, the layer by layer approach was found limiting and modeling and programming robotic assistance for extrusion along a path in multiple axes looked complicated, so he simplified the process.


 ...Podem também fazer em casa esta Impressora 3D Open Source, por cerca de 100 Dólares, que exige apenas uma noção elementar de Impressão 3D:


Edge 3D Printer - an affordable open source 3D printer! 

appleman123987 

Hello everyone! In this instructable I will show you how to make a low cost 3d printer that I designed! It should cost around $150 US dollars or $175 Canadian dollars, if you buy from the links provided in this project (parts are from Aliexpress). You can also buy locally but it will cost more (about $300- $400 instead of $150).

You WILL need to have at least some knowledge in 3d printing top complete this project. 


Ou então, esta Fresa CNC que podem também fazer em casa, para as vossas pequenas peças, para fazerem peças em Metal, Madeira, e etc.


Basic beginners mini 3 axis CNC mill

Unclejake 

I've been a CNC machinist just short of 20 years. Owned a Fadal 4020 with extended Z made some neat gadgets with it. About 5 years ago after illness I started back working and looked into and purchased some micro-controllers. All with the idea of building my own little machines. And explore what makes it all tick. Above are two pictures of where my build started and ended over a 24 day period. I'll be doing updates and more instructables around this project in the future. Please enjoy and criticize where needed my first Instructable and CNC competion.


Mas também podem aproveitar Tubo de PVC, para aí, aos pontapés, transformando-o em Chapa que depois podem fresar, ou trabalhar, para o que quizerem!


Recycle Old PVC Into Flat Sheets 
kludge77

When you think about PVC, you're probably like me, and consider it as a tube. Well, it's pretty easy to get it into flat material for the shop. I flattened a 4" piece of schedule 40 PVC in about 20 minutes. You just need a heat gun and a flat surface. Odds are, you've got loads of the stuff sitting around the house. Why not recycle it into something useful?