Blog Posts

terça-feira, 19 de julho de 2016

Tinkerbots, perfeito para Inventores!.E Moldar por Vácuo, corte por Fio quente, mais Treatstock, imprimir 3D por perto

Isto é PERFEITO para facilitar a vida a quem quer um Protótipo em meia-hora!
Um Jogo de construcção com partes que repetem um Movimento que sintam, com Tele-controle, e compatíveis com o Lego...
Algo a ter em conta, não só para a Criançada, mas para as vossas Engenhocas. 


THIS IS TINKERBOTS 
Tinkerbots means playing and learning at the same time. Through connecting the different modules, building roobts and even controlling them, kids learn about robotics, mechanics and sensorics. You just connect the modules in a swift movement and everything works and with our brick adapters you can combine them with LEGO® bricks. 


Ora cá têem uma Moldadora Portátil, para os vossos Moldes a vácuo,  e que se faz com uma Torradeira sucatada, o que é duplamente bom!


Build a Toaster Oven Mini-Vacuum Former
WardWorks  
I built a larger 18x24 bed vacuum former first, and then decided that
I needed a mini vacuum former for smaller pieces and for the leftover scrap plastic from the big former. This was a weekend project and it makes great pulls. 


Continuando na senda de pequenas Máquinas-Ferramentas que vos facilitam a vida de Engenhocas, eis agora esta Cortadora a Fio Quente também portátil, e fácil de fazer em casa:


DIY Hot Wire Cutter for Plexiglass, Cardboard and FoamRCLifeOn
This Instructable will demonstrate how you can build your own hot wire cutter, able to slice through foam, cardboard and even plexiglass!
A hot wire cutter works by a wire, often nichrome or in my case kanthal wire, which is heated via electrical resistance. As the wire reach high temperatures it slices through materials by melting it just in advance of contact.

http://www.instructables.com/id/DIY-Hot-Wire-Cutter-for-Plexiglass-Cardboard-and-F/


Querem mandar imprimir em 3D, sem dar a volta ao País?
Vem mais este Serviço, Treatstock, fazer a ponte entre Desenhadores, Compradores, e Impressores, e podem já inscrever-se e ver se estabelecem uma rede 3D no Bairro:


Treatstock
About 
Treatstock is an online platform for consumers to search and purchase anything that can be made on a 3D printer. All members of our team are enthusiasts of what we do and we are all, to some extent, carried away by 3D printing. Our main objective is to provide the most extensive range of 3D models for both unique and everyday items that can also be personalized to your liking. Another important objective is to minimize delivery time for our 3D models which is achieved by using the closest print service to the customer.
We invite authors of 3D models, 3D printer owners, 3D print services, and anyone who wants to make a profit on 3D printing to register on the website! 


quarta-feira, 13 de julho de 2016

Impressoras 3D em Portugal! E triturar Plástico para Filamento, uma Bicicleta Aquática(!), um Spray-Maravilha, e Curvas na serra de banda

A pedido de vários Engenhocas, cá vão 2 Dicas sobre como e onde comprar uma Impressora 3D, em Portugal, embora suspeite que vendam para o Estrangeiro...

Here's a couple of Portuguese Retail Shop 3D Printers, that might also be available elswehere: 


Por 322 Euros, à data desta publicação, eis algo simpes e barato, para começar a imprimir, é comprar e usar, logo a seguir:


Impressora 3D DaVinci JUNIOR

Ref. imp3DdavinciJr
Nova impressora 3D de filamento PLA (apenas) capaz de criar objectos de uma dimensão máxima até 15x15x15cm.
Não necessita de calibração e imprime até 150mm/sg com resoluções desde 0,1mm até 0,4mm e com software compatível com os formatos .stl e XYZ incluído.  


Um modelo, mas há 4 modelos diferentes, à vossa disposição, eis uma Loja com isso, e muito mais, Filamentos, etc.
Este Modelo, tem outra qulidade, e, já se está a ver outro preço, 750 Euros:


Blocks One  
Se gostam da Ultimaker, então vão adorar esta impressora. Uma impressora com uma óptima qualidade que chega aos 40 microns, e mais impressionante que isso é que mesmo a 200mm/s consegue imprimir razoavelmente bem. Uma vez que tem mesa aquecida, também é possível imprimir com diversos materiais. Para além de todas estas regalias, também já vem montada, é ligar e começar a usar. 


Uma ideia genial para re-aproveitar Objectos da vossa Impressora, de volta para Filamento, e acho que muitos mais Plásticos, eis uma Trituradora por pouco dinheiro e fácil de fazer, vejam como é:


Low Cost Plastic Shredder

joshmt2012 
I have been looking for a way to shred my waste 3D printed parts and support material so i would be able to turn it back into filament. Most of the commercially available ones on the market start at around $500 and having parts water jet to make a shredder can cost over $100 plus all of the bearings and hardware to make it functional. I wanted something inexpensive that would get the job done so i came up with the idea of using an electric hand planer. This is my first iteration of the design and will be updating it to make it work better as i go. The total cost for me was $31.50 but that was because I only had to buy the planer and electrical, with all the other materials the cost should be between $40-50 


Para àguas calmas, vejam só esta bela desta Bicicleta Aquática, que vai ser a alegria deste Verão...
Se lhe juntarem umas correntes de pneu, como as para a Neve, mas com pequenas "pás", e um Leme, podem até pedalar p'lo Rio afora! 


River Rider Water Bike

W1LL7 
Hi Instructables, here is the abstract for the river bike project I've been working on all winter. This is more of a broad guide on how I made it and what I learned then a how-to make your own river bike step by step.
The best way to figure out the project is to watch the video then skim through extra notes I added here. Don't forget that the youtube player has speed adjustment under the gear icon if you need to see something slower.
Project Goals:
Build a bike that I can ride to work on the bike paths then I can ride home down the river.
I do not want to have to swim while using the bike.
The bike can not sink very far into the water because it needs to float over rocks.
Project Mile Stones:
Carve pontoons out of EPS foam.
Shape & seal pontoon.
Weld legs to bike frame.
Constrain pontoons with cables. 


Uma dica bacana do Tech Insider, Line-X vai doravante ser usado numa infinidade de Engenhocas e catrapázios, por Inventores de toda a parte...
FANTÁSTICO! 
MUÁHÁHÁHÁHÁ!


Line-X: This spray makes things almost indestructible
Darren Weaver, Rebecca Harrington and Kevin Reilly
 
There are a lot of ways to break an egg, but if you want to keep it from breaking, might we suggest Line-X? The company created a spray coating that adheres to nearly anything and is very durable. The spray is mostly designed for use on truck and car parts, but is also used on the walls of The Pentagon in the event of a bombing.
The company sent us some everyday items coated in Line-X to see if we could break them, so we gave it a shot.
Additional footage by Grace Raver and Corey Protin.


E se querem fazer algo complicado, quiçá, Artístico, com uma Serra de Fita, saibam como se faz, aqui:  


6 Tips for cutting curves on a bandsaw
ADintheStudio 
 
Cutting complex parts with tight curves safely and accurately on a bandsaw can be challenging, but is fairly easy with some practice, a properly tuned-up bandsaw, and a couple special tips and tricks... enjoy!
What you need:
- A bandsaw
- A thin blade (1/4" recommended)
- Drawing of your cut lines (printed if necessary)
- Supplies for transferring the drawings to your material (see step 2 for methods)
- The material you are cutting into parts (I was using 1" plywood)  


quarta-feira, 6 de julho de 2016

Printtable, Impressora 3D a partir de peças da IKEA! e Luzes para a Garagem, Um Purificador do Ar Open Source, uma Roda de Genevra, e um Grelhador a palitos

Isto é que é uma ideia bacana!
Ptinttalbe, de Print + Table, é uma Impressora 3D feita com Mobília IKEA, grande, impecável, e fácil de montar... Para além de ser de um Design limpo e funcional, sem ceder n aspecto estético, mesmo digno de nota.
Um portento. 


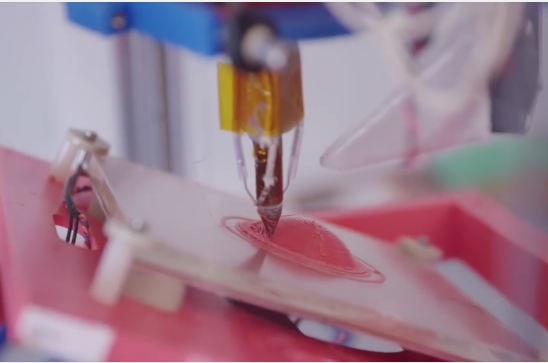
PRINTTABLE the Affordable, Attractive IKEA Lack Table Hack to create a 3D Printer

masondrust 
Being interested in 3D printers since 2011 after purchasing a
BFB 3D Touch (Now 3D Systems with the latest model being the Cube Pro costing over £2000) I wanted to build a stable Large build platform 3D Printer for a fraction of the price.
Many Enthusiast's entries into the 3D printer market comes from the purchase of the Prusa i3 kit and in keeping with the good work of the Joseph Prusa design I felt it would be great if the design could be simple.
One of the many drawbacks I noticed was the overall finished look of the DIY kits; i set upon the task of creating a product that not only was affordable and easy to build but one which had style and form a look in keeping with the futuristic possibilities 3D printing brings. 
http://www.instructables.com/id/PRINTTABLE-the-Affordable-Attractive-IKEA-Lack-Tab/


Um sem-fim de Engenhocas tem de fazer do Sótão, Cave, ou Garagem, a sua Oficina...
E trabalhar com Máquinas às escuras é, digamos, ALGO perigoso!
Por isso, é bem-vindo este Instructable, que vos permite ter uma Linha de LEDs que vai iluminar a Sala, e por pouco dinheiro:


Inexpensive garage lights from LED strips
happydupa

Hello all you happy people. Welcome to my first instructable.
This project came about as I recently rebuilt my garage and found myself in need of complete lighting throughout.
I had two main objectives: I wanted bright/even coverage and I wanted to do it as inexpensively as possible.
For a number of reasons I wanted to use all LED lighting for my project but the commercial products were cost prohibitive. At the time of this writing, 4 foot shop lights are going for $40 and higher. I did some research and before long came across inexpensive lighting strips from China. The strips are sold in 5m lengths (16.5 ft) and can be found on ebay for $5-7 each. But how to use them?
After a lot of thought, I came up with the idea of putting them directly onto my trusses. This would give me even lighting throughout and a clean modern look.
I found that one LED strip wasn't bright enough, so I added a second for more light. This is probably enough for general lighting but I wanted MORE POWER and added a third. Why not at this price, right? To give you an idea of the coverage, my garage is 24'x40'. I'm putting lights on 5 trusses and they are 8'6" off the ground.


Para um melhor Qualidade de Vida, eis uma oferta de peso...
O vosso próprio Purificador de Ar, que fazem em casa, porque é Open Source!
Obrigado, Ian van Mourik.


OPEN SOURCE AIR PURIFIER
ianvanmourik 
Hi y’all,
I'm Ian van Mourik a Product Designer from the Netherlands. This instructable is a brain child that I just had to share with the world. Bad air quality causes various health problems and purification solutions are often complex and expensive. The solution is an open source no nonsense air purifier: the OPEN AIR!
This instructable is based on my first experimental prototype of the OPEN AIR.
It’s meant to be a platform to build upon and improve. My personal goal is to test and improve the design and effectiveness. Collectively we can provide new and better solutions. The modular filter design makes it possible to change and test different kind of filters.
This Design is based on a carbon type filter in collaboration with two pressure optimized 120mm 12v PC fans. It´s controlled by an Arduino with a gas sensor and a LED panel for subtle visual feedback.
If you decide to build your own OPEN SOURCE AIR PURIFIER, be ready to roll up your sleeves, because this won't be an easy one. It will include laser cutting, 3D printing, prototyping, soldering, programming and a lot of other bits and bobs. It will be an advanced instructable. But don't let it scare you, because the reward is big, very big! Like thousands cubic meters of fresh pure clean air big.
Good luck! 


Para fazerem algo mais que pisa-papéis e bustos do Yoda, com a vossa Impressora 3D, eis algo de prático e Didáctico, a Roda de Genebra, que transforma uma rotação contínua em  6 passos pausados, algo que pode servir para muito Protótipo.


3D Printed Geneva Drive
robives 
This project was originally posted on notes.robives.com
The Geneva Drive is an elegant mechanism used to convert rotary motion into intermittent motion. There is a YouTube video above as well as on my Instagram feed.
I’ve designed the parts for this project in Autodesk Fusion 360. If you have access to a 3D you can follow these construction instructions to make your own 3D printed Geneva Drive.
Download the STL files from the geneva.zip link above. They should be suitable for most 3D printers. I printed the parts out in a variety of colours of PLA from rigid.ink using an Ultimaker 2. 


Para Churrascadas e Sardinhadas, eis algo que vos poupa uma boa maquia em Carvão, porque o Rocket Stove, do qual esta Grelhadora é uma variante, aproveita todo o Combustível, de tal maneira que nem sai Fumo!
O que também é bom, principalmente para quem sofre de Alergias, ou não quer problemas com a Vizinhança: 


Rocket Grill!
bennelson
 
Want a D.I.Y. way to cook food WITHOUT using fossil fuel L.P. or having to buy charcoal? I know I did. That's why I built a "Rocket Grill"!
This is just one variation of a "rocket stove" - a simple appropriate technology for cleanly burning bio-fuels.
The rocket grill is fired by twigs, wood scraps, wood chips, or nearly anything else you can put in it. It naturally drafts air to maximize combustion. Once the the grill is really going, NO smoke comes out the top, only heat, and the grill really does sound like a rocket!
The grill is designed to not only grill, but also boil, bake, braise, and roast!
Because of the simple design and robust construction, it is nearly maintenance free. Unlike an LP grill, the burner will never burn and rust away to nothingness. (And cost good time and money to replace.) There is no piezo-electric starter or other "modern" technology in the grill, which would be prone to failure. 


sábado, 2 de julho de 2016

Impressora 3D DLP super-rápida! E de Fotos para 3D em 5 passos, uma Impressora por 60€, Um mini-engenho, e uma Impressora 5D!!!

Uma Impressora 3D de Resina, com velocidade de Impressão de 3mm por minuto, dá um objecto com 18 Cm de altura, numa hora! 
E é claro, com uma qualidade de impressão inigualável pelas Impressoras de Filamento...


Gizmo GiziPro Super Speed 
The world’s first continuous print super speed, high quality top down DLP 3D printer: The GiziPro is now on Indiegogo. GiziPro is designed for producing high quality 3D models at an amazing speed up to 3mm/minute! Gizmo GiziPro has received an A rating from iMakr's test report. 
Utilizing a multiple built-in USB connections and an HDMI connection, the GiziMate can connect directly to your PC. One USB connection is used by Gizmetor to control the printer and the second USB connection can be used for anything the user might require, e.g. adding a web camera to the printer. The HDMI connection is used to display the layers when building 3D models.


Dica da Imaterialise, podem agora transformar uma data de objectos em Ficheiros 3D, com esta técnica simples.
E tudo isto, com Software grátis?
É bom! 


How To Make a 3D Model from Photos in 5 Easy Steps

Billy
Looking for turning a photo into a 3D model? You can easily create 3D printable objects and 3D models from images and photos nowadays. In this tutorial we will show you how you can turn ordinary 2D pictures of everyday objects into extraordinary 3D models. Turning 2D into 3D has never been easier as this project requires no coding experience and runs 100% on free software. If you think about 3D printing these 3D models, you don’t even have to buy a 3D printer and you can do it all without leaving your house.  Let’s get started!


Se estão apertados de Finanças, mas têem MESMO de ter uma Impressora, podem então construír esta Impressora 3D, por só 60€, o que já estará ao alcance, práticamente, de qualquer um...
E feito por um engenhoso Geek de 16 anos de idade, por isso, não me venham com desculpas, façam uma destas! 


Cherry- 60€ 3D-Printer

Vulcaman 
Hello, in this instruction, I will show you how to make a 3D-Printer for less than 60€ (maybe the cheapest in the world)
I'm 16 Years old and I made everything by myself.
This 3D-Printer, works with the cheapest motors on the market (28Byj-48), for the electronics I use the Ramps 1.4 . It also has an all metal hotend for around 5€.
Specs:
Buildsize : 10x10x10cm
Travel speed: 20mm/s
Printspeed: 10mm/s
Resolution: 0.2mm 


Do nosso amigo Andrea Biffi vem mais esta ideia, de  como podem  ter um mini-Engenho, para as vossas Dremmel, para furos como devem de ser furados, sem falhas nem brocas partidas:


Cheap precision drill stand

andrea biffi
When I begun to etch my custom pcb I felt the need to improve circuit drill tecnique. I drilled my first circuits by free-hand with my Dremel, but despite it's very fast, it's subject to errors, and it's also dangerous, because the drill bit is very narrow and weak.
I've searched a column drill as the "Proxxon Bench Drill Press TBM 115" but it's a little too expensive. I've found also a vertical stand for Dremel alt 50€, but it was a model with a single metal column as rail, similar to the most you can see with a "drill stand" search, and it had a low precision in horizontal movement of the bit. In fact you felt the head moving of about a millimeter, which is a lot when your bit is so narrow. So I decided to build it by myself.


E ainda fora do alcance do Público em geral, eis uma Impressora...
5D!
Mas bnão se assustem, que é uma Impressora de Filamento, com um Extrusor normal, mas que pode inclinar a placa de deposição, em 2 eixos, e daí 5D, ou mais exactamente, 5 graus de liberdade, no movimento.

O que isto traz de muito útil, é que esta máquiina imprime não só em camadas planas, mas em camadas CURVAS, o que para além dum sem-fim de usos possíveis, e do fim das "escadinhas", significa sobretudo, Objectos com um grau de resistência muito maior...
Por serem feitos seguindo as Linhas de Força exercida sobre esse Objecto, tal como os Edifícios, que seguem a arquitectura da maior força com o menor Material.


3D Printing is So Last Week...Say Hello to "5D Printing" at Mitsubishi Electric Research Labs!
Clare Scott  
 
We all know what 3D printing is – obviously. (If you don’t, here’s a handy overview. Welcome, newcomer.) We’ve also explored 4D printing, which involves printed objects that mutate and morph into different shapes when exposed to an outside stimulus such as light, water or temperature changes. So what’s involved in 5D printing? Printed objects that levitate? Printed objects that teleport? Time-traveling printed objects?!
Well…no. You can 3D print a TARDIS, but you still can’t make it travel. 5D printing is simply another name for five-axis additive manufacturing, and while it may not be as exciting as teleportation, it’s still pretty cool – and useful. The term “5D” as applied to five-axis printing is being used by Mitsubishi Electric Research Laboratories (MERL), the North American subsidiary of the multinational corporation’s research and development branch. They’ve been experimenting with a print bed that actually rocks back and forth on two axes, creating a fourth and fifth axis as a result.
What this means for the final printed part is that instead of being created as a series of flat layers, the layers are curved. William Yerazunis, Senior Principal Research Scientist at MERL, describes the advantages of this process as applied to a pressure cap. A cap printed using standard 3D technology will be quickly ripped apart along the adhesion lines when pressure is applied, he explains. But if that same part is printed with the 5D method, curving the lines where the maximum stress will be applied, the part will be three to five times stronger – and will use 25% less material.