Blog Posts

Mostrar mensagens com a etiqueta torno. Mostrar todas as mensagens

domingo, 20 de setembro de 2020

Aspirador DIY! E Junções 3D, um Gato Robot(!), ligar fios eléctricos de maneira fácil, e Esferas feitas no Torno!

Cá têem um Vídeo que vos ensina a fazer um aspirador, com uma Garrafa de Àgua e mais umas coisas:


SUPER VACUUM Cleaner using a PLASTIC BOTTLE - Aspiratore fai da te

Daniele Tartaglia


https://www.youtube.com/watch?v=QJ9R8w4AmLY


Uma ideia que vos pode poupar muito tempo e maçadas, este sistema de junções permite tanto usar-lo em placas, como fazê-lo parte das vossas engenhocas 3D!


#kidraulic - cardboard 90° fold holder

https://www.pinterest.pt/pin/822540319435788416/


Alguém tinha de o imaginar e fazer, e já está, este nosso amigo ensina como fazer um Gato-Robot em casa!


Robot Cat

By 陳亮

I am playing with the well known Strandbeest many years ago and really love the artificial life. And then I tried Trotbot, but sorry about not yet built Wadevag suggested Strider :P


Two years ago, I start saw many robot cats and dogs projects on the web. They works, walk well and can do some pose. The only shortcoming is it does not look like a cat or dog.


So I try to build my own robot cat. The main target are look like a cat, act like a cat.


https://www.instructables.com/id/Robot-Cat/


Easy way to assemble 2 wires

Androf


https://www.pinterest.pt/pin/586593920209663309/


E por hoje acabamos com este truque para fazerem um Assessório Esferas no Torno, e sem que o Assessório seja apanhado pelas garras do torno:


The Secret to Cutting a Ball On a Manual Lathe

Arnold's Design

It's true. They don't show you this sort of thing when you take machining courses. Here I show you how a ball turning fixture works. There are a lot of different types of ball making fixtures, but this one is unique because it allows you to offset your cutting tool so that the rest of the fixture doesn't get hit by spinning lathe jaws.

https://www.youtube.com/watch?v=mwuZwkn1MsQ&ab_channel=Arnold%27sDesign

quinta-feira, 8 de março de 2018

Máquinas-Ferramenta feitas em casa! Em Madeira, Aço, e até um Torno CNC! Mais um Robô vencedor, e Iron CAD

Podem fazer todo o Ferramental em vossas casa, com este canal do Youtube, que parte do princípio simples de que a estrutura das ditas Máquinas-Ferramentas pode ser feita em Contraplacado, em várias camdadas...
E muita Engenhosidade!
Boa iniciativa.
Eis, por exemplo, uma Lixadora de Fita:


Making a Homemade Belt Sander - El yapımı Şerit Zımpara Makinası
Gökmen ALTUNTAŞ

Building a homemade belt sander, powered by a drill. Simple, cheap and usefull. it's made of plywood. You can find all the measurements at the end of the video. Kontrplaktan yaptığım şerit zımpara makinası. Basit ucuz ve kullanışlı. Tüm ölçülerini videonun sonunda bulabilirsiniz.


Mas podem também fazer um Torno, com Tubo de Aço, e pouco mais, para trabalhar Plástico e Metais macios...


Homemade mini lathe
Homemade lathe machine

My homemade mini lathe for processing small parts of plastic and soft metals.

https://www.youtube.com/watch?time_continue=18&v=RK4gmRmuQJ8


...E ATÉ UM TORNO CNC!


CNC mini lathe - DIY design and build project from scratch! Part 1
Behrouz Parsee

 Decided my next project is to build an awesome CNC mini lathe, super compact and super accurate is the plan! This video shows my preliminary design and goes through all my thoughts on the engineering behind it.


Eis este Robot, um Vencedor, deste nosso amigo Lusófono, IgorF2, que venceu uma data de Prémios, por boa razão, é excelente.
E vocês podem fazê-lo em casa, também.


Joy Robot (Robô Da Alegria) - Open Source 3D Printed, Arduino Powered Robot!
IgorF2

First Prize in the Instructables Wheels Contest, Second Prize in the Instructables Arduino Contest, and Runner up in the Design for Kids Challenge. Thanks to everyone who voted on us!!!
Robots are getting everywhere. From industrial applications to underwater and space exploration. But my favorite ones are those used for fun and entertainement! In this project a DIY robot was designed to be used for entertainment in children's hospitals, bringing some fun to the kids. The project is focused in sharing knowledge and promoting technological innovation to assist NGOs that carry out charitable work in children's hospitals.
This instructable shows how to design a remotely operated humanoid robot, controlled over a Wi-Fi network, using an Arduino Uno connected to an ESP8266 Wi-Fi module. It uses some servomotors form head amd arms movements, some DC motors for moving small distances, and a face made of LED matrices. The robot can be controlled from an ordinary internet browser, using a HTML designed interface. An Android smartphone is used to broadcast video and audio from the robot to operator's control interface.

https://www.instructables.com/id/Joy-Robot-Rob%C3%B4-Da-Alegria-Open-Source-3D-Printed-A/


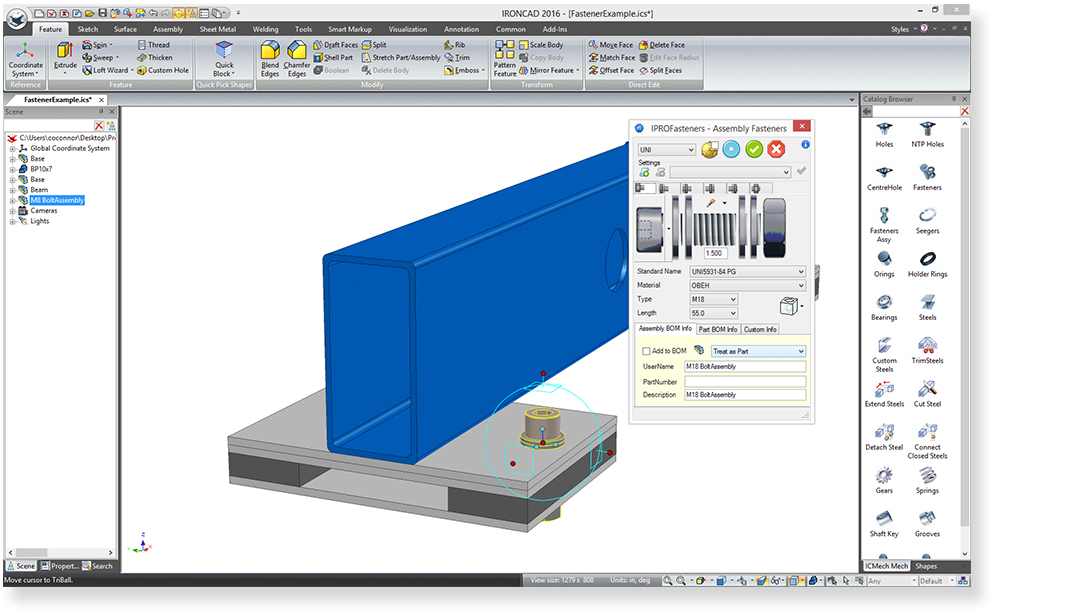
30 dias de teste, montar os vossos Conceitos, como se fosse Lego, com partes já existentes no Mercado!
IronCAD, em vários diferentes programas, permite-vos ser sérios, nos vossos Designs, com a inclusão de peças existentes no Mercado, optimizando, economizando, e convencendo:


IronCAD Mechanical
A Powerful CAD Parts Catalog for Fabricators

Library of Standard Components
IronCAD Mechanical is an IRONCAD catalog that includes pre-made designs for industry-standard fasteners, bearings, O-rings, piping, and flanges, saving fabricators hours of design time. Just drag and drop these readymade designs into assemblies, where they will attach themselves to other parts thanks to IRONCAD’s built-in intelligent behavior.


... E para rirem um pouco, eis o que um Engenhocas diz sobre a sua Impressora 3D, quando está cansado, frustrado, e farto de regulações, afinações e mais frustrações:


Adventures in 3D printing

EdgarInventor 

 The sufferings of just another geek trying to bleed a print from a cheapo printer.

 https://www.youtube.com/watch?v=iTlfX8ckugk


sexta-feira, 17 de novembro de 2017

Fritzing! E mais um Torno Gingery, Wi-Fi à medida, um Rocket Stove, e um Carregador Portátil

Montar circuitos electrónicos como se fosse um Jogo de Computador!

E ainda tem 3 esquemas de visualização, um, como se montassem um circuito numa Breadboard, outro com a tradicional visão esquemática, e outro inda, que permite levarem esse esquema para imprimir um Circuito numa Placa feita à medida para isso!
 
Querem mais?
Vem com vários circuitos já feitos, tanto a nível de iniciado, com o mais avançado...
Impecável.


Fritzing
Fritzing is an open-source hardware initiative that makes electronics accessible as a creative material for anyone. We offer a software tool, a community website and services in the spirit of Processing and Arduino, fostering a creative ecosystem that allows users to document their prototypes, share them with others, teach electronics in a classroom, and layout and manufacture professional pcbs.

http://fritzing.org/home/


Perdoem a insistência, mas um Torno quase de graça, e feito como um Hobby, é muito importante para um Engenhocas, tanto para obter um Torno...
Como para aprenderem como fazer uma Máquina, e qualquer outra, a partir daí!
Aprendam:


Build Your Own (metalworking) Lathe - Part I
corradini

You can make an entire machine shop worth of power machine tools, using basic hardware store/home center supplies and scrap metal. Melt aluminum in a metal-pail furnace, using sand, charcoal, and a clay flowerpot! Cast sophisticated metal tool parts using supplies from a gardening shop and modified kitty litter! End up with a full machine-shop lathe ("the only tool capable of making any OTHER machine-shop tool, including itself!") for just the cost of your time, some scrap steel and aluminum, and a motor!

https://www.instructables.com/id/Build-Your-Own-metalworking-Lathe---Part-I/


Mais numa coisa bastante útil para fazerem com as vossas Impressoras 3D!
Com isto, vão ter Wi-Fi por toda a casa, e o que é melhor, como vocês queiram, nos quartos que queiram:


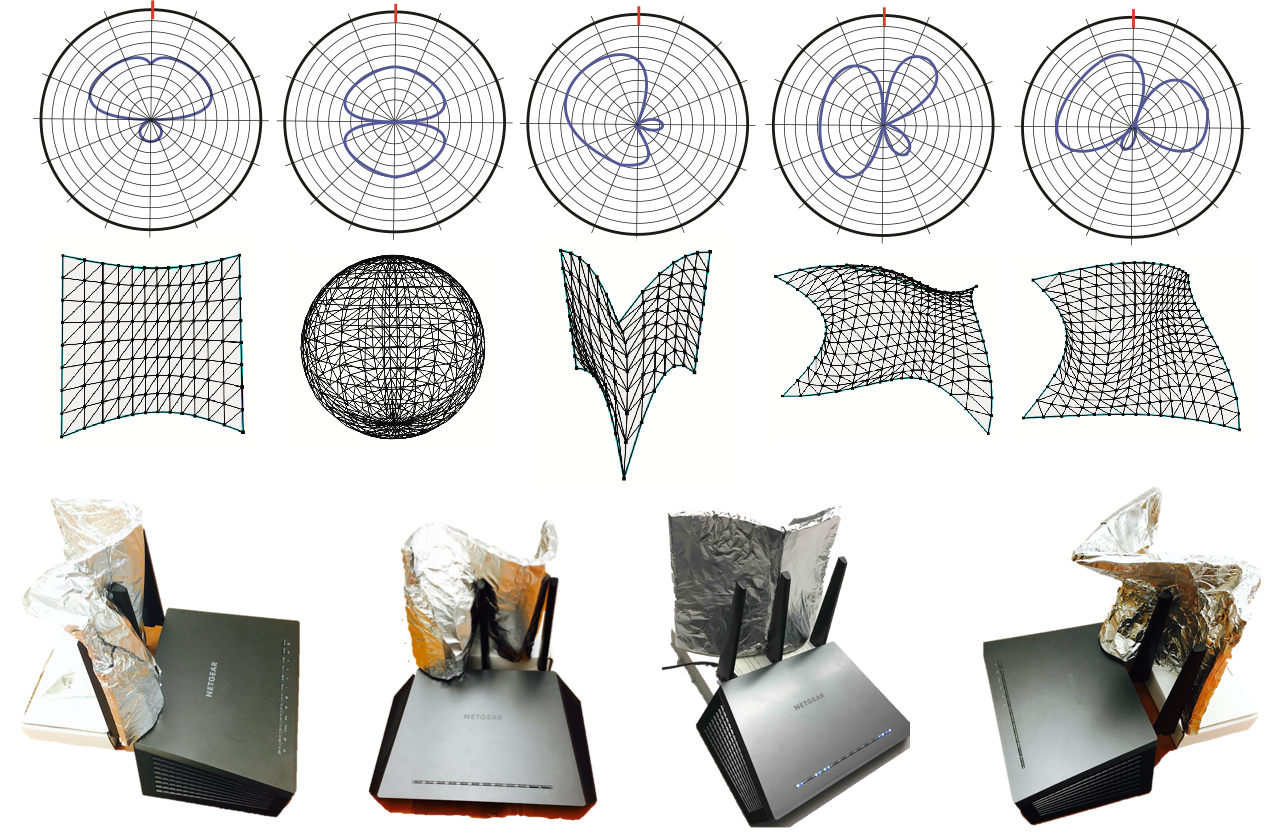
Customizing Indoor Wireless Coverage via 3D-Fabricated Reflectors
Abstract

Judicious control of indoor wireless coverage is crucial in built environments. It enhances signal reception, reduces harmful interference, and raises the barrier for malicious attackers. Existing methods are either costly, vulnerable to attacks, or hard to configure. We present a low-cost, secure, and easy-to-configure approach that uses an easily-accessible, 3D-fabricated reflector to customize wireless coverage. With input on coarse-grained environment setting and preferred coverage (e.g., areas with signals to be strengthened or weakened), the system computes an optimized reflector shape tailored to the given environment. The user simply 3D prints the reflector and places it around a Wi-Fi access point to realize the target coverage. We conduct experiments to examine the efficacy and limits of optimized reflectors in different indoor settings. Results show that optimized reflectors coexist with a variety of Wi-Fi APs and correctly weaken or enhance signals in target areas by up to 10 or 6 dB, resulting to throughput changes by up to -63.3% or 55.1%.

http://dartnets.cs.dartmouth.edu/wiprint


Dizem que este Inverno via ser o mais frio dos ùltimos 100 anos!
BRRRRR!
Por isso, é melhor terem este catrapázio no Quintal ou num canto na casa, porque um Rocket Stove;

-Funciona com galhos, cartão, e etc;
-Gasta muito mpouco combustível porque o aproveita até às cinzas;
- Como queima até o fumo, e o monóxido de carbono, é muito mais seguro, mesmo para dentor de casa!
Muito importante.
Atenção, a Introducção é mínima, mas as Instrucções, são muito completas:


Building a Rocket Stove for the Cabin
foodplotsurvival

FPS combines my passion for hunting and wildlife conservation with the overall need for self sufficiency.

https://www.instructables.com/id/The-16-Brick-Rocket-Stove-Quick-30-Second-Build-Ea/


Há Carregadores Portáteis que resultam mais baratos que construír o vosso próprio Carregador, mas se como eu, coleccionam Sucata...
É de graça!
LOL
Por isso, mãos à obra:


Build Your Own Inexpensive Powerbank with 3D Printing
Matthew Mensley

Instructables user Nematic! details how to make your own portable powerbank from laptop cells, 3D printing and a little electronics savvy.
We’ve all experienced that unique feeling of helplessness and anguish that only a dead cellphone battery can bring. Cut off from the internet and contact with others it becomes impossible to navigate, and what the heck are you supposed to do while sitting around waiting for the bus/train/plane. It sucks.
Fortunately there’s no shortage of inexpensive power banks knocking around to keep you topped up with juice on your travels. But for the thrifty with time to kill and a handful of old laptop batteries lying around (a common scenario, we know) there’s an alternative.
In a short-and-sweet post over on Instructables, user Nematic! shows us how with nothing more than a few tools (3D printer, soldering iron and glue gun), a cheap powerbank module and some 18650 cells, you can make your own smartphone powerbank lickety-split.

https://all3dp.com/3d-printed-powerbank-how-to/ 


sexta-feira, 2 de junho de 2017

Cimento 3D! E Cortar por Waterjet por tostões, Protótipos feitos à medida, Q.bo.One Um Robot para todos, e um Torno de Metal DIY(!)

Que tal, o vosso Laboratório, ou Oficina...
Impressos em 3D?
Foi o que foi feito em Dubai, pela Empresa Holandesa CyBe, isto é um Mundo fantástico:


Dubai’s New Drone Laboratory is 3D Printed from Concrete

Matthew Mensley 
And the award for the most “the future is now” headline goes to this story, and the news that concrete 3D printing company CyBe has completed its first project in Dubai.
The Dutch firm has been working on the city’s new R&Drone Laboratory, one of a number of progressively technology-focused projects commissioned by Dubai’s numerous authorities.
Located in the desert at the city’s Solar Park, it will be home to exciting research facility. Exciting indeed, since 3D printing will be one of the areas of focus, alongside the building’s titular drones.
The Dubai Electrical and Water Authority, architects Wanders Wagner, engineering consultants Witteveen + Bos and construction firm CONVRGNT all have a stake in the project. But it is CyBe that planned and physically constructed the structure.
To achieve this the company used its array of proprietary, concrete-based products. This includes software, material and the CyBe RC 3Dp mobile printer.


Abram os olhos, Engenhocas! 
Cortar por jacto-de-àgua, a 150 Dólares!
Podem ver no vídeo como é, corta Alumínio, uma maravilha à espera de ser transformada em Máquina de Corte CNC, nalgum Fablab...


Waterjet cutter built with a cheap pressure washer
Applied Science
Building an abrasive waterjet cutter with a $150 pressure washer.


Há quem tenha muito Tempo e pouco Dinheiro...
Mas há quem tenha Dinheiro que chegue, mas pouco Tempo!

Para esses, e para quem tem de apresentar um Protótipo já num  nível muito mais avançado, já para a pré-producção, eis esta empresa, que vos resolve o problema:


EPD is a high-tech, full service product development firm. 
We are devoted to providing uncompromised quality and service at a competitve cost. We have the skill and expertise to develop your product to its fullest potential. We believe that products are only complete when styling, function, ergonomics, economics, ecology and manufacturing are fully balanced.
From concept to manufacturing, we can make your product a reality. We use state-of-the-art computer aided design and engineering to develop your product, and the latest in material and process technologies to prototype and manufacture your product.
We've worked in many different industries that span from architectural components, automated equipment, automotive parts and products, bicycles and components, consumer appliances and electronics, furniture, luggage, marine products, medical products, snowboards and other sport-related products, toys and vending machines, just to name a few.


Eis um simpático Robot Open Source, o Q.bo One, e é mesmo para todos, Programadores, Educadores, Hobistas, ou mesmo os mais novos!

Porque pode ser programando com um Interface de programação intuitivo, o Scratch, ou para Engenhocas mais sabidos, em  C++, Java, PHP ou Python, vai ser uma ferramenta bacana:


The Perfect Platform for Kids, Educators and Developers
Qbo Robot 
Q.bo One is built to be easy. It is easy to adopt because it is relatively inexpensive, it is easy to understand because it is interfaced with very simple parts and it is easy to build applications on because its hardware and software are open source.
Programming language such as C++, Java, PHP or Python can be used to program Q.bo One. Notwithstanding, those with little or no programming language experience can always start with Scratch. Scratch is easy to learn, so much so that even kids can pick it up. Essentially, Scratch is supported by comprehensive and interesting tutorials together with references and discussion forums to get the learner up to speed. It is designed to be graphical so that users can just pick and drop various modules to write a program. It similar to building a jigsaw puzzle, only that this time, instead of putting an image together, the user writes a program. 


Quantas vezes já não vos falei do Torno Gingery!
Pois para vos inspirar a fazerem um, cá vai esta história de sucesso, para verem que sim, pode ser feito:


Re: Home made tools!
ndr1968 
Here’s my ultimate home made tool. My lathe! It swings 10.5” over the bed. Turns 24” between centers. Threads the full compliment of SAE threads. Has steady and follow rests as well as a Southbend inspired taper attachment. Yep, I cut all the change gears, made most of the tooling (except chucks) including a sector type dividing head with hole plates. This little lathe still turns with +/- .001” (or better) accuracy and I still use it on occasion. I completed it back in the late 90’s and as I recall it took me about two years of pretty much devoting every spare moment I had to it. 
I was inspired by the David Gingery book Metal Lathe. The book outlines detailed plans and instructions for building a small lathe from aluminum castings. I used no castings for mine but the shop lore and techniques in this little book were all I needed to understand the processes and basic machining skills needed to complete the project. Even if you have no intention of building such a thing the book is well worth looking at. Gingery is a genius of what I like to call “bootstrap engineering”. He takes scratch building to a whole new level. He has several other project books out including how to build a drill press, a shaper, a horizontal mill, sheet metal brake, dividing head, etc. 


quarta-feira, 17 de maio de 2017

Aulas de Design 3D, free Class! E publicar 3D paramétrico, uma Câmara de Infravermelhos de Bancada, um Torno feito por Impressão 3D(!), E UM MOTOR BRUSHLESS!

Aulas à borla, é bom!
Estes nossos amigões da Autodesk, oferecem-nos uma série de Aulas bacanas para aprenderem a desenhar 3D, no programa Fusion 360, como deve de ser.
Impecável.
Vão-se lá inscrever:


3D DESIGN CLASS
Autodesk Design Academy 
Learn 3D modeling in Fusion 360 in under an hour! Whether you are new to CAD or already using parametric CAD software, this short video-only class includes everything you need. We'll introduce you to valuable tools for learning and teaching Autodesk Fusion 360 essentials, and give you great tips and tricks from industry professionals. Through a scaffolded learning experience, you'll develop your 3D modeling skills by applying them to a real world design challenge inspired by the Louis Kalff "Krähenfuss" table lamp.
The class includes step-by-step video instruction, a printable PDF guide, and a quiz.
Let's get started! 


Desenho 3D paramétrico, é outra coisa.
Porquê?
Porque é infinitamente adaptável!
Só para dar o exemplo mais óbvio, um Desenho paramétrico dum par de sapatos pode ser configurado para todos os tamanhos, cada número de Calçado é uma derivação dum desenho-base.
Por isso, este novo serviço, Profissional, permite-vos publicar um Modelo, e esse pode ser configurado N vezes, para os vossos clientes, por todo o Mundo.


Welcome! 
ShapeDiver is a web service for publishing parametric 3D data. It is run by ShapeDiver GmbH, a limited liability company registered in Vienna, Austria. Alexander Schiftner, Mathias Höbinger and Mathieu Huard founded it in 2015.
Our motivation is to bring parametric modelling to the web, and to make it a smooth, convenient and exciting experience for both designers and viewers. We want to offer the flexibility of mass customization to every company, big or small, in a simple web browser. Read more about our mission.
Our responsibility is to do it in a way that respects every designer's needs and concerns, be it regarding intellectual property rights, data security, privacy or any other issue that concerns you when you think about the idea of uploading your precious work to the cloud.
Read more about how we protect your IP.
There is nothing like seeing your product through our technology for the first time. Request a demo and let us show you how parametric design can enable new possibilities for your company.

https://shapediver.com/business-3d-configurators


NewFLIR ETS320 Thermal Imaging Camera, Temperature Measurement Range: -4 → +482 °F 320 x 240pixel
FLIR ETS320 Test Bench Thermal Camera 
FLIR ETS320 is a professional, affordable solution designed for hands-free laboratory testing. Ideal for reducing test times and improving product design for electronic board and device evaluation. The ETS320 detects design flaws that materialise as heat. Which is an important indicator of how a system is functioning. The ETS320 helps engineers and test technicians collect accurate, reliable data in seconds and analyse it quickly.


Quando se é Engenhocas, é outra coisa...
Este bacano, como nas Aulas tinha de esperar à vez, para tornear os seus Objectos, vai mas é de fazer, ele mesmo, o seu próprio Torno!
Brutal! Bravo.


3D Printed Lathe
iccycold3000  
First off, I am a sophomore high school student who actively participates in FTC Robotics representing Shark Beta Team #10088 and FatherBoards Team #10087. The goal of our robotics team is to learn as much as possible before graduating and going off to college. One crucial skill everybody on our teams had the desire to learn was how to manually lathe parts our self instead of sending the files for somebody else to machine them for us. This was where the idea of building my own lathe came in. As our school did not want to purchase a full-size lathe or for that matter allow students to operate a full-size lathe; the only other option was to build a miniature one myself. The major challenge of this project was that because all of our funds go straight into our robotics program and purchasing parts, the lathe had to be constructed out of existing parts in our lab, or the parts needed to be made personally (this is where the idea of 3D printing the lathe itself came into play. Another major challenge of this project was that the lathe needed to be relatively precise and accurate so that the final parts could actually be used on our robots. Those were the main challences I was faced with and I believe I did a relatively good job at solving these. If you do decide to build this you will find how percise and accurite it is despite it being 3D printed. So lets get to building! 


MARAVILHA!!!
600 Watts! 
MUÁHÁHÁHÁHÁ!

Eis um Motor Brushless, que vocês podem construír em casa, se tiverem uma Impressora 3D à mão, ou puderem imprimir estas peças nalgum lado, nalguma FabLab...
Usa o Arrenjo Halbach, de que já falei algumas vezes, e é fácil de montar:


600 Watt, 3d-printed, Halbach Array, Brushless DC Electric Motor
TheGoofy 
This is a very powerful, 3d-printed brushless DC electric motor. It has 600 Watts, and performs with more than 80% efficiency. The main components like rotor and stator can be printed with a common FDM-printer. Magnets, copper wire, and ball-bearings are ordinary components. The magnets of the rotor are arranged as Halbach Array. The motor runs with a standard ESC widely used in different RC-applications (plane, drone, car). 



quarta-feira, 10 de maio de 2017

Impressão 3D ao Metro, Non-stop 3D! E impressão 3d Híbrida, Um Torno económico, e um Teclado Faça-você-mesmo

Imprimir em 3D, sem suportes, e ao Metro?
Sim, ao Metro!
Ponha-se a Impressão a 45 graus, e faça-se um dos eixos, uma correia sem-fim.
Parece fácil de imaginar... Mas ninguém o fez!
Até agora:


Blackbelt 3D: Printing Ideas That Are Larger Than Life
Tyler Koslow
On Friday, another 3D printer will join the lengthy list of Kickstarter campaigns involving additive manufacturing. While some projects fail and others become forgotten, the Blackbelt 3D printer might just end up “changing paradigms” of FDM 3D printing technology.
Marketed as an industrial production machine, this printer is capable of creating extremely lengthy parts without the need for supports. These prints are easily repeatable thanks to a specially designed conveyor belt system.
Blackbelt 3D: Printing Ideas That Are Larger Than Life
The most unique concept of the Blackbelt is the high-precision conveyor belt that replaces the typical Z-axis. While the X-Y actuation system remains the same in theory, it has a slant of 45-degree. This modifiable angle will allow the user to print support-free overhangs.
The build volume allows for prints of up to 340mm x 340mm in the x and y direction. For prints that measure out to 1300mm or longer, Blackbelt recommends utilizing their roller table to provide additional print support.
Once the print process is complete, the machine will be ready to start producing the next object almost right away. The conveyor belt allows prints to roll right off of the print bed and into a container, eliminating the hassle of removing objects. 


Embeber o que queiram numa Impressão 3D, é agora possível graças a este novo método, THREAD, e isto, sem sequer aumentar o tempo de Impressão!
Brutal!


THREAD: The Hybrid 3D Printing Process That Does It AllTyler Koslow 
According to AMRC development engineer Mack Cocking, the inventor of this technique, the process is a “potential game-changer.”
Although THREAD is still patent-pending, Cocking is sharing a few details about the hybrid system.
For starters, the process offers full automation. It’s able to embed stands of materials like copper, fibre optic, steel, and also nitinol into the printing process. Additionally, the technique allows seamless connectivity through X, Y and Z axis directions.
This means that single or multiple strands of material can be embedded without impacting the original build time of the component.
The THREAD system will be ideal for applications with an intensive focus on weight and size of components. It will also prove valuable for systems that require integrated data transfer and protected sealed connective tracks.
Thus far, the AMRC team is testing the process on machines used for 3D printing polymer. However, they claim that their technique will be functional with different additive manufacturing platforms. 
https://all3dp.com/uk-engineers-thread-hybrid-3d-printing/


Este Site, Fine Woodworking, está sempre cheio de coisas boas, tal como este Torno bacano, feito com a Sucata que qualquer Engenhocas acumula, e 2 ou 3 artigos comprados na Ebay!
E o melhor, é que a ideia serve para muitas outras Máquinas, que queiram fazer à vossa própria maneira, e mais nada....


Homemade Lathe on a Budget
Matt Berger  
Retired engineer builds a bowl-turning lathe from scrap parts and a headstock purchased on eBay
When George Archer decided to upgrade his Shopsmith lathe to something that could handle larger projects, he didn’t browse the tool catalogs. Instead, he built his own.
“It does great,” said Archer, a retired engineer from Savannah, Georgia, who cobbled together a heavy-duty bowl turning lathe from $100 of purchased and found parts. “So far, so good.”
What inspired Archer to build his own lathe rather than buying a commercial one? “Probably the $2,000 difference in cost,” he said. Another likely contributor is his engineering prowess. The hobby woodworker spent many years engineering parts for air-conditioning systems. 


Ora aqui está mais uma ideia impecável da Rs-Online, não têem de fazer uns "monos" de teclados, podem-nos fazer como deve de ser, Teclas mesmo a sério...
Assim:


Building a Custom Keyboard
Andrew Back 
Assembling a high quality custom keyboard with Cherry MX switches
What could be more joyful than a keyboard featuring keys with a satisfying travel and characteristic sound as they bottom-out, topped off with solid, colourful keycaps of your own choosing.
In this post we take a quick look at the custom and collectible keyboard scene, before moving on to the sourcing of parts and assembly of a custom “ortholinear” keyboard with Cherry MX switches.