Blog Posts

Mostrar mensagens com a etiqueta fresa cnc. Mostrar todas as mensagens

sábado, 19 de dezembro de 2020

Bola de Natal. E cópias sem fim (!), Estlcam, para toda a CNC, às curvas com a Fresa, Thangs com tudo, Moldes com pistolas de cola, e Ovos!


Podem imprimir esta simpática bola de Natal, com o Presépio, para pendurar na Àrvore de Natal, obra deste vosso amigo, juntamente com muitos outros:


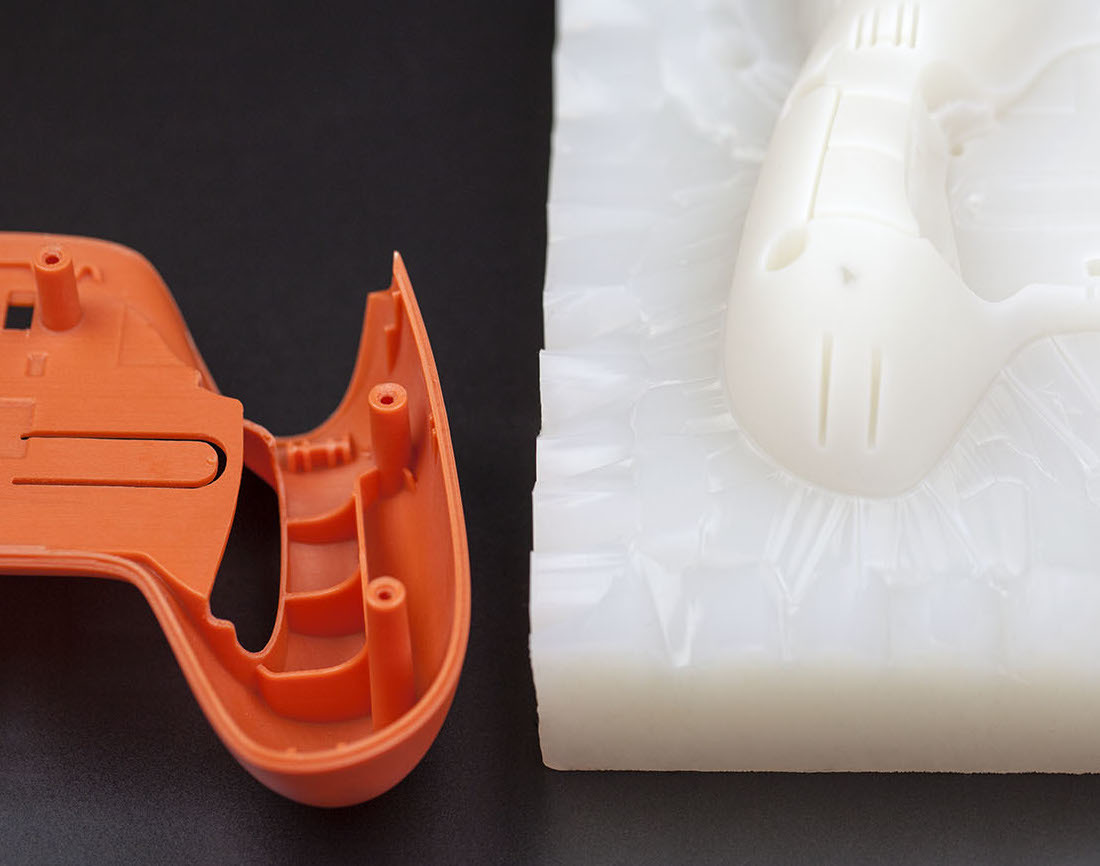
Para replicarem objectos sem fim, têem esta fenomenal técnica, e depois de criarem o DMolde, podem até usar a placa da Impressora 3G, só ela, não o extrusor, claro, para aquecer as placas de plástico para termo-formação:


NOW YOU CAN DELIVER DOZENS OF DUPLICATES WITH INEXPENSIVE 3D-PRINTED MOLDS FOR THERMOFORMING

Ira Somers

3D Printing Molds For Thermoforming Short Runs: Quick, Easy, and Inexpensive
 
Businesses call owners of Massivit 3D printing solutions to bring their most creative ideas to life. Now they can call when they need multiple copies of displays, signs, or props.

Massivit 3D makes short run molds for thermoforming possible—and even profitable.

Thermoforming is a cost-effective process when you need multiple copies of the same product. Take a mold, place a thermoplastic sheet on top, add heat and a vacuum and voilà! The sheet takes the form of the mold. Lather, rinse, repeat until enough copies are created.

https://massivit3d.com/blog/now-you-can-deliver-dozens-of-duplicates-with-inexpensive-3d-printed-molds-for-thermoforming/


Ponham as vossas criações, 2D ou 3D, neste programa, Esticam, e ele deita cá para fora o G-code nessessário para os 2 casos...
É bom!


CAM Lite
ALL3DP

Estlcam is a computer-aided manufacturing (CAM)  program that allows users to turn 2D drawings and 3D models into machine-readable G-code. This brilliant project was created by Christian Knüll, and its popularity has skyrocketed since it debuted in 2014. Perhaps the most attractive characteristics of Estlcam are its simplicity and low price.

If you’re a beginner in CNC milling, you’ve probably been frustrated by the complexity (and ungodly prices) of many CAM programs. Estlcam solves these frustrations by presenting users with an extremely intuitive user interface at a price of around $60.

The program sticks to the basics. Simply import a 3D file (such as an STL) or a 2D file (such as .dxf, .svg, .png, .gif, or .jpg), generate toolpaths, export the G-code – which is referred to as a “CNC program” in Estlcam – and start cutting. In this article, we’ll guide you through Estlcam’s basic features and provide tips on settings along the way.


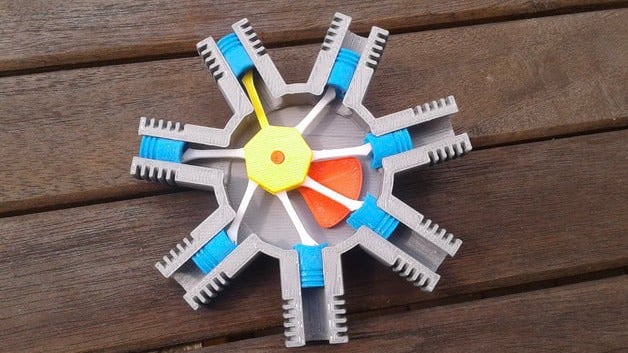
Sigam de perto este Bacano de poucas palavras, mas MUITAS idéias, o Alex Laiho, porque para além desta maravilhosa Ferramenta DIY, tem um sem-fim de outras criações magníficas!


Uploaded by 
Alex Laiho


Em Thangs, vocês encontram um sem-fim de Ficheiros 3D, podem carregar os vossos Objectos, colaborar com outros criadores, e encontrar o que querem, devido ao seu poderoso motor de busca, o que estão à espera? Vão lá!


Let's find Thangs. 
Thangs is the fastest growing 3d community with over 1,114,093 available models to search, store, and collaborate.

We created Thangs for one reason: our community members. With powerful search, collaboration tools, model sharing and unlimited storage, we are the fastest growing 3D community.


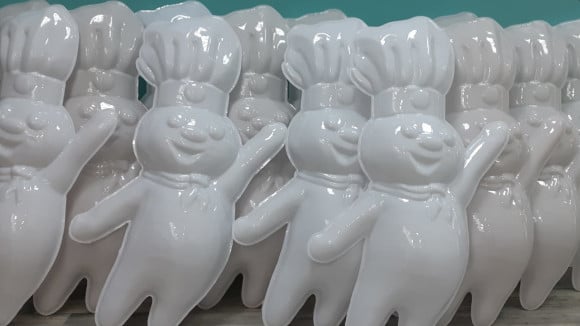
Ora aqui está uma bela ideia para a escola, para vender, ou para o que quizerem, fazer com a cola da pistola de cola toda a espécie de coisas, em série pequenas:


The Secret to a Perfect Hot Glue Mold
SophieBdoesart

I've been making molds for a while now, but I often found myself frustrated by the high costs of materials. I love the quality that silicone molds like Smooth-On give, but I wanted to find a cheaper alternative for small casts. Hot glue was the obvious choice for me because of its price, its flexibility, and its incredibly quick cure time. The one major problem with hot glue is that it sticks to almost everything. I needed to find a mold release that would fill any small pores in the positive, allow the object to de-mold easily, and be as inexpensive and readily available as hot glue to avoid defeating the purpose. I tried everything. Oil, petroleum jelly, even some Smooth-On mold release as a test but none of them worked well enough to not damage the molds when I removed the object. I didn't figure it out until we had a power outage and I was digging through my collection of scented candles. The liquidy, melted wax was perfect for coating objects. Hot glue doesn't stick to it but it goes on thin enough to not obscure the details of the mold. Here's how I finally got the perfect hot-glue mold:


Como aqui há de tudo para todos, cá vai este Projecto para a malta que nos alimenta, uma bela Incubadora para chocarem os ovos da vossa exploração Pecurária!
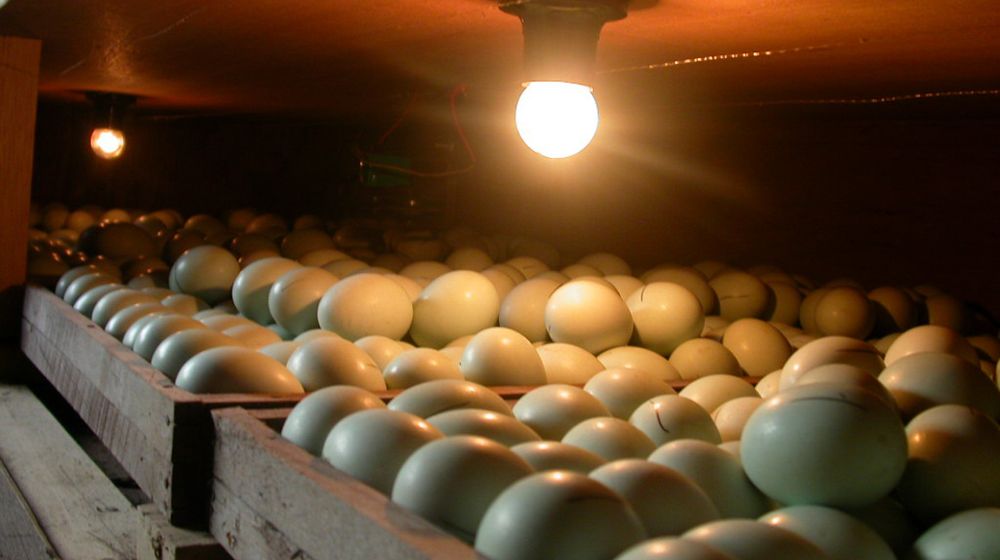


DIY Homemade Incubator
DIY Dave 
Branded and commercial incubators can be expensive for DIYers. A homemade incubator, on the other hand, can also hatch eggs successfully, and you don’t need to spend a lot of money on it.

https://diyprojects.com/homemade-incubator/


sábado, 11 de janeiro de 2020

Faça o seu Retro-Projector! Multi-Máquina, fornalha do micro-ondas(?), Dremel CNC, e um Scanner 3D


Isto faz-me um Engenhocas feliz...

Podem fazer isto com alguns plásticos de embealagem, e acho que vou fazer isso mesmo!

5 Minute Cheap and Easy Rear Projection Screen 
melarky

Looking for a new way to decorate for the holidays? This projection screen is great for Halloween, Christmas, New Years, 4th of July, just about any holiday you want to make cooler!
We use this projection screen in our front window at home as well as at my husbands work (makes for a great eye catcher right on main street).
With 5 minutes and a few dollars worth of supplies, this is a great project that really makes holidays and special occasions fun. We are entering this into the halloween contest, please vote for us! 
https://www.instructables.com/id/5-minute-cheap-and-easy-rear-projection-screen/


Multi-Máquinas!
Vão figurar SEMPRE, aqui.
Por isso, cá vai mais uma:

$150, 12″ Swing, Metal Lathe, Mill, and DrillPat Delany
The Lucien Yeomans “secret” that was almost lost.
Your developing world school needs almost-free machine tools?
Your developing world factory needs unavailable spare parts?
You need a complex part that is too expensive to have made?
Need to bootstrap a factory but only have a few bucks?
No problem!
You just need a metal lathe. Metalworking lathes are necessary to the production of almost everything but are very expensive. In 1915, special lathes made from concrete were developed to quickly and cheaply produce millions of cannon shells needed for World War I. Lucien Yeomans, the inventor, won the nation’s highest engineering award for it but sadly the technique was almost forgotten after the war. We re-discovered it as a way to quickly make inexpensive but accurate machine tools for use in developing countries and in trade schools and shops everywhere. We made modern construction practical by replacing the original poured, non shrinking metal with cement grout.
https://makezine.com/projects/the-multimachine-150-12-swing-metal-lathemilldrill/


Aqui, podem aprender com fazerem a vossa própria Fornalha...
De Micro-Ondas?


DIY Microwave Kiln | Fuse Glass in Your MicrowaveShakeTheFuture 
In this Instructable, we'll look into way to make a microwave kiln.
For those who don't know what is a microwave kiln, here is a quick introduction.
Microwave kiln is a kiln that you can put in your regular microwave oven.
It does not use a wire heating element or gas to heat up. Microwave kiln is covered with silicon carbide.
Silicon carbide absorbs microwaves and turns them into heat.
Microwave kilns are usually used to fuse glass.
You can turn broken glass into amazing jewelry. 
https://www.instructables.com/id/DIY-Microwave-Kiln-Fuse-Glass-in-Your-Microwave/


Eis outro Engenhocas feliz, pudera, já fez a sua Frasa CNC, dum Dremel!


DIY 3D Printed Dremel CNCNikus
When I got my first 3D printer I was extremely happy with all the new possibilities to create things but after some time I noticed the limitations of 3D printing. Plastic is easy to melt, sometimes it's not mechanically resistant enough and most importantly sometimes doesn't look good. Don't take me wrong here, I love 3D printing and I like plastic (except plastic waste) but there are things that look, work or feel way better when made out of nonplastic material. Imagine all your furniture made out of plastic. Sometimes I prefer wood, when I need strength, metal (mostly aluminum) is a way to go. That's where CNC milling machines are used. Usually, the cost of such machine is really high, most of the hobbyist, small makers can't afford such expensive equipment. That's why the idea of building my own CNC machine sparked in my head
https://www.instructables.com/id/DIY-3D-Printed-Dremel-CNC/


E para terminar, um Scannner que fazem com pouco, mas faz o serviço!


DIY Budget 3D Scanner V3

tobychui

Hey guys, it has been a while I didn't publish any instructables. This time, I brought to you guys one of the project I made back in Feb 2019. The version 3 Budget 3D Scanner!


quinta-feira, 8 de agosto de 2019

Uretano? E imprimir mais transparente, 607 ideias(!), façam uma Fresa CNC, e 10 passos para boa impressão.

Ora aqui está um meio caminho entre imprimirem, um por um, uma pequena série de objectos, e mandar fazer um Molde para injecção em séries grandes.
Isto vai libertar muito Criador e Engenhocas...


Urethane Casting – All You Need to KnowAlex Haysler  
Urethane casting (UC) is a manufacturing technique allowing for low- to mid-range volume production. It successfully bridges the gap between alternative low-cost methods, which lack scalability, and injection molding. This method allows creation of production-like parts with high-quality, detailed features and cosmetic similarity both quickly and inexpensively.
UC is primarily aimed towards situations where the cost of hard tooling in aluminum or steel, such as for injection-molded parts, would prevent manufacture. UC can also be referred to as room temperature vulcanization (RTV), where the silicone mold is cured in ambient conditions. 
https://all3dp.com/2/urethane-casting-all-you-need-to-know/


Há Materiais Transparentes, mas aqui aprendem com aperfeiçoar a Impressão para o melhor possível:


Transparent 3D Printing – 4 Ways to Create Transparent PartsBenjamin Goldschmidt  
As you might have guessed, transparent 3D printing is printing a plastic part that you can see through. Applications of this technique vary from see-through vases to optical elements like prisms, art, or decorative pieces. While this might seem simple to achieve (buy transparent filament and print it), the reality is a bit more complicated. Before going into methods, we’ll need to learn about some of the science behind what makes something transparent: What is transparency?
Transparency, or the ability to see through an object, is controlled by how light passes through it. If light passes through an object without being redirected in a significant way (i.e. through a pane of glass), the object will appear to be transparent. In glass, the material is homogenous and clear, meaning that you can easily see through it. To mimic this property in a 3D printed object, we must adhere to the following rules:
Plastic material must be transparent to start with
Printing must limit the introduction of air bubbles into the part
The part should have a smooth surface in the desired transparent area 
https://all3dp.com/2/transparent-3d-printing-create-transparent-parts/


...E se vos faltam as Ideias sobre o que imprimir, cá vão 607 nLinks para seguirem!


https://www.pinterest.pt/fgunawanc3po/3d-printer-printing/


Podem seguir estes planos Open Source, para criarem a vossa Fresa CNC, e sigam o Site, com atenção, que tem muito mais:


The LowRider2 CNC
V1ENGINEER
The LowRider2 CNC is my revised version of a CNC router that can handle full sheet material! Of course you can go smaller. If the MPCNC is not big enough for you this picks up where that left off.
Thingiverse Printed parts files – Links 25.4mm, 25mm version. Hardware list – Parts.
This CNC router can handle any length (within reason), the Y direction is only bound by your table length.
Width (X direction on rails) should always be the shorter axis and is recommended to keep the work area no larger than 4′ on this axis.
The Z direction (height) is best kept to a 3-4″ maximum for wood, with that being said, you can make the usable z length as much as you want you will be working from the bottom up, so go to town. 


Eis como tratarem de terem Impressores perfeitas, com 10 ajustes avançados, que vos ensinam na Pinshape:


10 Advanced 3D Slicer Settings That Will Save Your Prints!

Accurate 3d slicer settings are one of the most important factors to achieve a successful 3d print. Even the most experienced makers often go through trial and error to find the 3d slicer settings that give them a beautiful print. In our last article Slicer Settings for Beginners – 8 Things you Need to Know, we went over the basic settings and how each one affects your print. Now we’re going to go over some of the more advanced settings that give you more detailed control over how your print comes out so you can take your 3d printing to the next level. An overwhelming number of you voted for Simplify3D as Top 3D Slicing Software in our 2015 Pinshape Awards which is one of the reasons we chose to use them as our example software for this post.  There are a lot of settings in this slicer program that give you a ton of control and provide faster, better quality prints. In one review, Simplify3D sliced a file in 55 seconds that took over 40 minutes to slice in another program!  


terça-feira, 11 de junho de 2019

Aerogel feito em casa! E um 4º Eixo CNC, um Modelo de Motor Radial, uma Bio-Impressora(!), gravem a Laser com a vossa Impressora 3D, e o vosso Filamento feito em casa!

Ficam a saber que há uma Org que vos ensina a fazerem...
AEROGEL!
Impecável!
Tudo, desde a aparelhagem, até aos diversos tipos desse sólido incrível que é o Aerogel, o que não é nem rápido nem barato, mas para Universidades, e diversos Grupos de Nardos, deve dar...


How-To: Make Your Own AerogelSean Michael Ragan 
The folks at Aerogel.org are serious about it: The “Make” section of their exhaustive “open source aerogel” site will teach you how to make high-quality monolithic aerogel the way the pros do it, from building your our own supercritical drying apparatus (“manuclave” is their neologism), to mixing up the wet ingredients, to actually performing the supercritical drying operation. It still won’t be easy or cheap, but all the information you need is right there, well organized and clearly explained. 
https://makezine.com/2012/02/01/how-to-build-a-supercritical-dryer-and-make-your-own-aerogel/


A vossa Fresa CNC pode melhorar muito, com este 4º Eixo, que a transforma quase num Torno CNC de origem...
É bom!


CNC Router Rotary Axis
mkmra2
My router was a 3-axis machine. Adding a 4th rotary axis allows considerably more flexibility as the part to be machined can be rotated to expose different faces for cutting. I'd previously done some 4-axis router work at Stamps School of Art & Design - here's that post. I really wanted to add this capability to my router.
After exploring a few options - most of which were very expensive - I chose to go with an inexpensive kit from China. It was only $358 including shipping. I'd have to figure out how to get it hooked in to the electronics then build my own mount.


Eis algo de nada banal, para fazerem com as vossas Impressoras 3D...
Um Modelo de Motor Radial de 7 Cilindros!
E sem complicações de montagem, por isso, de que estão à espera?


[Project] 7-axis Hand-Cranked Radial Engine ModelMika Yeap 

Hand-cranked and fully functional, this is a model of a seven-cylinder radial engine by plusalphaDesigns. It’s a “reciprocating type internal combustion engine configuration in which the cylinders ‘radiate’ outward from a central crankcase like the spokes of a wheel,” according to Wikipedia.
It’s a relatively painless model to assemble and print, requiring just a handful of plastic parts – you don’t even need any fasteners. So let’s jump right in!

https://all3dp.com/1/project-7-axis-hand-cranked-radial-engine-model/


Isto existe MESMO, uma Bio-Impressora para Laboratórios, e podem fazer uma destas por uma fracção do preço das do Mercado!


Low Cost Bioprinter
mechbioprinter

The goal of this project is to develop a low-cost bioprinter to make bioprinting more accessible to research institutions. Currently, low-end bioprinters cost approximately $10,000 while high-end bioprinters cost approximately $170,000. In contrast, our printer can be built for approximately $375.


Só coisas boas!
Não é que podem transformar a vossa Impressora 3D numa Gravadora Laser?
E não é muito difícl, nem caro!


Convert a 3D PRINTER to LASER ENGRAVER | Under 40$Jakes

- To start this project we are gonna need a laser that is strong enough to burn into most of the household materials. I found that 500 mw laser is just right for this project due to its low price and capability of engraving in almost every material with exception of metals and glass.
-I bought my laser on Aliexpress for a small price. Here is the link: https://goo.gl/obFmFD
-With laser you will also get a laser driver circuit and a safety glasses which are necessarry when operating with lasers.

https://www.instructables.com/id/Convert-a-3D-PRINTER-to-LASER-ENGRAVER-Under-40/


...E como não quero que vos falte nada, cá vai como fazerem o vosso próprio Filamento para a Impressão 3D!
Poupa-se dinheiro, assim...


Build Your Own 3d Printer Filament Factory (Filament Extruder)ianmcmill

UPDATE: Now with wiring diagram !
Long read:
3D printers are cool and they finally start to drop in price. Kickstarter campaigns like the one from QB-UP or M3D are popping up and they are finally "affordable". And with affordable I mean affordable like 200 $ and not "affordable" like 2.199$ affordable. However, once you are a proud owner of a 3D printer you will soon realize that your wallet is far from being let alone. No ! You need plastic filament of course to print those super awesome coat hooks and wheel chocks. Since the price for these filaments tend to top the actual material costs, printing before mentioned life savers is kind of expensive and could become a problem to the development of the ever growing 3D printer community
BUT FEAR NO MORE !! Some clever gents came along - Hugh Lyman with his Lyman Extruder may be mentioned here or the guys over at Filastruder.com - and saved the day ! YAY. And there was much rejoicing ! They have built plastic extruders everyone can build or buy at a decent price. However if you are a fellow Instructable.com user the first thing that should come to your mind is "I can build this by myself...and cheaper...". Building at lower costs is the nature of DIY after all.

https://www.instructables.com/id/Build-your-own-3d-printing-filament-factory-Filame/