Blog Posts

Mostrar mensagens com a etiqueta led. Mostrar todas as mensagens

quarta-feira, 20 de setembro de 2017

Façam a vossa Impressora 3D! E magia LED, Acabamento 3D, Peltier para Câmaras, e Craftware

Se têm acesso a uma Impressora 3D, dalguma Fablab, ou de alguém que conheçam, podem, em troca dumas Bobinas de Filamento extra, e mais uns Trocados à parte, ter esta bestial Base CNC, que pode ser uma Impressora 3D, uma Fresa CNC, uma Cortadora Laser...~
Ou as três, com 3 cabeças de encaixar!

É bom!


Cheap Scalable Arduino CNC (Plotter, Mill, 3D Printer...)

mendelecha1 
In this Instructable I'll show you how to make a cheap scalable CNC machine controlled by Arduino. My printer has a usable volume of 1500x1000x200mm. It will provide a computer controlled plate where you can add any kind of tool for your application: laser, mill, drilling machine, 3D printer head, pencil…
THIS IS MY FIRST INSTRUCTABLE, PLEASE VOTE IT IN THE First Time Author Contest!!!
In order to maximize customization capabilities and reduce costs:
Most parts are 3D printed
Open source hardware / software
Tube profiles work as Rails
If you are looking for a CNC but don’t want a single purpose thousand-dollar machine, this is your project!!
Be sure to watch the video above, and if you like it please consider subscribing to my channel which has been recently created and will be updated with new amazing projects.
Before starting you should know the usable length, width and height you want for your machine. The less heigth (Z) the better.
This project is based on Allted's design CC BY-NC 3.0 


Algo fácil de fazer, mas espectacular, é este Globo LED que podem fazer, e ter a satisfação de criar, sem dar cabo da cabeça...
Claro, isto vai-vos convencer a mererem-se em mais Projectos, mas há Vícios bem piores! LOL


Make Your Own POV LED Globe

GreatScottLab 
In this project I will show you how I combined a couple steel pieces with an Arduino, an APA102 LED Strip and a Hall effect sensor in order to create a POV (persistence of vision) RGB LED Globe. WIth it you can create all kinds of spherical pictures or even letters which is a definite eyecatcher. Let's get started! 


Uma Impressão 3D para uma Prova-de-Conceito, não precisa de ter um acabamento especial, mas há alturas em que o Aspecto vende uma ideia.
Para isso, ou seja lá para o que for, Montras, festas, Modelos para Arquitectura, etc. vejam bem aqui, como obter um Visual de fazer chorar as Pedras da Calçada...
Belas Dicas do Site: Let's Print 3D


Guide: How to Finish 3D Prints

brett 
While I have 3D printed hundreds of designs over the years, not once have I taken the steps to finish a single print. There are plenty of videos and articles covering the process but they are often a general overview and leave out small but important bits of information. For someone inexperienced like myself who prefers to follow explicit instructions, the artistic process can be a rather daunting task. Unfortunately I purchased my 3D Printers for costume and prop design and can’t leave them unfinished forever, where this guide will cover my successful, albeit awkward adventure into the task of post processing 3D prints. 


Não sei se não se poderá usar isto para cabeças de extrusão das Impressoras, ou mesmo para os Computadores sobrecarregados dos Engenhocas, mas já para estas Câmaras espectaculares, é uma Maravilha...


Peltier Cooling for ZWO Astro Camera

1CM69 
After stumbling on these two YouTube vids showing how to add cooling to an uncooled ZWO Optics Astro Cam
DIY Guide Making a Peltier cooling fan mod for ZWO ASI120MC S
Peltier Cooler for ZWO Cameras - Based on Martin Pyott's Vid
I thought I'd give it a go myself.
My completed mod is shown in the image above. 


A Impressão 3D depende em tudo duma boa traducção dos nossos belos sonhos em 3D, em GCode que produza algo de jeito.
Sem isto, é só Filamento estragado, acreditem que sei do que estou a falar...
Por isso, estes Programas Grátis, que encontram na Net, são tão importantes!


CraftWare
Overview 
CraftWare is a FREE, fast, easy-to-use slicer software that converts your digital 3D object into a .gcode toolpath format understood by most 3D printers.
CraftWare primarily works as a slicer for solid 3D digital objects, but it is also an excellent tool for many other tasks. You can interactively manage your prints, thus reducing build time and finding the optimal build supports. CraftWare also utilizes the most impressive gcode visualizer on the market; this allows you to see each print layer-by-layer, from any angle, easily allowing you to detect any places that you may want to modify before printing. It is basically like seeing a finished print in front of you before you press the start button.
CraftWare utilizes dual channel communication for real time interaction between the software and the printer -just another great tweaking option. 


quinta-feira, 16 de fevereiro de 2017

Um Forno de temperar metal! E fotos da passarada, uma Serra de Fita portátil, o vosso póprio Aduino Nano, e uma Mega-Lanterna LED

Se quizerem temperar Metal duma forma científicamente controlada, podem agora fazê-lo, a preceito, com um baratíssimo forno de Toradas, e uns truques!
É bom!
Muito importante para obterem peças em Aço com a dureza e flexibilidade que quizerem, molas ferramentas de corte, etc. 


PID Temperature Controlled Oven

kai.h  
With this instructable, we will take a cheap toaster oven and turn it into an accurate, temperature controlled tempering oven that will be able to achieve a stable and accurate temperature controlled by a microprocessor.
We will combine some common and off-the-shelf components to easily and safely achieve this goal.
Why do we want to do this? After heat treating steel, it's in a very hard and brittle state. So we can use it with less risk of it snapping, we want to temper it. Tempering will slightly soften steel, but more importantly will restore flexibility to it. Most steel manufacturers specify particular temperatures to temper steel at so you can achieve a given hardness rating.


Para fotos da passarada do vosso Quintal, enquanto não lá estão, que é quando eles estão à-vontade, contem com esta Engenhoca, que detecta os vossos amigos de asas, e os fotografa, enquanto vão às compras:


Simple PIR DSLR Camera Trap

stinkyabb

The biggest problem I have capturing images of wildlife is not getting close enough to the subject. I never have enough time to sit and wait for them to come to me or they are easily spooked, and fly away at the first sign of movement. Using an simple, widely-available PIR motion sensor, I can leave my DSLR in the yard to capture images while I run errands, cut the grass, or even leave it out overnight.


Uma Serra de Fita que podem levar às Exposições, Trabalho de Campo, Campos de Aero-modelismo, e o mais que queiram, já existe, mas o que fazem com esta adaptação, é terem uma base fixa que vos permite tabalhar duma forma precisa, como nos modelos maiores:


Portable Bandsaw Metal Stand

seamster 
I recently got a portable band saw for cutting metal.
In order to get the full potential out of it, I built a metal stand so I can use it like a traditional vertical bandsaw.
My stand is essentially a metal version of this wooden one made by Honus, coincidentally made to use with the same model of saw (DeWalt DWM120 Portable Band Saw).
If you're looking to make a metal stand for your portable bandsaw, hopefully this will help you out. It's a great project to practice some welding as well as a bit of precision metalwork. Thanks for checking this out. 
http://www.instructables.com/id/Portable-Bandsaw-Metal-Stand/


O Arduino Nano é um Chip bacano, e podem agora fazer um em vossas casas!
Por isso, se têem amor ao Hobby da Soldadura, mãos à obra:


Make your own Arduino Nano (DIY - Arduino Nano)

Pratik Makwana  
In this instructable, I will show you how to make your very own Arduino Nano. I'm using laminator for the toner transfer method.
What things you will need:
Copper - clad board (Dual Layer)
Ferric Chloride (FeCl3)
Acetone (Nail polish remover)
Glossy Paper
LASER Printer
Marker Pen
Scissors
Plastic container
Sand paper
Safety gloves
Latex gloves
Saw - For copper board cutting
Laminator or iron
Let's Do it...


Esta Lanterna, é um Farol!
Podem ter assim uma Fonte de Luz LED que mete respeito, para as vossas Experiências, e tudo o que envolva uma actividade nocturna sem outas condições.
Ou uma Garagem ou Cave onde têem de trabalhar, mas sem Luz de Jeito!


Mega Torch - the ultimate guide
sjowett 
Mega Torch Build!
Welcome! This instructable has been 'written' mainly as a set of detailed videos (10 in total including the 'fake' advert above). As such, you will find the text is sparse but, this is more than made up for during the in depth descriptions in the vlogs.
I hope you enjoy this build and hope you can find the time to subscribe to my YouTube channel.
In this series, each video is between 5 and 15 minutes long and so its time to get a nice cuppa, sit down and lets get started!
Happy making!


quarta-feira, 6 de julho de 2016

Printtable, Impressora 3D a partir de peças da IKEA! e Luzes para a Garagem, Um Purificador do Ar Open Source, uma Roda de Genevra, e um Grelhador a palitos

Isto é que é uma ideia bacana!
Ptinttalbe, de Print + Table, é uma Impressora 3D feita com Mobília IKEA, grande, impecável, e fácil de montar... Para além de ser de um Design limpo e funcional, sem ceder n aspecto estético, mesmo digno de nota.
Um portento. 


PRINTTABLE the Affordable, Attractive IKEA Lack Table Hack to create a 3D Printer

masondrust 
Being interested in 3D printers since 2011 after purchasing a
BFB 3D Touch (Now 3D Systems with the latest model being the Cube Pro costing over £2000) I wanted to build a stable Large build platform 3D Printer for a fraction of the price.
Many Enthusiast's entries into the 3D printer market comes from the purchase of the Prusa i3 kit and in keeping with the good work of the Joseph Prusa design I felt it would be great if the design could be simple.
One of the many drawbacks I noticed was the overall finished look of the DIY kits; i set upon the task of creating a product that not only was affordable and easy to build but one which had style and form a look in keeping with the futuristic possibilities 3D printing brings. 
http://www.instructables.com/id/PRINTTABLE-the-Affordable-Attractive-IKEA-Lack-Tab/


Um sem-fim de Engenhocas tem de fazer do Sótão, Cave, ou Garagem, a sua Oficina...
E trabalhar com Máquinas às escuras é, digamos, ALGO perigoso!
Por isso, é bem-vindo este Instructable, que vos permite ter uma Linha de LEDs que vai iluminar a Sala, e por pouco dinheiro:


Inexpensive garage lights from LED strips
happydupa

Hello all you happy people. Welcome to my first instructable.
This project came about as I recently rebuilt my garage and found myself in need of complete lighting throughout.
I had two main objectives: I wanted bright/even coverage and I wanted to do it as inexpensively as possible.
For a number of reasons I wanted to use all LED lighting for my project but the commercial products were cost prohibitive. At the time of this writing, 4 foot shop lights are going for $40 and higher. I did some research and before long came across inexpensive lighting strips from China. The strips are sold in 5m lengths (16.5 ft) and can be found on ebay for $5-7 each. But how to use them?
After a lot of thought, I came up with the idea of putting them directly onto my trusses. This would give me even lighting throughout and a clean modern look.
I found that one LED strip wasn't bright enough, so I added a second for more light. This is probably enough for general lighting but I wanted MORE POWER and added a third. Why not at this price, right? To give you an idea of the coverage, my garage is 24'x40'. I'm putting lights on 5 trusses and they are 8'6" off the ground.


Para um melhor Qualidade de Vida, eis uma oferta de peso...
O vosso próprio Purificador de Ar, que fazem em casa, porque é Open Source!
Obrigado, Ian van Mourik.


OPEN SOURCE AIR PURIFIER
ianvanmourik 
Hi y’all,
I'm Ian van Mourik a Product Designer from the Netherlands. This instructable is a brain child that I just had to share with the world. Bad air quality causes various health problems and purification solutions are often complex and expensive. The solution is an open source no nonsense air purifier: the OPEN AIR!
This instructable is based on my first experimental prototype of the OPEN AIR.
It’s meant to be a platform to build upon and improve. My personal goal is to test and improve the design and effectiveness. Collectively we can provide new and better solutions. The modular filter design makes it possible to change and test different kind of filters.
This Design is based on a carbon type filter in collaboration with two pressure optimized 120mm 12v PC fans. It´s controlled by an Arduino with a gas sensor and a LED panel for subtle visual feedback.
If you decide to build your own OPEN SOURCE AIR PURIFIER, be ready to roll up your sleeves, because this won't be an easy one. It will include laser cutting, 3D printing, prototyping, soldering, programming and a lot of other bits and bobs. It will be an advanced instructable. But don't let it scare you, because the reward is big, very big! Like thousands cubic meters of fresh pure clean air big.
Good luck! 


Para fazerem algo mais que pisa-papéis e bustos do Yoda, com a vossa Impressora 3D, eis algo de prático e Didáctico, a Roda de Genebra, que transforma uma rotação contínua em  6 passos pausados, algo que pode servir para muito Protótipo.


3D Printed Geneva Drive
robives 
This project was originally posted on notes.robives.com
The Geneva Drive is an elegant mechanism used to convert rotary motion into intermittent motion. There is a YouTube video above as well as on my Instagram feed.
I’ve designed the parts for this project in Autodesk Fusion 360. If you have access to a 3D you can follow these construction instructions to make your own 3D printed Geneva Drive.
Download the STL files from the geneva.zip link above. They should be suitable for most 3D printers. I printed the parts out in a variety of colours of PLA from rigid.ink using an Ultimaker 2. 


Para Churrascadas e Sardinhadas, eis algo que vos poupa uma boa maquia em Carvão, porque o Rocket Stove, do qual esta Grelhadora é uma variante, aproveita todo o Combustível, de tal maneira que nem sai Fumo!
O que também é bom, principalmente para quem sofre de Alergias, ou não quer problemas com a Vizinhança: 


Rocket Grill!
bennelson
 
Want a D.I.Y. way to cook food WITHOUT using fossil fuel L.P. or having to buy charcoal? I know I did. That's why I built a "Rocket Grill"!
This is just one variation of a "rocket stove" - a simple appropriate technology for cleanly burning bio-fuels.
The rocket grill is fired by twigs, wood scraps, wood chips, or nearly anything else you can put in it. It naturally drafts air to maximize combustion. Once the the grill is really going, NO smoke comes out the top, only heat, and the grill really does sound like a rocket!
The grill is designed to not only grill, but also boil, bake, braise, and roast!
Because of the simple design and robust construction, it is nearly maintenance free. Unlike an LP grill, the burner will never burn and rust away to nothingness. (And cost good time and money to replace.) There is no piezo-electric starter or other "modern" technology in the grill, which would be prone to failure. 


terça-feira, 14 de julho de 2015

Novo Material para Imprimir! E Fitas LED coloridas, uma Fornalha para Metal, PVC parecendo Madeira, e Sepcific Love

Para quem tem uma Impressora Cube, pode agora imprimir toda a espécie de formas com este novo Material, lavável, que funciona como Suporte:


Infinity™ Rinse-Away Support
Printing with complexity has never been easier. Break beyond the boundaries set by unachievable overhangs and the laws of gravity, and enter the possibilities of intricate patterns, degrees of freedom and suspension in space.


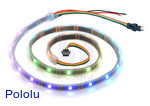
A Pololu oferece-vos agora estas Fitas LED coloridas, que podem mudar de cor, individualmente, para uma infinidade de usos possíveis, eis só um de muitos exemplos:


Addressable RGB 30-LED Strip, 5V, 1m (APA102C)
This LED strip has a length of 1 m and contains 30 RGB LEDs that can be individually addressed using an easy-to-control SPI interface, allowing you full control over the color of each RGB LED. The flexible, waterproof strip runs on 5 V and can be chained with additional APA102C strips to form longer runs or cut apart between each LED for shorter sections.


FORNALHAS DE METAL!
Aparecem cá muito, e é sobretudo porque, com uma destas, fazem-se em horas, projectos que levam dias a fazer, maquinando Metal... 

E porque derreter Metal é BACANO. 

Esta tem a vantagem de re-aproveitar uma Botija de Cerveja, e duma forma que é muito engenhosa , de tal maneiram que parece se feita de propósito para isto!


Beer Keg Metal Melting Furnace

Random_Canadian


So there is a long list of instructions on building a metal melting furnace. But I have decided to show you my process anyway.

I have turned an old beer keg into a portable metal melting furnace, This will cover both the furnace and the propane torch burner. I being in Canada relay heavily on Canadian Tire store and online product availability.

The metals were acquired locally at a metal recycler and the chems were from a not so local chem supplier, OH and the melting material from a previous employer 


Para o caso de precisadem de decorar os vossos Projectos PVC, de forma a parecerem Madeira, criarem Modelos à escala, reconstituições Históricas, Montras malucas, e etc, cá vai, como fazerem o PVC pareder Madeira!


Make PVC Look Like Wood
zaphodd42 

I came up with this simple trick to give PVC pipe a realistic wood texture when I built a few plastic didgeridoos a couple of years ago. It would also work for theater, home decor or backyard tiki-bars! Send an invite if you build that last one. 


E para o fim, este simpático Projecto de coisas simples para a Família, e mesmo toda a Malta, fazer em casa, o Specific Love:


Welcome to SpecificLove
We are a community of How-to, and Homemade creativity. We hope you can get inspired to make new projects.


quarta-feira, 8 de outubro de 2014

Cortador Laser Portátil! Mais um Prémio Nobel para Inventores, Jon Cantin exibe, e novidades da Pololu

Sim, podem levar este Cortador/Gravador Laser convosco, e ele até corta e grava na Vertical!
E com um sistema de eliminação de fumos, não há tubos de Exaustão por todo o lado...


Origami portable laser cutter slices and etches whatever, wherever 
Eric Mack

When I covered MakerCon last month in New York for Gizmag, literally one of the first things I did was text a photo of the 45-lb (20 kg), tote-able laser cutter to my friend who owns a shop back home in New Mexico. As it turns out, that's exactly the type of consumer Pittsburgh startup Red Ant hopes to target with its Origami.


Eis algo de que não estava à espera, mas deram um Prémio Nobel a Inventores, sim, leram bem, os Inventores do LED azul.
Eu, que ainda sou do tempo em que os LEDs eram só amarelos ou vermelhos, ou verdes, e não serviam para iluminar nada, sei bem o avanço que veio, desde aí...


2014 Nobel Prize in Physics awarded to inventors of blue LEDs

David Szondy


Thomas Edison may have invented the lightbulb, but he never received the Nobel Prize for it. Isamu Akasaki and Hiroshi Amano at the University of Nagoya, and Shuji Nakamura working at Nichia Chemicals in Tokushima, Japan have proven more successful, being awarded the 2014 Nobel Prize in Physics for their invention of the blue LED, which is the key to modern energy-efficient lighting.

http://www.gizmag.com/blue-led-2014-nobel-prize-physics/34151/


O nosso amigo Jon Cantin exibiu as suas obras, e as dos seus associados do Site CNCKingdom, na Makerf Faire de Nova York, e cá vai o relato, com os meus parabéns, vão lá ver, que vos conta a história toda, e está cheio de Vídeos bacanos:


Exhibiting @ World Maker Faire New York 2014 (USA)
CNCKingdom.com News


After attending the Detroit Maker Faire a few months back, I decided I had to see what it was like on the other side of the booth and decided to become an exhibitor at the World Maker Faire New York 2014. It was quite an experience!

I cut and assembled without using any glue, my Eiffel Tower out of 3 mm hardboard (video below of all the models in the picture). I didn’t have much time to get things organized for the show so my booth did look a bit sparse but the important thing in my mind is that I made it after driving all day to get there to setup.

http://cnckingdom.com/exhibiting-world-maker-faire-new-york-2014


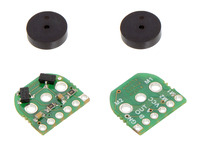
E a pololu oferece-vos agora estes sensores que permitem o controle dos motores que eles já vendem, para as vossas Engenhocas ficarem ainda mais precisas, no seu andar:


Magnetic Encoder Pair Kit for Micro Metal Gearmotors, 12 CPR, 2.7-18V

Add quadrature encoders to your micro metal gearmotors (extended back shaft version required) with this kit that uses a magnetic disc and hall effect sensors to provide 12 counts per revolution of the motor shaft. The sensors operate from 2.7 V to 18 V and provide digital outputs that can be connected directly to a microcontroller or other digital circuit.
Overview

This kit includes two dual-channel Hall Effect sensor boards and two 6-pole magnetic discs that can be used to add quadrature encoding to two micro metal gearmotors with extended back shafts (motors are not included with this kit). The encoder board senses the rotation of the magnetic disc and provides a resolution of 12 counts per revolution of the motor shaft when counting both edges of both channels. To compute the counts per revolution of the gearbox output shaft, multiply the gear ratio by 12.

http://www.pololu.com/product/2598


quarta-feira, 30 de abril de 2014

Impressora 3D dos Instructables! E um medidor de pulsação, um Kit Espacial, e um projector Raspi

E que tal construírem a vossa própria Impressora 3D?
Eis uma forma de terem em casa uma Impressora 3D por muito pouco...


Eventorbot! Open source DIY 3D printer. Free plans
eventorbot
For those who do not have access to a 3D printer. You can order the plastic parts and frame at: http://www.kickstarter.com/projects/1874396831/eventorbot-open-source-3d-printer
http://www.instructables.com/id/Eventorbot-Open-source-3D-printer-Free-plans/


Homebrew Arduino Pulse Monitor (Visualize Your Heartbeat)
ASCAS

Movies look cool with those EKG (electrocardiogram), the one that beeps and detects heart activities. A few months ago, we had to shoot a hospital scene for our school project. We needed an EKG instrument. To keep the movie authentic, we didn't want to fake the readings so we made the next best thing, a pulse monitor. Since my dad is a doctor he gave me some advice to design the pulse monitor.


Temos aqui algo de fascinante, um Kit para os vosso filhos, ou até para vocês, mais um Kit da littlebits, e este, feito em colaboração com a NASA!


SPACE KIT

IN COLLABORATION WITH NASA


MAKE SOMETHING THAT TEACHES SOMETHING
littleBits brings you fun and powerful ways to explore Earth + Space science in the classroom and at home.

Designed in collaboration with NASA SCIENTISTS & ENGINEERS

Includes 12 modules, 5 NASA lesson plans and 10 STEAM activities

Learn scientific principles like Electromagnetic, Kinetic, & Potential Energy

Make a Mars Rover or an ISS; transmit music wirelessly and more!

Connect with the littleBits library to infinitely expand your discoveries 

http://littlebits.cc/kits/space-kit


E com este Projector, Impresso em 3D, e com Raspberry pi, podem fazer uma data de Multimédia, bastando-vos arranjar uma Lanterna LED decente...

É bom!


Augment Your Reality With The iTorch raspberry pi flashlight projector  
MrTravisHiggins

iTorch

Media Sharing

Created By: Travis Higgins
This Instructable is for a prototype homemade projector that can be illuminated by any decent LED flashlight/floodlight.

This is my first published instructable so please leave comments and/or suggestions! Any feedback is very welcome and I will try to respond to everyone as soon as I see it!
At this stage the iTorch is a kit that I hope to be able to make available if I were to somehow get my hands on my own laser cutter. I have been spending a good amount of money using school equipment to laser cut this project, and got a quote to use the 3d printer and the price was astronomical. So needless to say a laser cutter and 3d printer would go to good use and be greatly appreciated.

Though you could probably reverse engineer one of your own. ;)
http://www.instructables.com/id/iTorch-raspberry-pi-flashlight-projector/