Blog Posts

Mostrar mensagens com a etiqueta engrenagens. Mostrar todas as mensagens

quarta-feira, 24 de fevereiro de 2021

Torcer a 90º! E uma data de engrenagens, Radio WiFi, e um pantógrafo para fresa

Algo para espantar os amigos e família, uma engranagem a 90º, mas sem dentes! 
sim, há maneiras de criar engrenagens sem rodas dentadas...


Twisty Toy

 rschoenm

I designed this simple twisty toy based on an epicyclic bar angular transmission. It's a cool little fidget toy that looks like it shouldn't turn. Works well as a stress reliever!

You can make this toy with either a wood lathe, or a 3d printer, or a laser cutter.


Supplies:

Hardwood like maple and cherry

1/8" brass rod

3/8" dowel

CA glue, wood glue

https://www.instructables.com/Twisty-Toy/


Ora aqui está um curioso projecto para ouvir Rádio do WiFi, para a vossa criançada, que ainda não têem idade para acessar o Spotify:


RFID Internet Radio
tars.vanhoof 


Hello fellow makers,

This Instructable describes how I made an RFID internet radio for my kids. They like to listen to music but since they're too young to start Spotify and cast to the TV themselves, I decided to make an easy and hopefully fun interface for them. This was a Covid-19 project so I took my time.

The player is built with a Raspberry Pi, a HiFi module and an RFID module. The tags are put in a base on which wooden puppets are glued which are easily identifiable for the kids as containing a certain playlist. I also designed and built a nice enclosure because it will be visible in our living room and therefore it has to look good.

I made a lot of personal choices during the development but because it's built around a Raspberry pi it's very customizable. I'll try to describe my progress and all the problems I encountered as detailed as possible.

I've already got a few upgrades in mind such as removing the (need for) buttons to make it even simpler, I'd like even better full-range speakers, playlist programming via a smartphone, maybe in the long run easier set-up of WiFi and Spotify for non-Raspberry-savvy family members...

I'd love to see what others make of it! Can you guess which song the puppet on top is for?

https://www.instructables.com/RFID-Internet-Radio/


Uma enorme quantidade de engrenagens e rodas dentadas!
É preciso dizer mais?


Gears 

Fred Peyerl

https://www.pinterest.pt/fredpeyerl/gears/


E para terminar, um Pantógrafo para Fresa 3D


The Pantograph Welder 
MegaLoceros 3D


https://www.pinterest.pt/pin/806003664562273251/


sexta-feira, 1 de abril de 2016

3D em grande! E a Mecânica dos Redutores, Moldar com Fita, Bluetooth HID bem barato, e mais uma Impressora 3D bem barata!

Não  é preciso ter de imprimir pecinhas pequeninas, não com esta proposta de Incheon, na Coreia do Sul.

Com preços a partir de 500 Dólares, em Kit...

Eis um Projecto a apoiar.


Want a bigger printer ? You can easily expand our printers. Reasonably priced LARGE print bed.
bigger 3D printers  
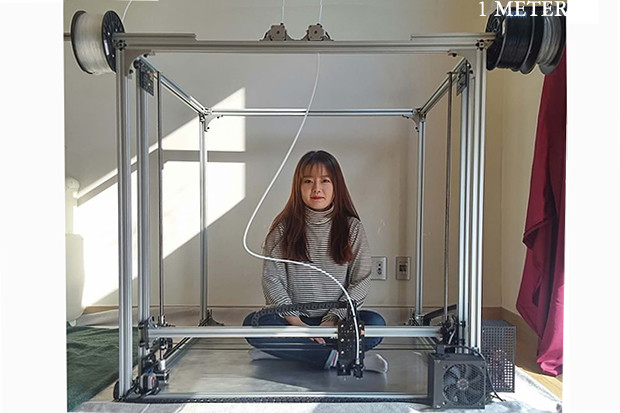
After a year of hardwork. Blood (literally) sweat, and tears. It is time..  We are Colossal3D.  ( c3d for short ). And there is only one goal for us. We will make larger 3D printers available at a reasonable price. By larger we mean ½ meter print bed or larger. With our expansion kit, print area can go to 1 1/2 meters, 2 meters or more. No need to buy another printer. Bored with printing something that can fit in a suitcase. You can print the suitcase. 
How about printing a big Drone that can fly for hours or carry a heavy payload ? Or a custom Kevlar bicycle frame (2 pieces, frame and front forks),  a backpack, a toolbox, an insane chair for computer gaming, or a canoe. Not in 12 pieces, in only 1 piece. With multiple extruders, parts can be printed in multiples. With a second controller board it is possible to use 2 independent gantries on the larger printers. A first in the consumer 3D realm.  
We offer 3 types of printer. Desktop. $2000. 1 Cubic meter $2,500, and 2 Cubic meter with plexiglass enclosure. Price on request. 
UPDATE !!  We offer D I Y kits for $500 lower price.  


Dica de Rodrigo Vertulo, no Blogue Laboratótio de Electrónica, aprendam, com as necessárias equações, como reduzir a velocidade, aumentando a potência...
Ou ao contrário, se invertermos a ordem das rodas dentadas: 


Redutores; nem sempre mais rápido é melhor!
Rodrigo Vertulo
 
O uso de motores na automação de processos industriais é uma realidade incontestável e a presença dos diversos modelos de motores é facilmente notada nos variados tipos de máquinas que “populam” os parques industriais, sendo, inclusive, intensamente utilizados nos robôs industriais como principal elemento de movimentação desses equipamentos.
Os motores em geral possuem duas características muito importantes que devem ser levadas em consideração ao serem utilizados, ou seja, a velocidade de rotação e o torque. A velocidade de rotação determina quantas voltas por minuto o eixo do motor é capaz de executar e normalmente é chamada de RPM (rotações por minuto). Por outro lado, o torque é a força que aparece no eixo do motor quando ele gira e depende da distância entre o ponto em que uma carga é aplicada ao eixo até o centro do mesmo. Em outras palavras, quanto maior for o torque do motor maior é a sua capacidade de movimentar cargas mais pesadas. 


Querem moldar algo em grande?
Usem a Fita auto-colante da grossa, tipo Duct Tape, para fazer o que quizerem, como por exemplo, Armaduras, Vestuário, ou toda a espécie de Engenhocas, como Bicicletas, Drones, Próteses, etc.


Cast or Pattern Anything with Duct tape
ashleyjlong
 
In this Ible I'll be showing you how to use regular ol' duct tape to duplicate an existing object, then create a 2-dimensional pattern from the duct tape duplicate. This may not be one of my more attractive Ibles, but the methods explained herein have infinite applications if you're a prop builder, costumer, or puppet maker. In fact, the woman who taught me this method worked for the Henson Co. for many years and said this was how they'd get patterns for "skinning" puppets after the forms had been carved out of foam.
This is a very budget friendly method for the following problems:
--I want to make a corset/costume, but I don't have a dress form. Just to give you an idea of the potential here, I've included a photo of a duct tape full body cast my friend, artist Deb Winslow, made in order to fit armor for a masquerade ball we attend.
--I want to re-upholster this prop, but I don't want to massacre the original to get a pattern.
--I have a cool object I want to duplicate, but I don't have the skills/ materials/ workspace to do casting and molding. Mold making putty works fine for small objects, as in my Glitter Grenade Soap Ible, but larger objects may be best served by this duct tape treatment. 


Para ligarem mais não sei o quê, por Bluetooth, eis um Instructable para o fazerem, e por um preço bem em conta...
3 Dólares! 


$3 Bluetooth HID Module (HC05 With RN42 Firmware)
EvanKale
 
Bluetooth HID (human interface device) modules will let you create bluetooth peripherals that can pair with mobile devices out-of-the-box (like bluetooth keyboards, gamepads, mice, etc.).
If we're looking to build our own bluetooth HID device, the hefty price of a single HID module can spike the budget of a project (like the BlueSMiRF HID for $40 USD, or the BlueFruit EZ-KEY HID for $20 USD).
An inexpensive bluetooth serial module commonly used by hobbyists, the HC-05, sells for $3 USD, but is not HID capable by default. With a bit of a firmware hack though, we can turn this cheaper module into a bluetooth HID module. 


E por falar em, barato, eis mais uma Impressora 3D para combater a Crise, uma versão aproximada da Ultimaker, mas por quase um terço do preço a Ultifaker!


UltiFaker²Go 3D Printer
PaulSS 
I set out to make a 3D printer about 3 months ago. I had been eyeballing designs like the Prusa i3 or a delta style printer but I wanted something a little bit more sturdy, less "hack job" looking, and a printer challenging enough to make it interesting. I decided to go with a "clone" of the Ultimaker²Go mostly because it's small enough that the side panels could be machined in my CNC router.
I also didn't want to do a direct clone. The Ultimaker²Go sells for a whopping $1600 and I wanted to keep the price around $500-$600. I decided to heavily tweak the design and components in order to drop that cost. This build requires that you have some sort of CNC router capability unfortunately unless you want to use 6mm birch plywood as the paneling (totally doable) and drill and cut the panels by hand. 


segunda-feira, 15 de fevereiro de 2016

Íman reversível! E mais uma Cortadora Laser CNC feita em casa, uma ideia do caraças, Pinos-Mola, Genuino, e desenhem a vossa Impressora 3D!


Cá está, da minha lavra, um arranjo magnético Halbach que ou atrai ou repele outro, por rodar sobre si próprio, invertendo a polaridade...
Pode funcionar por alavanca, ou por Rotação:


An aplication of the Halbach Array, by wich, groups of Magnets, each set 90 degrees to the next, have almost all the magnetic attraction concentrated on one side, i.e. a Monopole Magnet. In this case, the top Magnets, by the lever on the back, turn 180 degrees, so as to either attract or repell the sliding bottom array, thus creating a switchable magnet array, out of permanent Magnets. 


Aqui vai mais uma maneira de começarem a vossa Oficina CNC, e/ou a vossa Oficina de Aeromodelismo, etc. 
Uma máquina de Corte Laser CNC, que vocês fazem em vossas casas!


CNC Laser Cutter Journey
Arno1978  
I want to share with you the journey had had , creating my very own CNC laser cutter.
This projects is about 2 years in the making, due to research and development, and spending allot of time on www.instructables.com it took me a bit longer than anticipated , but I finally decided to start building my very own CNC laser cutter in the middle of 2014.
Motivation behind this was that I fly and build model airplanes , and wanted an easier more precise method of manufacturing parts for these planes etc. 


Aqui, poupam-se a ter de fazer um par de Rodas dentadas, para transmitir uma rotação a 90º, mas atenção, ao contrário das Engrenagens, este movimento mantém o mesmo sentido de rotação!
Espantoso! 
Cortesia deste Blog, o Nerd 360 graus:

http://ner360graus.blogspot.pt/


Será uma Mola-Pino, ou um Pino-Mola?
O que é de certeza, é uma boa solução para Molas em espaços limitados, e cá vai, cortesia da Traceparts, um Manual grátis sobre como desenharem uma destas:


Download SPIROL's Complimentary Coiled Spring Pins Design Guide. 
SPIROL invented the Coiled Spring Pin and its production technology in 1948. Since that time, the Coiled Spring Pin has proven to be the most versatile spring pin in the industry. More than fasteners, SPIROL Coiled Pins provide flexibility, uniform strength, equal stress distribution, closer diameter tolerances, no interlocking, trouble-free automatic feeding, and they reduce costs. Learn how you can take advantage of Coiled Pins in your assembly!   


Aqui está o Genuino, um Arduino feito com Intel, e que vem com um Giroscópio e tudo, para Iniiados em Programação e Electrónica, mas é claro que os mais Engenhocas irão utilizar isto para N usos avançados...


NewGenuino 101 board powered by Intel
 
Genuino 101 Development Board powered by Intel
The Genuino 101 Development Board powered by Intel, and developed by Arduino and Intel®, is an educational tool for beginners to electronics and programming. The more experienced among you can also use the board to prototype IoT designs such as wearables and Smart home/leisure devices. A successor to the Arduino Uno, the Genuino 101 board features extra functionality, notably Bluetooth Low Energy (BLE), a six-axis accelerometer and a gyroscope.  


E se acham que podiam fazer uma Impressora 3D melhor, ou mais eficientem, ou sei lá que mais, aprendem aqui como desenhar tal Máquina-Ferramenta:


How to Design a 3D Printer
3DHotpants 

I recently built my own 3D printer with a friend. The process was both challenging and rewarding, and it's awesome to have a 3D printer of my own design. However, I found very little information out there on how to make a 3D printer from scratch on my own.
The goal of this instructable is to help those interested in 3D printing to have a chance to design and build something that is truly their own and providing resources to help organize the process of making a 3D printer. This process mirrors the engineering process very closely, but will also provide useful resources along the way. 
http://www.instructables.com/id/How-to-Design-a-3D-Printer/


terça-feira, 2 de fevereiro de 2016

Um Torno para Madeira, um Gerador de Engrenagens, uma Onda Mecânica, e uma Mão Biónica!

O melhor trabalho até agora, que eu tenha visto, para transformarem um Engenho de furar num Torno de Madeira sólido e práctico!


Homemade Woodworking Lathe

WoodCrafts 67 

This My Homemade Lathe I made Last year. It consists of An old drill press and Off cuts I had Leftover in the shop. Rails are from An Old louvre door some pine and for the rotating centre I used the bit/ collet end from an old router that was broke. I use this quite often and it still works great. 


Já vos mostrei outros Geradores de Engrenagens, mas este é mais completo, com engrenagens complexas, de rodas dentadas múltiplas:


About
Gear Generator is a tool for creating involute spur gears and download them in SVG format. In addition it let you compose full gear layouts with connetcted gears to design multiple gears system with control of the input/output ratio and rotation speed. Gears can be animated with various speed to demonstrate working mechanism.
Why this tool was created? Just for fun. I'm working on a hobby project, a scale construction machine, which needed some spur gears, and i quickly made a simple spur gear creator script in Javascript with SVG output. As it was done, i couldn't stop, and i added more and more features, and finally i got this tool. It was a pleasure to code the whole thing, i'm a bit sad it is already done, so if you have any idea, what would be a helpful feature, just let me know by sending an e-mail (I couldn't have done this tool without Pageflip, my main project).
Notes about browser compatibility: all new major browsers are supported (i didn't tested IE), but unfortunately Chrome can't render SVG circle correctly. The winners are: Opera for the best performance (shame on me, i never use it) and Firefox for the best looking SVG render. 


Didáctica, simples, mas engenhosa, esta Onda Mecânica mostra-vos como funcionam as ondas, ou seja, o mecanismo ondulantário, e o que ancontece quando a Onda começa no meio, ou nas extremidades, etc:


Mini Wave Model
The Oakland Toy Lab 

A little wave goes a long way!
The mini wave model is small but mighty. With just a few minutes of set-up, it's just as good at demonstrating as its bigger siblings. This is a great model for waves that move, reflect, stand, and wiggle, perfect for a starter project in classrooms learning about waves and motion.
What: Mini Wave Model
Concepts: waves, propagation, physics
Time: ~15 minutes to set up
Cost: ~$1.50
Materials:
Bolts x 2 (with nuts that fit)
Nuts x 40 (or so)
Sticks (I used candy sticks, but cut dowel or other sticks work great, too)
String
Block of wood (2x4 works great)
Tools:
Drill
Hot glue gun / hot glue
Ruler
Scissors
Make
Hop on the wave! 


Uma ideia que nos faz sentir melhor com a Humanidade, aqui está Ada, uma Mão Protésica, que pode ser feita para qualquer um, em qualquer lado, tudo Open Source, Bravo, Inventores do Grupo Open Bionics! 


Ada Robotic Hand - Open Bionics

Open Bionics 
This is a step by step guide on how to make an Open Bionics Ada robotic hand. This is derived from the Dextrus robotic hand, by the Open Hand Project. It assumes you have either ordered the Ada robotic hand kit or have access to a 3D printer are planning to print 3D parts from YouMagine or thingiverse. The list of required 3D printed parts, components and tools are stated below. If you have ordered the Ada kit, you can skip the first step and start straight from step 2.
This hand would provide an excellent research platform for robotics or a test platform for prosthetics research. It has been designed to be easy to build and repair and should be a great project for someone with interests in robotics or prosthetics and wants their very own robotic hand! 


segunda-feira, 25 de janeiro de 2016

Imprimir em 3D, Ferro-Magnético, Gravar em Laser, Impressão em Papel, MAS, em 3D, e Engrenagens Cónicas no Tico-Tico!

Podem agora imprimir nas vossas Impressoras 3D em Material Ferro-Magnético, o que abre toda a espécie de novas possibilidades, como Sensores, relays, e Motores magnéticos, tanto dos rotativos, como dos Lineares!


Functional 3D Printing Looking Attractive with New Magnetic Filament from Graphene 3D Labs
MICHAEL MOLITCH-HOU 
Graphene 3D Lab Inc. has already demonstrated some success with the release of their Conductive Graphene Filament, which at least one of our team members thought was fun to play around with. Now, the Canadian company is introducing yet another functional filament and, this time, it’s sure to attract some attention. Currently for sale on the company’s online store, BlackMagic3D, and on Amazon is Graphene 3D Lab’s all new Ferro-Magnetic PLA filament. 
As must as one might like to create fridge magnets with the material, the new magnetic filament from Graphene 3D Lab can actually be used to make functional objects like sensors, mechanical actuators, and motors.  I won’t pretend to know how to build these, but there are plenty of tutorials online describing how to make magnetic motors, sensors, actuators, and more.  Combined with conductive filament, we are slowly approaching the day in which all the parts necessary to reproduce a 3D printer will be 3D printable, fulfilling the dreams of RepRap founder Adrian Bowyer.


.. Para cpmeçarem a vossa Fabriqueta de Engenhocas, eis uma Máquina CNC só com um Arduino, e capaz de gravar em Madeira, e cortar Papel e Cartão.
Com o dinheiro que fizerem, bem podem comprar depois uma máquina mais potente!


Arduino Laser Engraver Wood Design!
MichielD99 
Hi everybody, my name is Michiel and I am going to show you how to make an awesome looking laser engraver!
A couple of months ago, there was a CNC challenge here at instructables, while checking out the entries of that contest, I saw some pretty cool engraving machines and I thought: "Why shouldn't I make my own?". And so I did, but I didn't want to make someone else's project, I wanted to make my own. And so my story began... :)
This laser engraver uses a 1.8W 445nm laser module, of course, this is nothing compared to the industrial laser cutters who use lasers of (a lot) more than 50W. But this laser will do well for us. It can cut through paper and cardboard and it can engrave all kinds of wood. I haven't tested other materials yet, but I'm sure it can engrave many other materials. l will let you know! It has a large engraving surface of about 500x380mm.
Who can make this laser engraver? Everybody, if you are an engineer, a lawyer, a teacher or a student like me, you can build this thing! All you have to do is follow this instructable. 


Para Modelos e Maquetes bem realistas, mas numa máquina acessível, esta nova Máquina da Mcor vem-vos ajudar, agora ainda mais, porque vem com uma data de truques novos!


This 3D Printer Builds Full-Color Paper Models!

Tested


Traditional desktop 3D printers use melted plastic as their build material, but Mcor's printers layer sheets of paper on top of each other to create their models. We check out the new Mcor Arke, a printer that cuts from a large spool of paper, glues those sheets together, and then prints color on them to turn digital files into large paper models!
Shot by Adam Isaak and edited by Joey Fameli


..E ainda mais uma Impressora 3D por quase nada...
235 Dólares, e feito em 7 horas, não há razão para não tentarem!


How to assemble very cheap 3D printer
Nikus 
3D printing is great tool, you can print almost everything that you need. For example my lamp was broken since few weeks but now I design part that I needed to fix it and it works!
Cheap printer maybe mean for somebody bad printer. But I think that for this price ($235)it works great. It can print offline, has heated bed (without glass table but I will show you how to make it). Assembling it is very easy. I made it without instruction (I didn't check SD card, on it you can find some video tutorials). It took me 7 hours to build, calibrate and print first thing (small 1cmx1cmx1cm cube). 


..Mais esta, como, com a vossa humilde Serra Tico-tico de Bancada, podem fazer Engrenagens Cónicas, as tais a 90º!
Para quem queira fazer maquinetas em Madeira, isto é indispensável... 
E até vem com os Planos para o Helicóptero que aqui vêem!
É bom! 


Making Bevel Gears on the Scroll SawJEPLANS 
Making wooden Bevel Gears on the Scroll Saw. In this video I go through how to make Bevel gears that go with my wooden helicopter plans.
Available at http://www.jeplans.com
https://www.youtube.com/watch?v=Yu5HjlxDWak&feature=youtu.be


segunda-feira, 26 de outubro de 2015

Makeprintable Beta! E Cerâmica em 3D, Matrizes e ferramental, Impressão 3D multi-material, e Mecanismos animados

Já podem lá ir, Versão beta, mas funciona, eu testei, e consertar os vossos Objectos 3D Online, o Site Makeprintable permite-vos consertar, gravar em 3d ou G-Code, e imprimir directamente!
É bom! 


MakePrintable Takes on Big Names with Universal 3D Print Prep Software
MICHAEL MOLITCH-HOU 

Two of the giants in the 3D printing software space, with tools designed specifically for 3D printing prep, are Belgium’s Materialise and Autodesk, augmented greatly by its recent acquisition of netfabb. With such big names dominating the field, it might be difficult to imagine the chance that a small startup would have in providing its own solution for 3D file prep and management; however, MXD3D’s MakePrintable cloud service for repairing 3D files has become a popular, free solution in the 3D printing community and could just prove to be the David in a Goliath-dominated scene. Not just due to the intuitive interface and quality of the online software, but because of the brains behind it.


Aqui este Artista a seguir, Adam Nathaniel Furman,  está de Parabéns, eis como se fazem Maravilhas, inovando na Impressão 3D, Cerâmica e Design, que são um espanto!


Building Wonders in 3D Printed Ceramics: Meet Designer Adam Furman

Fabian

London-based designer Adam Nathaniel Furman is quite an all-round talent: he is trained in architecture and fine arts, but also works in areas like product design, interior design, writing, and teaching. It only seems logical that a person who is so eager for knowledge would soon embrace the world of 3D printing. Let’s take a closer look at some of his stunning 3D printed designs. 
Back in 2013, Adam had already created 3D printed ceramic objects for his ‘Designers in Residence’ commission at the London Design Museum. The project he worked on was called ‘Identity Parade’ and consisted of 3D printed ceramic vases and ornaments, painted in luminous colors and flashy patterns. For this project, Adam actually slipped into the role of a fictional designer: 


Dica de DesignWorld:
Como fazer dinheiro com uma Impressora 3D? 
Esta é uma ideia bem inteligente e prática, usá-la para fazer Matrizes e ferramental personalizados, para criar e instalar Peças em várias Indústrias, e Serviços.
Boa ideia!  
E, estou farto de vos dizer, vejam toda a série de Vídeos que aparecem no Youtube, relacionados com este tópico, no fim deste Vídeo.  


Tips for using 3D printing for tooling

Design World 
One issue with 3D printing for potential users is justifying the expense. 
Tooling (jigs and fixtures) are often an expensive, time involved, but highly necessary aspect of manufacturing. 
By using 3D printers to speed up the development of tooling, users get immediate cost return benefits.  


Muitos Materiais numa só Impressão, um Sonho, agora realizado pela Sculpteo, podem agora as vossas Ideias realmente brilhar, em questão de Protótipos e Apresentações, etc!


Introducing our new Multi-material Ensembles

ARTHUR CASSAIGNAU 
Handling multmaterial 3D prints is THE dream when it comes to 3D printing. If 3D printing directly in all the materials available in the industry is not doable yet, the team at Sculpteo figured out a way for you to do it anyway. Thanks to a new feature you can now fully configure your Ensemble so that it includes parts with their own specifications. Within the same Ensemble, you are now able to configure parts with different materials, finishes and even sizes. Let’s take a look.  
It’s no secret, many of our users 3D print Ensembles, sets of parts and batches of pieces. Until not so long ago, the only way to create those was to print them one by one. This changed ealier this year, when we introduced two things: multi-upload and ensembles, allowing you to do two things very well:
  • Simultaneously upload a large quantity of 3D files in a single pass
  • 3D print off a whole set of different pieces – as long as you wanted them all in the same material


E ajudar os outros, ajuda este humilde Divulgador, eis como encontrei esta série de Animações de Mecanismos, ajudando um Bacano na Mechanical Adventures, um outro nosso amigo tinha encontrado algo de muito úitil aos Engenhocas...
Mais uma série de Vídeos incríveis, no Youtube! 


Transmission with teeth-uncompleted gears 8a
thang010146
 
Input: the yellow gear.
Its number of remained teeth Z1c = 9
Its number of teeth (teeth-completed) Z1 = 20
Its number of cut-off teeth Z1f = Z1 -- Z1c = 11
Output: the green gear.
Its number of teeth (teeth-completed) Z2 = 20.
When the yellow makes 1 revolution, the green makes 1/2 revolution. 
https://www.youtube.com/watch?v=wPxQOsEiJ2E