Blog Posts

segunda-feira, 31 de outubro de 2016

Façam um Barco-Foguete! E um Laser para brincar com o Gato, serrar a direito, com Ímanes, aplainar com a Fresa, e imprimir em Cilindros!

Isto é que é um Espectáculo!
MUÁHÁHÁHÁHÁ!
Um Barco movido a Motor de Foguetão, o que é preciso dizer mais?
Toca a fazer!


Rocket Boat
makjosher 
Every year in October, some friends of my parents have gotten together at a cabin next to a small pond. As a kid it was one of my favorite times of the year, as it meant I got to hang out with my two favorite cousins and one other friend. One year we got the idea to build a simple wooded boat and attach some model rocket engines to it. We built the boat and launched it from the dock. That boat only went about 6 feet, but an annual tradition was born. Over the next few years we built several more boats - most were dismal failures. Eventually, my brother decided to have a go at building a boat and his boats were considerably more successful. We gradually increased the rocket thrust and even added a second rocket stage. Our most successful run made it around half way down the pond before the boat lifted off the water and tumbled out of control. This year I decided to build my first boat in quite some time - this is the story of that boat. 


Para brincar com o Tareco, nada melhor que esta máquina Laser, que vocês controlam com o Smartphone, e é tão fascinante para o Gato, como para o Dono...


Smartphone Controlled Cat Laser
Ikkalebob 
I've been wanting to start exploring the world of microcontrollers and programming for some time now, so I came up with this simple project which uses an app called "Blynk" to allow you to wirelessly control an Arduino board through your wifi. Now obviously the end result isn't the most practical device you'll ever build, but this was a great way for me to learn the fundamentals of programming Arduino and it can help you to learn too.
I've tried to arrange this project in an easy-to-follow format so it's ideal for someone who knows nothing about Arduino, but there's a lot of room for tweaking and improvement in my code that would allow more advanced users to get some use out of this project too.
This is a project that's been done before a few times, but I wanted to add something new by giving the system remote control functionality. 


Com tanto Ìman de Neodímio à mão, eis uma boa ideia para usar um, neste caso, para serrar a direito, com um simples Serrote Manual de lâmina larga:


DIY Magnetic Hand-Saw Guide - Extremely Accurate Cuts!
Yonatan24 
I think handsaws are WAY better than circular saws for many reasons, but I always come across one problem: I'm never able to saw perpendicular, aka square, at a 90° angle. You can see the example for this here.
I have (finally!) received the saw that I won back in the 2015 Shelving Contest with my Ultimate Magnetic Pegboard. It's extremely sharp, beautifully made, and has a really comfortable handle. However, it is very thin, and doesn't have any aligning support on the top, so it bends really easily while sawing.
A well known solution for this is a Miter-Box. I've bought one, but it just doesn't work. Instead of having the sides hold the saw, I just saw into the plastic...
One day I was daydreaming a bit: "If I take that magnetic dovetail jig that I saw in one of Jay Bates' videos, and align it differently, will I be able to use it for sawing at 90°, perpendicular, and square to the wooden board that I'm sawing?" So I do a quick search and: "Wait, WHAT? It costs 50 DOLLARS?"
"OK, nevermind. I'm making my own!" I decided that I'd make myself a magnetic guide, which ensures that the cut will be square in all directions. Alternatively, you can modify it, and use it for dovetails, miters, or anything else. 


Se já têem uma Fresa, podem usá-la agora para aplainar Madeira, sem perderem muito tempo...
Com este Acessório, que podem muito bem fazer em vossas casas:


Make a Router Planing Jig
WOmadeOD  
No Planer/Thicknesser, or maybe it's not wide enough? If you have a router, then this router planing jig might be right up your street.
I built mine as an improvement over what I've used in the past to plane wide planks for waterfall tables. I estimate it halves the time to get the same job done as before - not bad for something cheap, easy, and quick to build!
Let me show you how I built and use it.
Use the Instructable and video to make your own - there is even a SketchUp model for free download! 


Para imprimirem numa superfície cilindríca, num tubo, rolo, tambor, etc, têem este Projecto como guia, e também vai um Link para a base disto, um Plotter CNC:


CNC Drum Plotter
lingib 
This instructable describes an A4/A3 plotter made from a section of plastic pipe, two BYJ-48 stepper motors and an SG-90 servo. Essentially it is a flat-bed plotter rolled up into a drum.
One motor rotates the drum while the other moves the print-head. The servo is used to raise and lower the pen.
This plotter has a number of advantages over a traditional flatbed plotter:
significantly smaller footprint
only requires one linear guide rail
simple to construct
cheap
An on-board interpreter accepts the gcode output from Inkscape.
Communication with the plotter is via a bluetooth link.
The plotter is compatible with the CNC Graphics Tablet described in my instructable http://www.instructables.com/id/CNC-Graphics-Tablet/.
While not a precision instrument the accuracy of this plotter is satisfactory for its intended purpose of transferring watercolor outlines on to paper. 


sexta-feira, 21 de outubro de 2016

Do 3D para a Fresa CNC! E a mais fácil Lixadora de Fita, my.Sketchup, 100 Projectos Arduino, e um Mini-Torno

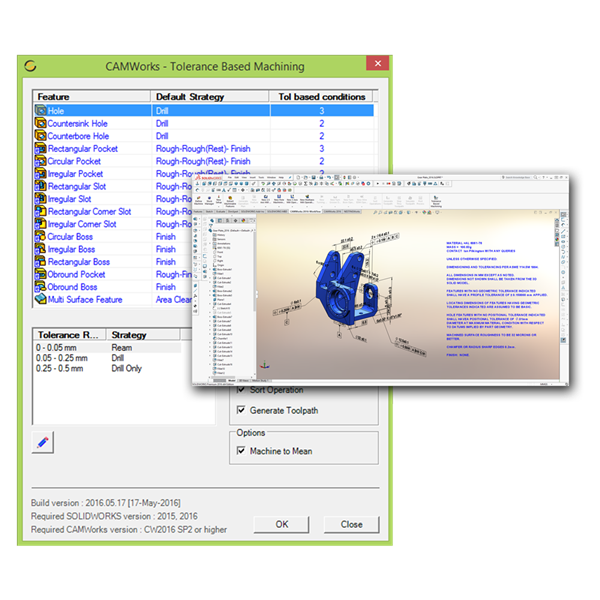
Um importante ajuda para quem quer transformar um Desenho 3D numa peça real, no Mundo Real, é este Programa, o CAMWorks...
Com a possibilidade de transformar um Objecto 3D numa série de Tarefas para Maquinação, com opções de nível de Tolerância e Acabamento, torna tudo mais fácil: 


Geometric Continues to Revolutionize CNC Programming
Responsible for the content of this press release: Geometric Technologies, Inc.

Geometric Continues to Revolutionize CNC Programming with a New Release of ‘Tolerance Based Machining’ for CAMWorks®
Geometric Ltd., a global leader in 3D CNC machining software, today announced a new release of their revolutionary technology that uses SOLIDWORKS® 3D DimXpert and Model Based Definition (MBD) 3D dimensions and annotations to automate the programming of CNC machined components.
CAMWorks was uniquely architected to reduce a 3D solid model into a set of discrete machining features, and apply a knowledge base that selects tools, feeds, speeds, and machining strategies to automate the creation of CNC toolpaths. Tolerance Based Machining dramatically enhances CAMWorks core architecture by adding the ability to read and react to non-geometric manufacturing information such as tolerances, surface finish, and other annotations in 3D models. This ability not only speeds up the CNC programming process, and improvements in quality, but also creates a much stronger design-to-manufacturing process for machined components.


Um Acessório que vos transforma um Berbequim numa Lixadora de Fita, é algo que já existe, mas não ao preço dumas Impressões 3D, e pouco mas.
E pode-se ainda usar apenas Madeira, torneada e furada, e então, ainda é mais acessível:


Power Drill to Belt Sander Conversion24Eng in 3D-Printing 
Some people spend a lot of money on a 3D printer then don't have money for other tools. I did that. I wanted a 1" (25mm) wide belt sander but it wasn't in the budget. Instead of admitting defeat, I decided to make parts for my own belt sander.
Creating the project with only 3D printed parts would have been possible but the filament would have gotten expensive. Instead, I wanted to combine the benefits of inexpensive steel hardware store parts with a printable design. Everything was printed in regular ABS so it's not necessary to track down a rare filament. 
http://www.instructables.com/id/Power-Drill-to-Belt-Sander-Conversion/


Podem agora criar Modelos pelo Sketchup, na Tablet, onde quizerem, encontrar os Modelos que quizerem e guardar o trabalho, tudo na Net, é uma maravilha:


What is my.SketchUp? 
my.SketchUp is the core SketchUp modeler, tuned to work in modern web browsers. Draw, orbit, push-pull: make anything you can imagine in SketchUp, anytime you imagine it.

Find a 3D model of anything
3D Warehouse lives on the web, and now so does SketchUp. Go ahead, find a 3D model of anything while you're working in my.SketchUp.

Connect with your models anywhere
my.SketchUp uses Trimble Connect to store models online, so they're handy whenever you need them. Create a Trimble account, and get started with 10 gigabytes of free personal storage. 
http://www.sketchup.com/products/my-sketchup


Eis uma lista de 100 Projectos Arduino, qual deles o mais bacano, cortesia da Autodesk Circuits com de tudo um pouco de introducção ao GPS, a um lançador de Bolas de Golfe, dos quais, destaco este, obra do nosso amigo Algarvio, de origem Francesa, o Alex Negrier, uma versátil Máquina CNC, que tanto pode Imprimir em 3D, como Fresar:


Arduino Controlled CNC / 3D Printer Hybrid
aldricnegrier in cnc 
Mother Nature Makes ... We Build.
BuildersBot Fuses 3D Printing & CNC Milling Into One Builder’s Dream "3dprintingindustry.com"
The BuilderBot is an Open Design machine, that uses Open 
Software and Open Hardware. It is a product of open projects such as the RepRap, Arduino and Repetier .
The objective of this instructable is to guide your way throw the entire making process of building a BuildersBot machine. An open design Arduino Controlled CNC Router that can also perform 3D printing.
The instructions will cover all areas such as design, mechanics, electronics and software.


Para as tais Fresas CNC, acima mencionadas, podem aqui fazer este Acessório, um Mini-Torno, que vos prende o bloco de Material a ser trabalhado, e em 15 Minnutos, está feito!
É bom, e vem com um outro Link, para outro Projecto, onde figurava esta peça:


Mini Vise in MinutesChipsWoodShop in tools 
This simple tool is very handy for holding small parts for cutting on the CNC router. I also find it useful for drilling holes and other jobs where I need to hold a small part in place. I made mine from materials I had lying around the garage. I was very easy to make, basically cost me nothing, and was well worth the effort.
This vise was featured in my last instructable on CNC Engraving. 
http://www.instructables.com/id/Mini-Vise-in-Minutes


sexta-feira, 14 de outubro de 2016

Acelerador no Stepper! E Simulação em CAD, Carne Fumada num Apartamento(!), Curso se Carpintaria, Raspberry Pi no Smartphone, e façam um Helicóptero em casa!

Era chato não poder usar os Steppers, ou motores passo-a-passo, para o que queiram, e com aceleração e desaceleração, mas agora...
Já podem!
Sim podem finalmente usar aquele monte de Motores que recuperaram das Impressoras, usando um Arduino...
É bom!


Arduino : How to Control a Stepper Motor With Potentiometer

MertArduino in arduino 
This instructable is the written version of my "Arduino : How To Control a Stepper Motor with Potentiometer" YouTube video that I've uploaded recently. I strongly recommend you to check it out.
First, you should see the following Instructable:
This tutorial is all about tuning the speed of a stepper motor using a potentiometer. The idea is to up or down the speed of a stepper motor using with analog read. Theoretically analog input to a digital output, we're going to use this concept to control the speed of a running stepper motor. 


Isto é fenomenal!
Simular Moldes para Injecção de Pástico, simular mesmo a injecção, Design e Simulação para Metamateriais, Testes de Solidez, etc. uma data de novas coisas boas:


3 new features in CAD software for 3D printing material testing 
One major issue while dealing with digital manufacturing is the ability to test your 3D printed model. Thanks to a better understanding of materials, new features in computer aided design software allow you to improve this process. Here is a list of a few new functionalities in CAD software, based on generative design implementations in molding simulation, structure optimization or mechanical behaviors. Enhance your CAD experience in 2017! 
https://www.sculpteo.com/blog/2016/10/12/3-new-features-in-cad-software-for-3d-printing-material-testing


Para a próxima vez que se sentirem tentados, por preços de Promoção, a comprar mais Carne do que a possam conservar no Frigorífico ou Arca Frigorífica, bom, agora podem...
Mesmo que vivam num Apartamento!
É só facilidades.


Smoking in an apartmentjuniortan in bbq-and-grilling 
I live in a country where 82% of people live in apartments, where the concept of having a backyard or any space to smoke meat is most uncommon. So I set out to try and see if it is possible to do this indoors without involving fire-fighters, hazmat suits or N95 masks. As it turns out, stove-top smoking is not that unusual in many countries, but looking for the necessary equipment here would definitely be challenging. Hence this instructable, and hopefully more foolhardy souls can give it a try too, that smoking meat in relatively confined spaces is not impossible...
This instructable will NOT be covering how to dress or marinade the meat; I use various rubs and mustards myself, here I will focus just on the smoking part. 
http://www.instructables.com/id/Smoking-in-an-Apartment/


Só nesne Mês, é grátis, por isso aproveitem que ainda podem, e aprendam Carpintaria, e sem Ferramentas caras, com este Curso de mikeasauros, da Instructables! 


WOODWORKING CLASSwith mikeasaurus 
Learn the basics of woodworking with simple hands-on projects to build your confidence and skills. Each lesson in this class explores an area of woodworking that will form the building blocks of all future woodworking projects you undertake. Keeping the average DIY'er in mind, this entire class is conducted using basic handheld power tools, with no fancy fixed tools like table saws, lathes, planers, or drill presses.
This class will cover the fundamentals from making straight cuts and perfect holes to mastering the router and making mitres, culminating in a capstone project that will tie these skills together. With easy projects throughout the class, this hands-on approach to learning woodworking is sure to satisfy.
Whether you're new to woodworking or just want to solidify your understanding of the woodworking basics, this class is definitely one you'll love! 
http://www.instructables.com/class/Woodworking-Class/


Podem usar o vosso Tablet como o Écran do vosso Raspberry Pi, eis uma grande ajuda para programarem sem entraves, pois não precisam do Monitor específico para o Raspi:


Use your tablet as Raspberry Pi screen

pinchan in raspberry-pi 
You need a certain type of monitor to use Raspberry Pi. Most of people do not have a monitor specifically for his/her Raspberry Pi. By taking this method, you can make your tablet or smartphone a screen for your Raspberry Pi. This will increase your productivity when you work with Raspberry Pi since you don't have to connect it with a PC screen.
Note that this technique works only when your Raspberry Pi and tablet/smartphone are connected to a same WiFi network.
For the detailed procedure, please refer to my blog


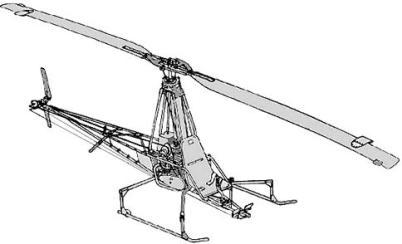
E por último, um Brinde, aqui vai, como fazerem o vosso próprio Helicóptero Ultra-leve, em casa, quer dizer no Quintal ou Garagem...
Visitem primeiro o link que têem aqui, que essa página tem Linksque vão dar à página dos Planos, informa sobre como aprender a voar num Helicóptero e etc.


Ultralight Helicoptersadmin 
All About Ultralight HelicoptersMany have said that ultralight helicopters are the ultimate form of ultralight flight. Fast, nimble, and able to go almost anywhere, lightweight helicopters are also a more economical way to get into flying helis. Plans can be bought very cheaply on the internet. Kits are available for purchase, but typically cost more than building one from scratch from plans. 
http://tinkersource.com/ultralight-helicopters/


sexta-feira, 7 de outubro de 2016

Uma Máquina duma peça só! E uma máquina de jogos de garra, um Catamaran de Espuma de Nylon, um Quadracóptero de PVC, e o Sketchup paramétrico.

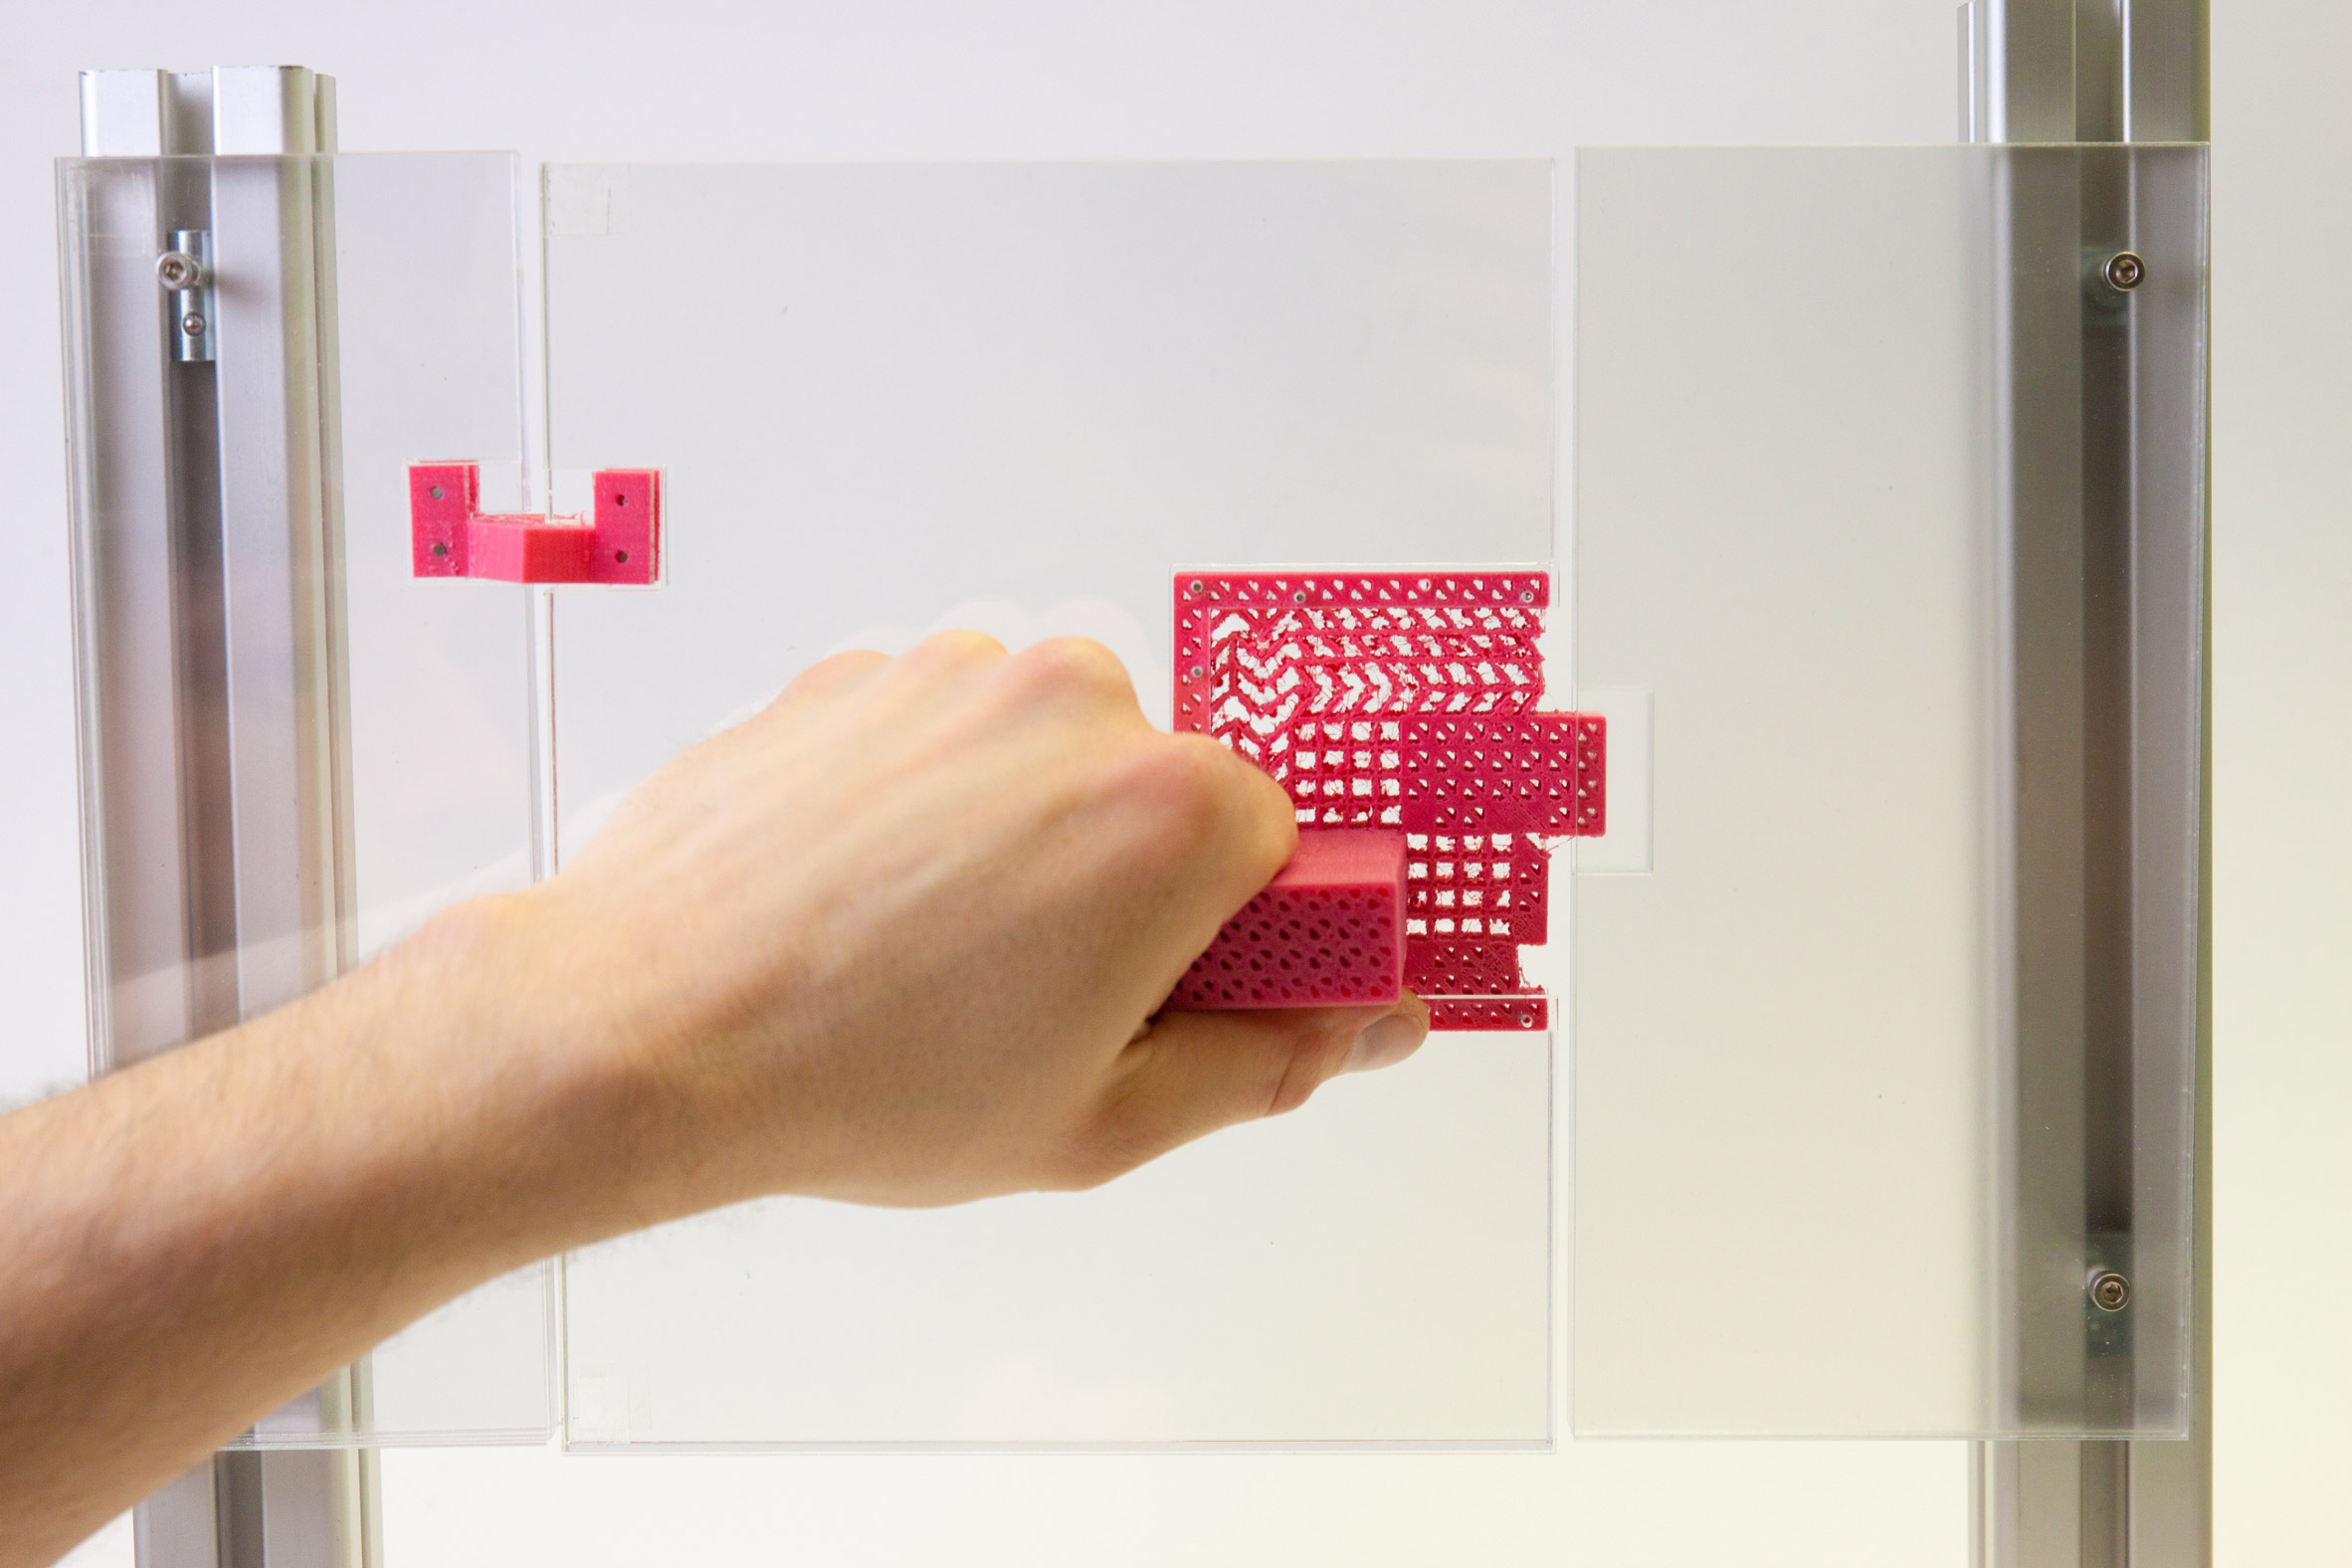
Como já referi antes, sobre Fixtures, a Ponoko oferece-nos esta dica, da Revista dezeen, aqui, chamam-lhes Metamateriais, mas parece-me a mesma coisa.
De qqualquer maneira, cá vai esta notícia sobre máquinas de uma peça só:


Metamaterials make it possible to create mechanisms from a single piece of plastic 
A door latch and a pair of pliers are among the mechanisms created without screws, bolts or other fixings by researchers working with a new technology called metamaterials (+ movie).
The team at the Hasso Plattner Institute's Human Computer Interaction Lab design objects that move despite being 3D printed as one single part.
To do this they use metamaterials – a type of engineered material defined by its internal structure rather than what substance it is made of. Metamaterials have properties not found in nature, as with the real-life "invisibility cloak".
The objects created can have controlled directional movement, which means they can perform set mechanical functions, like gripping something or latching a door. 


Uma ideia para se fazer em casa, que chama mesmo as atenções, é esta Máquina de Jogos digna dalguma Feira, é algo divertidíssimo de construír, e com sucesso certo:


HOMEMADE CLAW MACHINE

-MMM- in technologyrobots 

This is the second and new Version of my Claw Machine (Old Version)
As I announced in my first Version, the "new" Machine will be painted and setted up with an Arduino. 


E para uns Fins-de-Semana inesquecíveis, gastando pouco, que tal um Catamaran, feito com Espuma de Poliestereno, sim, Esferovite, ou Isopor, conforme o País, ora aqui está algo de fenomenal, e acessível à brava!


DIY styrofoam catamaran by Joshbuilds

outsideboats 
This is a Styrofoam catamaran i built. I had been wanting to build this for a while, then in the last few days of summer i decided to build it. This only took 2 full days to build and one day to test. The catamaran costed me around 200 dollars (sail not included) and this is comparable to a store bought catamaran which would cost 2000 dollars
In this instructable i have included a few schematics (located on the last page), a materials list, and various pictures and descriptions for all steps. 


E falando de coisas bacanas e acessíveis, vai aqui mais um belo dum Instructable, este, sobre como fazerem um Quadracóptero, com PVC, barato, e resistente, para se aprender a voar um Quadra, sem medos... 


The Ultimate PVC Quadcopter by thomasjarrett16

technologygadgets 
Whether you're a beginner looking for a quadcopter to help you get your feet wet in scratch building, or you're a little more experienced and are just searching for a cheap and reliable frame, look no further than The Ultimate PVC Quadcopter! This is a 450mm frame that is extremely cheap, at around $12 for all the hardware, and is extremely durable as well, mine withstanding dozens of near full speed crashes with nothing more than a couple of broken propellers! The electronics are 100% protected, either inside the PVC arms or underneath the lexan canopy, meaning 1: you'll never have to replace any electronic components and 2: you'll have the flyest (no pun intended :) ) looking DIY quadcopter around! This instructable is going to show you the creation process of this quadcopter and how to make it yourself! 


Dica da Sketchucation, se têem o Sketchup, isto é algo a juntar-lhe, para não perderem a paciência, após terem perdido uma hora de trabalho, por não terem gravado tudo, de 5 em 5 minutos...
Porque a história toda do que fizerem, está guardada, e podem voltar atrás, quando cometerem um erro, à vontade...
E podem usar um Modelo, para muitos usos, ou derivações, apenas mudando uns parâmetros, num Slider!


VIZ – Parametric Modeling for SketchUp 
Viz adds parametric modeling to SketchUp. All your modeling history is retained, you won’t need to redo all the work anymore. Often updating your complex model will turn out to be a matter of tweaking a couple of sliders.
Parametric Modeling
Boolean Operations and Constructive Solid Geometry
SketchUp 2014/2015/2016 Windows and SketchUp 2015/2016 Mac 


quarta-feira, 28 de setembro de 2016

Uma dobradeira sem soldadura! E como guardar Componentes, os 4 números para a Impressão 3D, uma Forja de carvão, e um Contador Geiger!!!

Uma dobradeira, para dobrar Chapa Metálica em Ãnguloscertos, e sem maus resultados, nem dedos golpeados, é uma necessidade, mais cedo, ou mais tarde, para qualquer Engenhocas...
E assim como aqui vêem, é sem sequer recorrer a Soldadura!
É bom.


Simple Sheet Metal Brake: No Welding

makjosher  
I love working with metal, but I've always struggled to get perfect 90° bends. Generally, I'll stick the piece to be bent in the vise and smack it around until it's bent. Since it almost always bends crooked, I end up rebending - and generally just making a mess of it.
For my next project I was going to need to bend some cardboard, which inspired me to first tackle a bending brake. Since I knew I would end up bending things much harder than cardboard in the future, I designed the brake to handle thin aluminum and steel.
Inspiration for the design came from several other DIY brakes, such as this one by Improbable Construct and one by the Youtuber JDCD Design. Since I don't have easy access to a welder (and also try to avoid welding as I'm not terribly great at it), I modified the design to make it weld-free. 


Ter uma data de Peçinhas ou Componentes electrónicos, ou ambos, e gastar uma eternidade a procutrá-los dunas latas, é uma trapalhada, que só se evita...
Com ORGANIZAÇÃO!
E aqui está um Móvel mesmo feito para isso:


Electronics Components Storage

Alex in NZ 
Electronics is great fun, but you do end up with lots of different types of components which need to be stored individually.
I kept mine in a series of small plastic divided cases (Tactix brand), but the cases themselves were getting a bit out of control.
I liked J-Po's cabinet design but my cases had slightly curved edges which meant that they would not be held securely by the method J-Po had used.
Jesper75 had built a cabinet for the same style of cases, but I didn't want to have to cut, paint and fit the number of shelves which I would have required.
The requirements for my solution were to have as little space between the cases as possible and to use timber which I already had.
I decided to use aluminium extrusion to make holders for the cases, and since it would have been annoying to fit these once the carcass was assembled, I also decided to finish the surface before assembly. Unusual, and probably not an experiment which I will repeat, but a method which worked "well enough." 


Cortesia da Sculpteo, há 4 números que devem sempre ter em conta, para produzirem uma boa Impressão 3D, e aqui seguem, para terem sempre um bom resultado final, sem desilusões nem desperdícios:


Never fail a 3D Print again: the 4 key numbers of 3D printing 
Missing faces, bad quality, printing rejection and production delay? When you design and send your 3D file for 3D printing, some issues can happen frequently. But don’t worry! If you keep the following 4 numbers in mind while designing, these issues can be easily corrected before you 3D print or order on a 3D printing service.
Which are those key numbers for 3D printing?
1-   The number of polygons
2-   The size of your 3D file
3-   The dimensions of your product
4-   The number of volumes and parts in your file 


E que tal, uma forja, com Carvão de Churrascada?
Ora aí está algo de acessível, e empolgante para qualquer Geek Engenhocas que se preze, e ainda por cima, algo que pode-vos fazer ganhar uns cobres, nas horas vagas...
Por isso, cá vai Instructable!


Charcoal Grill Forge: Become a blacksmith on the cheap

Mtownzach  
To me, backsmiths are freakin' badasses. The roar of the fire, and the ping on the hammer striking glowing metal; it's almost mystical. They are legendary figures that have been around since the Romans, manipulating the elements to create long-lasting, useful and desirable stuff. Since the industrial revolution and modern technology, this has become a lost art.
However, this is one hell of a survival skill. I'll show you how to make a forge on the cheap to get started. I encourage you to try it out.


Para ainda serem mais radicais na nobre Arte da Engenhoquice, (e sabe-se lá se não vai ser preciso, um dia), não há como terem o vosso próprio Contador Geiger.

Mais que não seja, para terem a certeza que a Tralha sem nome que vão apanhando, NÃO é radiactiva...

MUÁHÁHÁHÁHÁHÁ!

E até vem com uma explicação simples de como os Contadores Geiger funcionam, por isso, é também um Projecto Didáctico.


Simplest Geiger Counter

tanner_tech 
Have you have ever wanted to test the radioactivity of your smoke alarm, or have you ever wanted to be extra prepared for that nuclear apocalypse that is always being spoken about? If you have, then this instructable is for you. In this instructable, I will show you how to build a very simple and cheap Geiger counter that can be built with salvaged parts and still get the job done. The video below will compliment this instructable with a verbal explanation of all the steps. Lets get started!