Blog Posts

Mostrar mensagens com a etiqueta steppers. Mostrar todas as mensagens

sexta-feira, 1 de março de 2019

Fundição PLA! E um Cadinho eléctrico, um Stepper DIY, Acústica caseira, e segurem o Filamento,

Estou farto de dizer isto, a Impressão 3D pode ser grandemente amplificada, usando-a como Moldes, para  a Fundição de Metais!
E usando uma Àrvore de fundição, para produzir N peças de uma só vez!


Lost PLA Casting - making & using a Casting Tree #pla4
VegOilGuy

Casting Trees are a great way to produce a large number of castings in one pour. But can this technique be used with a 3D Printer in Lost PLA? Yes! Jewellers and Ornamental Casters have been using this approach for years and I wanted to try it. In my last video I tried to make 5 pendants in one casting, but only 1 turned out okay. This time I try for twelve and almost nail it. With just a 3D printer and a little imagination, it's possible to make some incredibly detailed castings using the Lost PLA method.


E se querem meter-se nisso, sem usar Gás ou Carvão, podem usar este Método, que se pode usar em qualquer parte, sem causar alarme!


Zero Cost Aluminum Furnace (No Propane, No Glue / Epoxy, No Welding, Individually Replaceable Parts)
quickshadow_2

NOTE: THIS ITEM CAN BE USED TO MAKE CASTINGS AS GIFTS FOR ANY HOLIDAY OR OCCASION!
As seen from the picture and title this instructable is about how to make a zero cost aluminum furnace from salvaged items from your local scrapyard or around the house.
Please be advised that though this aluminum furnace can truly be made at zero cost, for some steps you may want to substitute a tiny bit of money for less hassle and trouble, throughout this instructable i shall be pointing out these steps and how you could do so.
BTW this aluminum furnace build can seriously smelt down a lot of aluminum, but takes a while to heat up, so ensure that you have a large store of scrap aluminum before using, for maximum efficiency.

https://www.instructables.com/id/Zero-Cost-Aluminum-Furnace-No-Propane-No-Glue-/


Um Stepper não serve de nada, sem um Controlador, e cá está como o fazerem vocês mesmos, com este Projecto:


DIY Stepper Motor Controller
DIY KING 00

Remember those DC motors, all you need too do is to hook up the positive and negative leads to a battery and holla it starts running. But as we started doing more complex projects those DC motors doesn't seems to deliver what you need.... yes I mean efficiency, precision and above all torque without any gear reduction.
Well the story started as I planned to built a semi automatic drill press which can help you drill through objects like a usual drill press but with the help of a foot pedal so that you can hold the object with both your hands without the need of a helping hand. Long story short I need a motor that can move the drilling head up and down precisely and also offers a good amount of torque.
Failing to get all those from a simple DC motor I decided to use a stepper motor. Yes the one that has four wires and thats all I knew about them.So I in this instructables we are going to make a controller for these four wire stepper motors that enables us to control the speed and direction of the motor without using a micro controller.

https://www.instructables.com/id/DIY-Stepper-Motor-Controller/


Um Estúdio de Som no vosso Quarto?
Podem fazê-lo, assim, com estes Painéis Acústicos que aprendem a fazer, neste Instructable:


Scratch Built Acoustic Absorbers for Bedroom Studio
epicchum

Hey everyone! I'm in the process of converting my bedroom into a bedroom studio for music recording and production, so I thought I would teach Y'all how I made my acoustic absorbers!

https://www.instructables.com/id/Scratch-Built-Acoustic-Absorbers-for-Bedroom-Studi/


É bastante irritante, quando a Impressora está alegremente a imprimir coisa nenhuma, porque o Carreto de Filamento conseguiu encravar o fio!
Esta é uma solução impecável, para poderem mandar imprimir a Máquina, e irem às vossas vidas, com confiança! 
É bom!
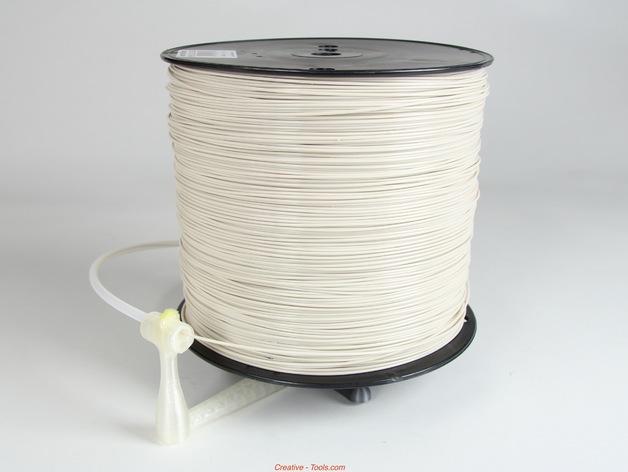


CreativeTools Creates Most Unique, Innovative 3D Printable Universal Filament Holder Yet
Whitney Hipolite

...
The other day, I was printing out some toys for my son. I had to leave the house for two hours, and fully expected that when I returned I would have 3 little toys laying finished on my print bed. Unfortunately, when I returned to check on my prints, the printer had completely stopped printing halfway through. I couldn’t figure out what went wrong… until I looked at the filament and found that it had become tangle up upon itself, preventing its own flow to the extruder. The 3D printer had no other option but to shut down. This was completely my fault, as I had been provided with a sample of filament to try out, and because I was in a rush, I had just put the filament to the side, rather than on a spool. This allowed it to easily knot itself up and ultimately terminate my print job.

If you were to browse websites like Thingiverse, you would discover hundreds of filament spool holders, all of which are unique in their own right. However, none are as innovative, as comprehensive, and frankly quite as amazing as one which was just created by a company called CreativeTools, and its CEO Paulo Kiefe. Called the ‘Universal Stand-Alone Filament Spool Holder’, it is entirely 3D printable and its name simply does not do it justice.

https://3dprint.com/20280/3d-printer-spool-holder/


quinta-feira, 7 de fevereiro de 2019

Controlem os Steppers! E uma fresa CNC, motores PMDC, Maker como Profissão, e muita Fundição,

Eis algo de não muito barato, mas que vos permite controlarem os Steppers que tiram da Sucata, de 6 maneiras diferentes!
USB, TTL serial, I²C, porenciómetros, código de quadraturea, e até com consolas de Radio Controle!!! (RC)
Para os Engenhocas é algo a ter à mão, ou pelo menos, a saber que existe, para um dia que precisem...


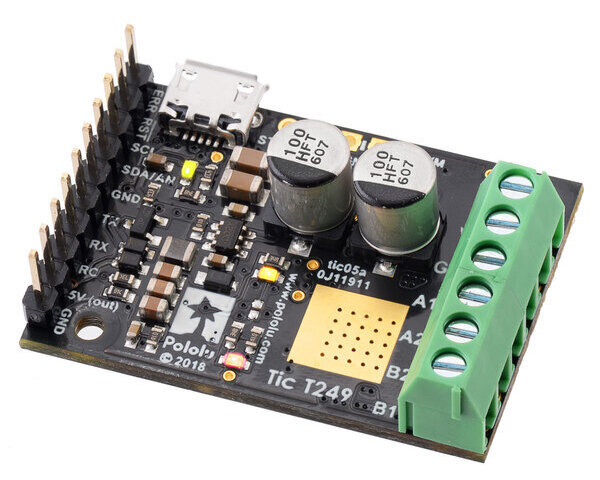
Tic T249 USB Multi-Interface Stepper Motor Controller (Connectors Soldered)

The Tic T249 USB Multi-Interface Stepper Motor Controller makes basic control of a stepper motor easy, with quick configuration over USB using our free software. The controller supports six control interfaces: USB, TTL serial, I²C, analog voltage (potentiometer), quadrature encoder, and hobby radio control (RC). This version incorporates a Toshiba TB67S249FTG driver with innovative and unique features that include Automatic Gain Control, and it ships with soldered header pins and terminal blocks. It can operate from 10 V to 47 V and can deliver up to approximately 1.8 A per phase without a heat sink or forced air flow (or 4.5 A max with sufficient additional cooling).

https://www.pololu.com/product/3138


Uma Fresa CNC, construída também com algumas peças impressas nas vossas Impressoras 3D, e explicado duma forma divertida, é o que vos apresento aqui:


3D PRINTED CNC ROUTER
Ivan Miranda

This week I started to make a CNC router with 3D printed parts and leftovers found around the shop, I know that it might seem odd that I claim that I had those guides and all lying around the shop, but the fact is that those were going to be to make a big 3D printer that is no longer an incoming project. We need to go metal!!

https://www.youtube.com/watch?v=MfYmT3Reoz4


Conheçam aqui os Motores PMDC, e como escolher o motor certo para o que precisarem de motorizar!


Spinning the wheels: Selecting a PMDC motor
Bill Marshall

My recent post Spinning the wheels: interfacing PMDC motors to a microcontroller, covered interface hardware and the use of PWM for speed control. In response to a comment from a DesignSpark member, I thought I would go through the basics of choosing a PMDC motor for a particular project. What follows is a highly simplified design process which should yield the ‘ballpark’ parameters of the motor needed.

https://www.rs-online.com/designspark/spinning-the-wheels-selecting-a-pmdc-motor


E como viverem só de construírem Engenhocas, ouçm as dicas importantes deste nosso amigo, de como viverem disso. 
Não é fácil, mas se se empenharem, dá certo!


Making A Living As A Maker: Ep. 1 Finding The Perfect Product
Artfully Rogue

I make a living as a maker and would like to share what I've learned with anyone that is trying to jump off the 9 to 5 hamster wheel and start their own maker biz.
Keep in mind, there is so much information out there in the world, my way is not the only way by any means. It's what has worked for me. Thank you for taking the time to watch my video. I am a creator of things, a metal artist, a maker of stuff, a woodworker, a welder, and a bohemian traveler of the world. I hope to inspire, motivate, teach and be a part of the lives that seek to become creators of their own wonderful creations.

https://www.youtube.com/watch?v=EaGUTbpnTqw


Aqui vai uma página, com links para uma data de Projectos sobre Fundição feita em casa, para escolherem o que ais vos serve!
É bom.


Backyard Metal Casting and Homemade Forges
blkhawk

For thousands of years, man has worked metals. Although some of the technology to work metals is relatively recent, the initial human drive to create is still with us.

https://www.instructables.com/id/Backyard-Metal-Casting-and-Homemade-Forges/


sexta-feira, 14 de outubro de 2016

Acelerador no Stepper! E Simulação em CAD, Carne Fumada num Apartamento(!), Curso se Carpintaria, Raspberry Pi no Smartphone, e façam um Helicóptero em casa!

Era chato não poder usar os Steppers, ou motores passo-a-passo, para o que queiram, e com aceleração e desaceleração, mas agora...
Já podem!
Sim podem finalmente usar aquele monte de Motores que recuperaram das Impressoras, usando um Arduino...
É bom!


Arduino : How to Control a Stepper Motor With Potentiometer

MertArduino in arduino 
This instructable is the written version of my "Arduino : How To Control a Stepper Motor with Potentiometer" YouTube video that I've uploaded recently. I strongly recommend you to check it out.
First, you should see the following Instructable:
This tutorial is all about tuning the speed of a stepper motor using a potentiometer. The idea is to up or down the speed of a stepper motor using with analog read. Theoretically analog input to a digital output, we're going to use this concept to control the speed of a running stepper motor. 


Isto é fenomenal!
Simular Moldes para Injecção de Pástico, simular mesmo a injecção, Design e Simulação para Metamateriais, Testes de Solidez, etc. uma data de novas coisas boas:


3 new features in CAD software for 3D printing material testing 
One major issue while dealing with digital manufacturing is the ability to test your 3D printed model. Thanks to a better understanding of materials, new features in computer aided design software allow you to improve this process. Here is a list of a few new functionalities in CAD software, based on generative design implementations in molding simulation, structure optimization or mechanical behaviors. Enhance your CAD experience in 2017! 
https://www.sculpteo.com/blog/2016/10/12/3-new-features-in-cad-software-for-3d-printing-material-testing


Para a próxima vez que se sentirem tentados, por preços de Promoção, a comprar mais Carne do que a possam conservar no Frigorífico ou Arca Frigorífica, bom, agora podem...
Mesmo que vivam num Apartamento!
É só facilidades.


Smoking in an apartmentjuniortan in bbq-and-grilling 
I live in a country where 82% of people live in apartments, where the concept of having a backyard or any space to smoke meat is most uncommon. So I set out to try and see if it is possible to do this indoors without involving fire-fighters, hazmat suits or N95 masks. As it turns out, stove-top smoking is not that unusual in many countries, but looking for the necessary equipment here would definitely be challenging. Hence this instructable, and hopefully more foolhardy souls can give it a try too, that smoking meat in relatively confined spaces is not impossible...
This instructable will NOT be covering how to dress or marinade the meat; I use various rubs and mustards myself, here I will focus just on the smoking part. 
http://www.instructables.com/id/Smoking-in-an-Apartment/


Só nesne Mês, é grátis, por isso aproveitem que ainda podem, e aprendam Carpintaria, e sem Ferramentas caras, com este Curso de mikeasauros, da Instructables! 


WOODWORKING CLASSwith mikeasaurus 
Learn the basics of woodworking with simple hands-on projects to build your confidence and skills. Each lesson in this class explores an area of woodworking that will form the building blocks of all future woodworking projects you undertake. Keeping the average DIY'er in mind, this entire class is conducted using basic handheld power tools, with no fancy fixed tools like table saws, lathes, planers, or drill presses.
This class will cover the fundamentals from making straight cuts and perfect holes to mastering the router and making mitres, culminating in a capstone project that will tie these skills together. With easy projects throughout the class, this hands-on approach to learning woodworking is sure to satisfy.
Whether you're new to woodworking or just want to solidify your understanding of the woodworking basics, this class is definitely one you'll love! 
http://www.instructables.com/class/Woodworking-Class/


Podem usar o vosso Tablet como o Écran do vosso Raspberry Pi, eis uma grande ajuda para programarem sem entraves, pois não precisam do Monitor específico para o Raspi:


Use your tablet as Raspberry Pi screen

pinchan in raspberry-pi 
You need a certain type of monitor to use Raspberry Pi. Most of people do not have a monitor specifically for his/her Raspberry Pi. By taking this method, you can make your tablet or smartphone a screen for your Raspberry Pi. This will increase your productivity when you work with Raspberry Pi since you don't have to connect it with a PC screen.
Note that this technique works only when your Raspberry Pi and tablet/smartphone are connected to a same WiFi network.
For the detailed procedure, please refer to my blog


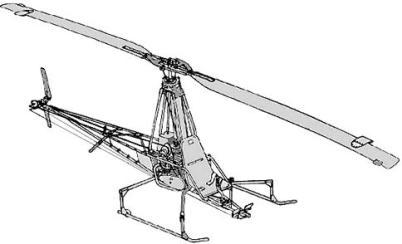
E por último, um Brinde, aqui vai, como fazerem o vosso próprio Helicóptero Ultra-leve, em casa, quer dizer no Quintal ou Garagem...
Visitem primeiro o link que têem aqui, que essa página tem Linksque vão dar à página dos Planos, informa sobre como aprender a voar num Helicóptero e etc.


Ultralight Helicoptersadmin 
All About Ultralight HelicoptersMany have said that ultralight helicopters are the ultimate form of ultralight flight. Fast, nimble, and able to go almost anywhere, lightweight helicopters are also a more economical way to get into flying helis. Plans can be bought very cheaply on the internet. Kits are available for purchase, but typically cost more than building one from scratch from plans. 
http://tinkersource.com/ultralight-helicopters/


sexta-feira, 3 de julho de 2015

Ciclone em 20 Minutos! Mais um Rádio de onda curta com 3 transistores, Steppers com Arduino, e Stepper ainda mais barato!

Este Instructable vai para todos os Engenhocas, Carpinteiros, Modelistas, e o que mais seja, que acumulem pó nas suas Oficinas...
Em 20 Minutos, constroem este Separador Ciclone, que não vos encherá mais os Sacos dos Aspiradores, pelo menos, não tão cedo!
É bom!


Super easy cyclone!

shopbuilt  
 I had a need for a cyclone separator for my CNC because it keeps plugging the filter in my shop vac. I didn't want to spend a bunch time building one so I though I would put one together as simple as I could and checks its efficiency. I think it turned out pretty good for a total of 20 minute work time to build it.
http://www.instructables.com/id/super-easy-cyclone/ 


Para todos os Rádio-Amadores, e Engenhocas da Electrónica, cá vai este Brinde, um Rádio de Onda Curta, que podem construír com 3 Transistores, e pouco mais: 


Three Transistor Short Wave Radio

netzener 

The 60's and 70's were the golden age of electronic kit building. The novice had a great many educational kits to choose from that taught basic skills and electronics theory while assembling a device that could do something useful or entertaining. An advanced builder could use "sweat equity" to inexpensively obtain popular electronic products like HiFi stereo systems, color televisions, CB radios, and automotive test equipment.
Today there are still quite a few electronics kits available for education purposes, but rapidly evolving features and shrinking components ended the consumer electronics kit business. I would have loved to have assembled some of the products that were popular in the 70's, but unfortunately most of the companies that made all those wonderful kits were gone when I began my career.
In honor of a great set of educational Radio Shack electronics project kits available during the 60's and 70's, I've redesigned the original Science Fair brand Three Transistor Shortwave Radio (Catalog #28-110) using modern components still available from electronics component re-sellers in the US. All of the components in the updated kit can be found on Amazon. There were many things Radio Shack did extremely well during its prime. For the nostalgic or the enthusiast who would like to build an updated version of this classic radio I've included schematics, parts information, assembly documentation, and pictures of a completed and tested Three Transistor Short Wave Radio based on the original from 1968.
Visit www.netzener.net for more information! 


Têem um Arduino, e querem usá-lo para ainda mais um fim imprevisto?
Pois podem pô-lo a controlar um Motor Stepper, pode ser um daqueles que sacaram, ao desmontar mais uma Impressora...

Só porque sim! 

MUÁHÁHÁHÁ! 


Controlling a Stepper Motor with an Arduino

Maximous 
This tutorial will show you how to operate a stepper motor that was salvaged from an old printer with an Arduino.
 A stepper motor consists of two main parts, a rotor and a stator. The rotor is the part of the motor that actually spins and provides work. The stator is the stationary part of the motor that houses the rotor. In a stepper motor, the rotor is a permanent magnet. The stator consists of multiple coils that act as electromagnets when an electrical current is passed through them. The electromagnetic coil will cause the rotor to align with it when charged. The rotor is propelled by alternating which coil has a current running through it.
Stepper motors have a number of benefits. They are cheap and easy to use. When there is no current send to the motor, the steppers firmly hold their position. Stepper motors can also rotate without limits and change direction based on the polarity provided. 


...E se não tiverem um Arduino, nem Steppers, então, façam um Controle vocês mesmos, com Motores que fica bem mais barato.
Notem que neste controlador, não podem inverter o sentido de rotação dos motores, mas tudo é tão barato, que bem podem pôr 2 motores, em contra-rotação, funcionando ora um, ora o outro, para isso! 


Motor Controllers for Cheap Robots 2
JayWeeks  
Hello and welcome! For those of you who haven't read any of my I'bles before, and for those of you unfamiliar with my For Cheap Robots series, I'm all about building robots on the cheap using simple materials that you can find around your house! If you've ever wanted to get into robotics, but don't know what you're doing and don't have the money for an expensive robotics kit, you are my kind of people!
Previously in this series, I covered how to make some super cheap wheels for your motors, but those motors can't go anywhere without some power! Problem is, most micro-controllers won't be able to power very many motors all at once, and certainly not any large motors. To solve this, we use a sort of electronic switch called a transistor. This allows the micro-controller to turn on and off the power to the motor very easily! That way the micro-controller still controls the motor, but the power comes from somewhere else!
This was the simplest circuit I could come up with for controlling motors. It won't let you change which direction the motors turn, but it will let you turn your motors on and off, which is enough to do some simple things.