Blog Posts

Mostrar mensagens com a etiqueta raspberry pi. Mostrar todas as mensagens

quarta-feira, 19 de junho de 2019

Soldar peças 3D! E façam o vosso Portátil com uma Raspi, AzureSphere para IoT, gravar METAL com uma gravadora Laser(!)e, e Scan 3D com uma Câmara normal

Isto é importante.
Porque assim, com este acessório manual, podem criar à vontade, sem problemas nem de tamanho, nem de cores diferentes...
Basta SOLDAR as peças, com este método de Plasma Frio.
Impressionante!
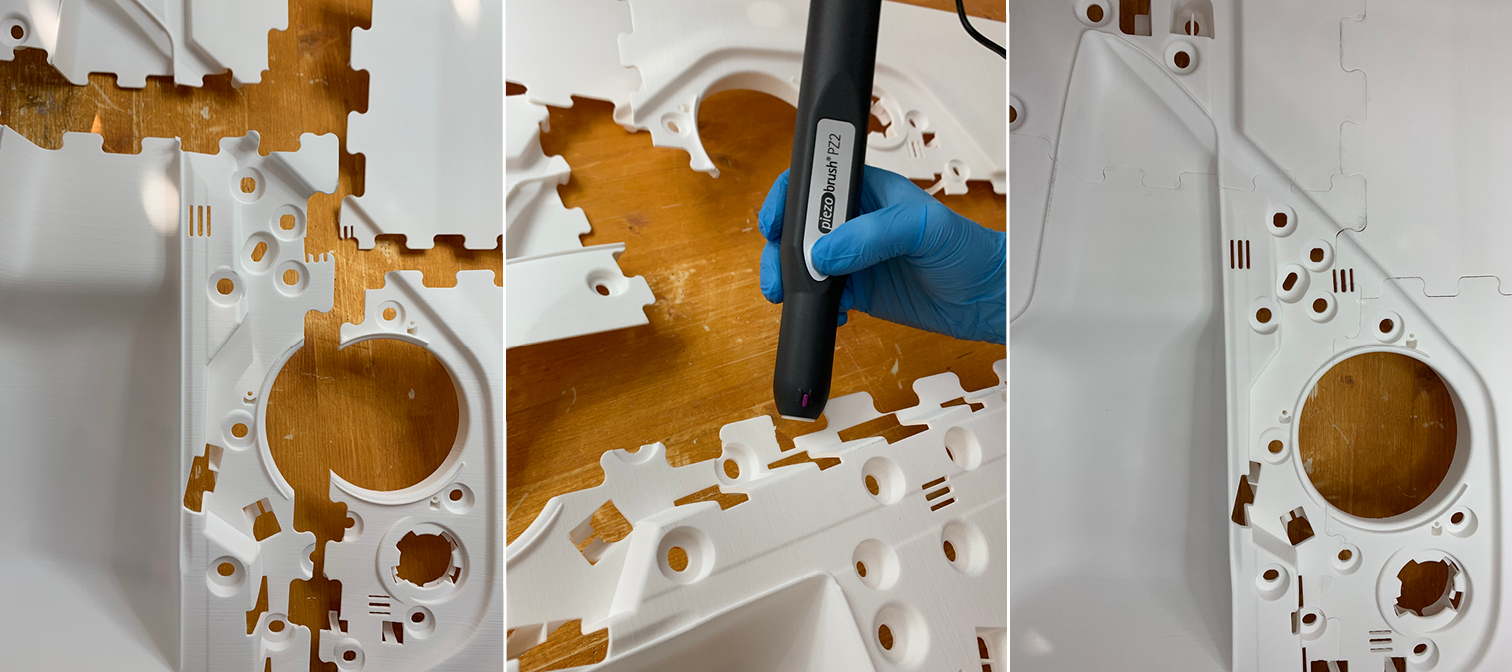


IS PLASMA THE MISSING LINK IN ASSEMBLING 3D PRINTED PARTS?
UMAIR IFTIKHAR

Creabis, a Kirchheim-based 3D printing service bureau, is using Relyon Plasma’s piezobrush PZ2, a handheld cold plasma device, to bond 3D printed parts.
The piezobrush PZ2 uses plasma to activate surface particles of a substance which strengthens the adhesion between joined parts. With a strong bond between assembled 3D printed parts, it is possible to manufacture large-sized sturdy components on small sized 3D printers. 
According to the CEO of Creabis, Ralf Deuke, plasma-aided bonding will lead to more novel applications in 3D printing.


Peguem numa Raspberry PI, e numas coisitas mais, e fazem o vosso próprio Computador Portátil todo manerinho, que cabe num bolso, dobrado! 
É bom!


Make a Portable Computer Using a Raspberry PiTylerJohnson

Have you ever wanted a portable computer you can take with you? This is the easiest way to build your own. For those of you who do not know what a Raspberry Pi is, it is a complete computer about the size of deck of cards that can run many different kinds of Linux. This portable computer will be complete with a screen, keyboard, wifi, and a battery. This is just to show how to make the components work on battery, this indestructible does not have instructions for building a case. There are a lot of interesting ideas for cases and I did want to limit anyone's options. I tried to find the easiest way of making a portable all in one battery powered computer.
For this project you will need to be comfortable doing electrical soldering and desoldering; if you are have not done electrical soldering before, there are many tutorials online.

https://www.instructables.com/id/Make-a-Portable-Computer-Using-a-Raspberry-Pi/


Para essa história do IoT, Internet of Things, podem desenvolver os vosso Porjectos, à brava com este Kit, Azure Sphere por isso, cá segue o Anúncio da coisa, mas atenção, podem até receber o Kit GRÁTIS, se forem, seleccionados...


Azure Sphere

We're partnering with Microsoft and Avnet to test their new, highly secure IoT dev kit, the Azure Sphere MT3620 Starter Kit. We'll be hosting multiple Design Challenges around this kit, as well as a RoadTest, webinars about using it for prototyping, and more, so we'll provide everything you need to get started with this IoT solution!
If selected for the RoadTest, you will receive the kit for free. Follow this group and watch for Design Challenge news.


Sabiam...
Que podem gravar em METAL, até com as minísculas gravadoras Laser que há à venda, por aí?
Podem, MAS com uns truques.
É preciso um tratamento Químico, e este Instructable, foi ver quais os melhores para quais metais, por isso, têem a papinha toda feita!


Laser Engrave Metalbrichtl

Being able to engrave metal was one of the main reasons, why I got a laser cutter.
In this instructable I am going to show you some of my experiences.
Please share your results and experiences in the comments, I would love to learn more about engraving metals.
A word of warning: The process of engraving metal after applying an agent to the surface is patented. So please inform yourself, before doing so commercially.

https://www.instructables.com/id/Laser-Engrave-Metal/


Mais uma forma de fazerem Scan 3D, com uma vulgar Câmara digital, todos os passos, programas e aparelhos necessários:


3D Scanning Yourself in High Resolution With a Camerashuang peng 

In this instructable, I'll share with you how to create a 3d model of yourself with a camera. Then clean up, fix the mesh make them printable models.
Things you'll need:
  • A camera (or a phone with camera function)
  • Autodesk Remake
  • Autodesk Mudbox
  • Geomagic studio (optional)
  • A 3d printer (if you want to print them)
https://www.instructables.com/id/3D-Scanning-Yourself-in-High-Resolution-With-a-Cam/


sábado, 8 de dezembro de 2018

Raspberry Pi 3, A+! E alojar as Impressoras, Mini-satélites(!), Lixar sem Stress, e o PVC sem Mestre

A placa Raspi não pára!
Agora um autêntico Computador, Quad-Coore de 64 bits, e o que mais,  a 1,4 GHz, vão ver à página deste Link as Especificações desta bela máquina!


Raspberry Pi 3 Model A+ Unboxing
e14phil

Introducing the Raspberry Pi 3 Model A+, the latest product in the Raspberry Pi 3 range.
Like the Raspberry Pi 3 Model B+, it boasts a 64-bit quad core processor running at 1.4 GHz, dual-band 2.4 GHz and 5 GHz wireless LAN, and Bluetooth 4.2/BLE.
The dual-band wireless LAN comes with modular compliance certification, allowing the board to be designed into end products with significantly reduced wireless LAN compliance testing, improving both cost and time to market.


...Algumas dicas que não são óbvias, e são mesmo essas as que nos tramam, quando não as sabemos...
Saibam então como fazer uma caixa para as vossas Impressoras 3D, que permita uma temperatura estável, sem abafar a máquina, e mais!
Dicas porreiras.


5 Tips for Building a 3D Printer Enclosure
3D Printing Nerd

While at Printed Solid, I spoke to David Randolph about 3d printer enclosures. They sell a number of enclosures, and even white label their enclosures for other resellers. Knowing I tried to build one myself with Bill Doran, I asked Dave to give me his five best tips for building one!


MINI-SATÉLITES!!!
Muháháhá!
Malta Estudante, e Super-Geeks, aprendam como construír estes bichinos, mas para durarem, que lançá-los, não é pela UPS, ou pelos Correios.
Ainda... LOL
Maravilha.


ArduSat-1 and ArduSat-X launched from the ISS Picture credit: NASA
Build a CubeSat Satellite that actually works, Part 1: Make it Resilient
Bill Marshall

It’s such a great idea: students in schools and colleges inspired to become the next generation of Space engineers by building and orbiting their own satellite. But it’s not a new idea. The first amateur satellite, OSCAR 1 was actually launched in 1961 as a secondary payload - only four years after Sputnik 1. Project OSCAR continued with more launches until 1969 when the Radio Amateur Satellite Corporation (AMSAT) was formed to co-ordinate further activity. The OSCARs are primarily amateur radio communication satellites built by students in educational establishments worldwide. Three were constructed at Surrey University in the UK starting with UoSAT-1 (OSCAR 9) in 1981 then UoSAT-2 (OSCAR 11) in 1984 and UoSAT-3 (OSCAR 14) in 1990. The educational purpose behind these satellites was highlighted when a special purpose radio receiver with software for the BBC Microcomputer became available. In the late 1990’s the CubeSat was born when it was realised that thanks to microelectronics it had become possible to squeeze most of the functionality of an OSCAR satellite into a 10cm cube. Since the first one made it into Low-Earth Orbit (LEO) in 2003, many more have followed. But the failure rate has been high for two reasons: the stresses of launch can ‘break’ the CubeSat before it even reaches orbit, and the Space environment is very hazardous for delicate electronics once orbit is achieved. What can be done to increase the likelihood of success?


Para não ficarem piores da Vista, nem dos Pulmões, não se lixem, ao lixar à máquina, e usem mas é esta Caixa protectora, que a saúde é essencial.
E também é essencial à paz de espírito, uma Garagem limpa, para terem de ouvir a querida Esposa a ralhar à brava...
LOL


Garage Dust/Sanding Enclosure
corbor4shore

INTRODUCTION:
I have a very small shop in my two car garage. Unfortunately I have to share that space with two cars. When I am sanding, routing or drilling, dust seems to coat every surface in my garage, including my wife car. I was tired of washing my wife’s car so I needed to find a solution to all the dust I was creating. I did some research and found some sanding downdraft tables, but I couldn’t imagine those working without an incredibly powerful vacuum (which I do not have), plus they do not contain the dust jettisoned out. I then started looking at bead blasting cabinets and found that I liked the containment aspect of the cabinet but I needed the downdraft capabilities of the sanding tables, so I decided to create a hybrid.

https://www.instructables.com/id/Garage-DustSanding-Enclosure/


Aprendam 5 lições duma assentada, sobre como usar o humilde, mas tão útil, Tubo de PVC para uma data de coisas boas, cortesia da nodda amiga, audreyobscura, que não pára de nos surpreender com a sua creatividade:


PVC CLASS
audreyobscura

Plastic PVC is most commonly used by plumbers and very clever DIY enthusiasts. This material and pipe were designed to transport water, as it cannot wear out over time like rusting metal can. PVC is also structurally very strong. When parts are constructed properly, it can support structures that are hundreds of pounds!
This class aims to go over the material properties of PVC as well as the most common ways it is worked, machined, joined, and finished. You'll be inspired to create furniture, agriculture projects, and more after learning these simple techniques to work with PVC.


quarta-feira, 9 de maio de 2018

Silicone fácil! E AstroBox, um PC Raspi, Visão Nocturna, e Inovação Rolls-Royce


Um Molde em Silicone, do mais acessível que há, e com a Dica imprescindível de que é preciso juntar mais Maizena de cada vez que se vai mexer a massa...
Ah! Se eu soubesse isto antes! 
LOL


A great Video on Silicone Molds.
Note the main Tip, is that you add more Corn Starch each time you mess with the "dough", so to speak. 
Saves a lot of stress...
LOL


DIY Silicone Mold - Easiest and Cheapest Method Ever!! Make a mold for $4.69!!

DIY Silicine Mold! This is the easiest and cheapest method out there! Make your own silicone mold for candle embeds for only $4.69!!! Subscribe and check out other amazing candle tutorial videos!

https://www.youtube.com/watch?v=Za0TBlSOIOw


Se já estão fartos dos controles rudimentares da vossa Impressora 3D, podem usar esta Máquina, que vos vai aumentar em muito as capacidades de Impressão...
Liga-vos a Impressora à Net, à Cloud, e permite ainda mais Apps!


5" Screen - AstroBox Touch DIY Kit

The AstroBox Touch is a simple, powerful touchscreen that is wireless, cloud connected, and infinitely extensible with apps.

The AstroBox Touch at a glance:
 Beautiful 5" touchscreen (800 x 480 pixels)
 Connected to the AstroPrint ecosystem - which includes the AstroPrint Cloud, Developer API, Desktop App(s), and Mobile App(s)
 Runs AstroBox Touch Software. Easy and intuitive to use. Just plug it into your printer and it's ready to go!
 Simple, gorgeous user interface built with simplicity in mind
 Wirelessly control your 3D Printer without needing to use SD Cards
 Developer friendly
 Compatible with all printers running standard Marlin, Repetier, & Sailfish firmware

https://store.astroprint.com/collections/diy-kits-software


Um PC por menos de 150 Dólares, é o que podem fazer com um Raspberry Pi, seguindo este Instructable.
Assim, evitam comprar um PC Desktop, para usos que não o justificam, como controlar gigajogas, ou jogar Jogos...


Pocket Pi - a Raspberry Pi Computer for Under $150
TheInventionMaker

This is a affordable $100 raspberry pi computer. This computer is not the thinnest or prettiest thing on instrutables. This is for getting the job done. The shell is 3D printed. There is 1 charging port, for the motherboard. The keyboard has a wire designated for charging the keyboard and will not be noticeable on the outside. There are 3 USB 2.0 ports are for input. 1 will be used by your bluetooth + wireless USB stick. Luckily, I have included a USB holder that holds your USB's.
The screen is 4.3 inches and is not a touchscreen. You can easily make it touch screen compatible. The raspberry pi is a zero. This is because the Adafruit Kippah currently does not support the zero w. You will still need a wifi network! It runs NOOBS, but you can still download PC games on it. All you have to do is to search on google how to install PC games on NOOBS.
You can use this to check up on things, play games, and use applications that are normally on PCs. It can do a lot of things that phones can do, but the computer is significantly cheaper. The parts are spread across 3 different websites. If you do not have a 3D printer or a soldering iron, you will have to but different parts. This will be explained in the steps. It should take you around 1 hour to build, but with shipping times and how long your 3D printer takes to print the parts, it could be longer.

https://www.instructables.com/id/Pocket-Pi-a-Raspberry-Pi-Computer-for-Under-150/


Podem fazer a vossa própria Câmara de Visão Nocturna, e de Bolso, e por bem menos do que custa uma, no Mercado, com este Instructable:


A Pocket $200 Night Scope, now, that sounds real Neat!


3D Printed Night Vision Scope
Happy_Mad_Scientist

Hey everybody!!! Hows it going?!?!?! Ok, so for a long time (~3 yrs.) I have been building these digital night vision cameras, and after over $1,000 and hundreds of hours in R'n'D later, I give you the "Eagle Scope 1.0" (named after the camera inside)!!!
It's a pocket-sized, 3d printable night vision monocular that you can build yourself for ~$200!!! Oh, and it is top of the line, sporting a near-eye display (that doesn't burn out your eyeball), a .00001 lux camera with an OSD, a rechargeable 3hr battery, and an (optional) external DVR for recording the footage!!! Best of all, it fits in your pocket!!! Over-enthusiastic!!!!!! But seriously, this thing kicks some major buttocks.


Um Motor feito com Ímanes Permanentes, que é um Anel, com a Hélice no meio!
Vejam o Vídeo, para perceberem as vantagens dum tal Sistema, que vale a pena...


Rolls-Royce | Permanent Magnet Technology

The AZ-PM thruster is the latest in a range of Rolls-Royce propulsion products using its permanent magnet technology. This technology is based on electric drive where the motor is in the form of a ring round the propeller. The moving part of the ring is a rim around the propeller blades which carries a series of strong permanent magnets. The rotor, fitted within a series of magnets, turns within an outer ring which form the stator. When current is supplied to the motor from the variable frequency power supply the electromagnets are excited in a particular sequence and the resulting magnetic fields interact with the field from the rotor magnets creating a torque that turns the rotor and its propeller blades.

https://www.youtube.com/watch?v=AZeWPlVoLko


quinta-feira, 29 de março de 2018

Motor drivers! E um Hexápede, um Segway à pata, soldar a partir de Baterias, e Vidro metálico?

Tanto para o Arduino, como para o Raspberry Pi, já têem estes bem acessíveis drivers, da Pololu, para os vossos Robots, e automatismos, e o que mais for, controlando um par de motores, motores esses duma enorme variedade de Motores e Voltagens.
É bom.


New products: Dual MAX14870 Motor Drivers for Arduino and Raspberry Pi
Patrick
For my birthday, I am excited to share two new products to help get your projects moving: dual motor driver boards for Arduino and for Raspberry Pi based on Maxim MAX14870 drivers, which on these boards (without additional cooling) can power motors with a continuous 1.7 A (2.5 A peak) from a voltage source anywhere from 4.5 V to 36 V. This makes the driver ideal for powering a wide range of motors including our high power micro metal gearmotors, and our 12 V 20D mm metal gearmotors. We like the MAX14870 so much that already we make a single driver carrier for it, and we use it on our A-Star 32U4 Robot Controller SV. These new boards make it easy to control two motors using the MAX14870 with an Arduino or Raspberry Pi.
https://www.pololu.com/blog/759/new-products-dual-max14870-motor-drivers-for-arduino-and-raspberry-pi


O termo correcto é mesmo Hexápede, (como em "quadrúpede"), aqui está um Robot de 6 patas, que podem construír, e este, por ser alongado, move-se mais como os Insectos:


Capers II, a Hexapod Robot
Toglefritz

This Instructable will show you how to build your very own hexapod robot, I call the design Capers II.
A hexapod robot is a robot with six legs. Each leg is actuated by three servos: one for forward/backward movement, one for up/down movement, and one to bend the leg in the middle. This gives the robot three degrees of freedom, allowing it to move in any direction.
Some hexapod robots are symmetrically designed, with the six legs equally spaced around a linearly symmetrical body. Capers II, on the other hand, has a slightly elongated body, giving the robot a more natural appearance and the ability to use gaits reminiscent of insects.

https://www.instructables.com/id/Capers-II-a-Hexapod-Robot/


Na brincadeira, na palhaçada, e um pouco fazendo troça dalguma Gadgeteria, cá vai uma Segway à lá Pata, isto é a pedalar, e é para quem quer...
Gandas malucos! 
Impecável.


Steampunk Segway ( Legway )
bdring

A self balancing, human powered, steampunk styled, Segway. All you need is a brave self balancing human. This is the ultimate green vehicle for all you eco conscious steampunkers. Is that an oxymoron? I made this out of mostly found materials. This was my first steampunk styled build. Any good suggestions on making it look better will be incorporated as long as the materials are cheap and easy to find. I have been calling it the Legway in reference to the propulsion method. Yes, I know about those Lego self balancers of the same name.

https://www.instructables.com/id/Steampunk-Segway-Legway-/


Algo que acho bem ùtil, por contraste ao projecto anterior, é esta ideia de ter um Ferro de Soldar que funciona com uma Bateria de Berbequim! 
Façam uma coisa destas.


Power Your Soldering Iron With a Drill Battery!
Chris Ray

Back in June of 2017 I moved out of my parent's house and started renting my own. One of the many things that changed was my workspace. I went from a 12' x 13' room to a 4' desk which meant I had to make some changes. One of the major changes was switching from a soldering / hot air rework station to a TS-100 as my main iron. I ended up falling in love with this little thing but I still didn't have a way to make it mobile. That is where this little circuit comes in. I designed this circuit to fit onto a Dewalt 20v Max battery and provide power to my iron, as well as protect the battery and charge my phone.

https://www.instructables.com/id/Power-Your-Soldering-Iron-With-a-Drill-Battery/


Uma coisa para o Futuro, que com a rapidez com que isto tudo agora se desenvolve, pode ser para a semana que vem, são estas ligas Metálicas amorfas, que não formam Cristais, o que lhes dará uma data de novas propriedades eléctricas e estruturais...


Researchers Reveal Method to 3D Print Metallic Glass Alloys in Bulk
Matthew Mensley

Materials Science and Engineering researchers at North Carolina State University recently detailed their method to produce large amounts of metallic glass alloys using 3D printing. The development could lead to better efficiency in electric motors and tougher materials and structures.
Researchers at the Material Science and Engineering department at North Carolina State University have turned to 3D printing to create a means to produce bulk amounts of metallic glass alloys. Typically produced in small amounts, the material (also known as amorphous metals) is notoriously tricky to produce in any large amount.
Unlike most other metals, metallic glass alloys lack a crystalline structure. With an amorphous structure instead, they boast “exceptionally desirable properties”, says Zyanab Mahbooba, a Ph.D student at the department and first author of the research’s paper.

https://all3dp.com/researchers-reveal-method-to-3d-print-metallic-glass-alloys-in-bulk/


quarta-feira, 10 de janeiro de 2018

Reprap.pt! E um Laptop Steampunk(!), YouMagine & uma peça 3D grátis, Pinterest tem how-tos, e Filamento ASA

Sou um Engenhocas feliz, já posso ir comprar N tipos de Impressoras 3D, filamento e acessórios, a uma LOJA física, não uma Roleta Russa dum Site online, e o que é melhor, uma loja dedicada só a isso mesmo, com malta que sabe o que vende.

É a Reprap.pt, do nosso amigo Pedro Emanuel, no Centro Comercial do Cacém, 2º Piso, loja 2.02, e assim, dá gosto.
Claro, podem sempre ver o que lá está, e encomendar pela Net, Link acima, e eles enviam pelo Correio, mas eu quiz ir lá, mesmo...
E valeu a pena ir ao Cacém num dia de chuva.


O homem da Idéia:
3D é que é...

reprap.pt - Quem Somos?
 

Esta página foi inaugurada por Pedro Emanuel - atualmente docente de multimédia e administrador da projetos3d.
Após uma visita à 3D Print Show 2014 no Reino Unido constatei que a maioria das impressoras 3D comerciais não são muito diferentes da que Adrian Bowyer inventou. A maioria funciona com o mesmo sitema de "Fused Filament Fabrication" (FFF).
Ao perceber isto decidi estudar o processo e montar uma impressora de raíz por mim próprio.
A criação desta página advém de uma série de dificuldades que tive de ultrapassar para encontrar algumas peças necessárias para montar a impressora 3D em Portugal.
Após uma série de estudos, decidi partilhá-los via web e foi desta forma que esta página surgiu- para todos aqueles que pretendam montar uma impressora 3D em português!
Neste site além de expor o processo de montagem também disponibilizo as peças necessárias tendo o valor das mesmas, a finalidade de ajudar no melhoramento deste projeto em Portugal. Pode também participar neste melhoramento submetendo as suas sugestões de melhoramento da página para o mail@reprap.pt


https://reprap.pt/


Fazer um Laptop dum Raspberry Pi é bom.
E fazê-lo Strampunk, é òptimo!
Eis aqui está como opodem fazer:


Steampunk Raspberry Pi Laptop
phrazelle

This was a really fun project. I wanted to make a unique backup computer for my girlfriend's birthday and decided to run with a Raspberry Pi-based system because her main needs are internet and word processing. I've seen a lot of variations on Pi laptops, but I wanted to make something unique. Steampunk seemed the way to go and I'm glad I chose that direction!

https://www.instructables.com/id/Steampunk-Raspberry-Pi-Laptop/


Cá vai algo grátis deste vosso amigo, eu, uma peça 3D que podem descarregar, deste Bacano Site, Youmagine, onde podem pôr também as vossas criações:


É baseado nesta peça que une um tubo de alumínio a uma vatera do mesmo material, vem duma dessas armações para secar roupa, mas fácilmente pode ser usado para as vossas armações, e engenhocas, em vários tamanhos:


 É só descarregar do Link embaixo:

Tube end connector
edgarinventor
 
Attribution
Junked stuff as in the photo, gave me the idea

A 3D part to connect tubes and rods or bolts, to make assemblages with cheap tubing, saving a lot of 3D printing.

https://www.youmagine.com/designs/tube-end-connector


No Pinterest, também há How-tos!
À maneira do Pinteres, uma série de imagens que rolam para baixo, mas dá para ver bem como se faz...
Por exemplo, vão ao Link deste impecável Rocket Stove:


Rocket Stove

https://www.pinterest.pt/pin/133067363973584129/


Este novo, ou antes, pouco conhecido Filamento, o ASA, é mais ou menos como o ABS...
Mas sobrevive melhor às condições do meio ambiente, ou seja, não amarelece tão depressa ao Sol.
Mas tem truques, e o Matterhackers explica-o, a seguir.


How To Succeed When 3D Printing With ASA Filament
Alec Richter

For most people, ASA filament is relatively unheard of within the 3D printing community. While is may not be too common, it’s an excellent material when you need to 3D print something that’s intended for outdoor use, like a planter, garden gnome, or for any random outdoor fixture. ASA is very similar to ABS filament, and prints about the same too, but what it holds over ABS is that white ASA takes a lot longer to start yellowing in the sun or to start deteriorating and losing its strength. If you’ve never printed with ABS or ASA before, there’s a couple tips and tricks you want to know before you get started, and with this guide, you’ll be printing with ASA 3d printing filament in no time.

https://www.matterhackers.com/articles/how-to-succeed-when-3d-printing-with-asa-filament