Blog Posts

Mostrar mensagens com a etiqueta multi-máquina. Mostrar todas as mensagens

quinta-feira, 16 de maio de 2019

3 em 1 diferente! E magnetizar e desmagnetizar, soldar PLA, Carvão dum Rocket Stove, desenhar e passar à fresa, e Mosaicos automáticos!

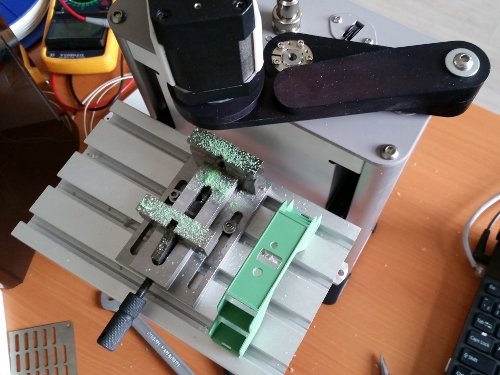
Aqui está uma máquina bem intrigante, com um mecanismo diferente, que eles dizem ser mais rápido e seguro, e parece mesmo ser assim...

E ainda vem com 3 meios de ser usada;

  • Como Impressora 3D
  • Como gravadora de Alumínio
  • Como fresa de plástico
É bom!


3D printer SkyOne 
3dlaboratorio 
Industrial 3D printer SkyOne is meant for printing by up-to-date plastics with melting temperature up to 260 °С. Fused deposition modeling technology (layer-by-layer formation of an object from as fused plastic) is behind a concept of its operation. The printer is realized according a coupled design SCARA (Selective Compliance Assembly Robot Arm), two motors control levers, which move an extruder in XY plane. Feeding along the Z axis is realized by a ballscrew transmission. Scheme SCARA provides an advantage in printing speed over printers, which use Cartesian ordinates. But at the same time the software for 3D printer SkyOne is much more complicated than for printers constructed according a standard design. 
https://3dlaboratorio.es/eng/3d-printers.htm


Às vezes, é mesmo útil ter uma ferramenta ou um parafuso magnetizados...
Outras vezes, é bem chato, só atrapalha!

Pois aqui aprendem como tanto magnetizar, como a fazer o contrário, desmagnetizar, e é um instructable bem porreiro:


Tool Demagnetizer and Magnetizer
tonyfoale 
Tools sometimes get magnetised, this can be both useful and undesirable depending on the type of tool and the actual job that you want to use it for. For example there are times when having a magnetised screw driver is helpful to hold a screw when you need to put it in an awkward place but unless you want to do that it can be a disadvantage because it will attract any ferrous swarf, nails and screws nearby. Drill bits are a tools which you would not want to ever be magnetised, it will get covered in chips when drilling ferrous material.
That said, we can see that a means to magnetise and demagnetise tools and other objects like vernier calipers would be a useful workshop addition. To magnetise a tool we only need subject it to a strong uni-directional magnetic field and to demagnetise we subject the object to an alternating magnetic field.

https://www.instructables.com/id/Tool-Demagnetizer-and-Magnetizer/


Para montarem as vossas Engenhocas em secções separadas, e juntá-las, sem cola, ou também para repararem uma Impressão com falhas, podem usar este belo deste método, a soldagem por Fricção!
Algo, portanto, que vos vai poupar a muita re-impressão maçuda...
E parmite ainda uma Engenhoca em várias partes! 
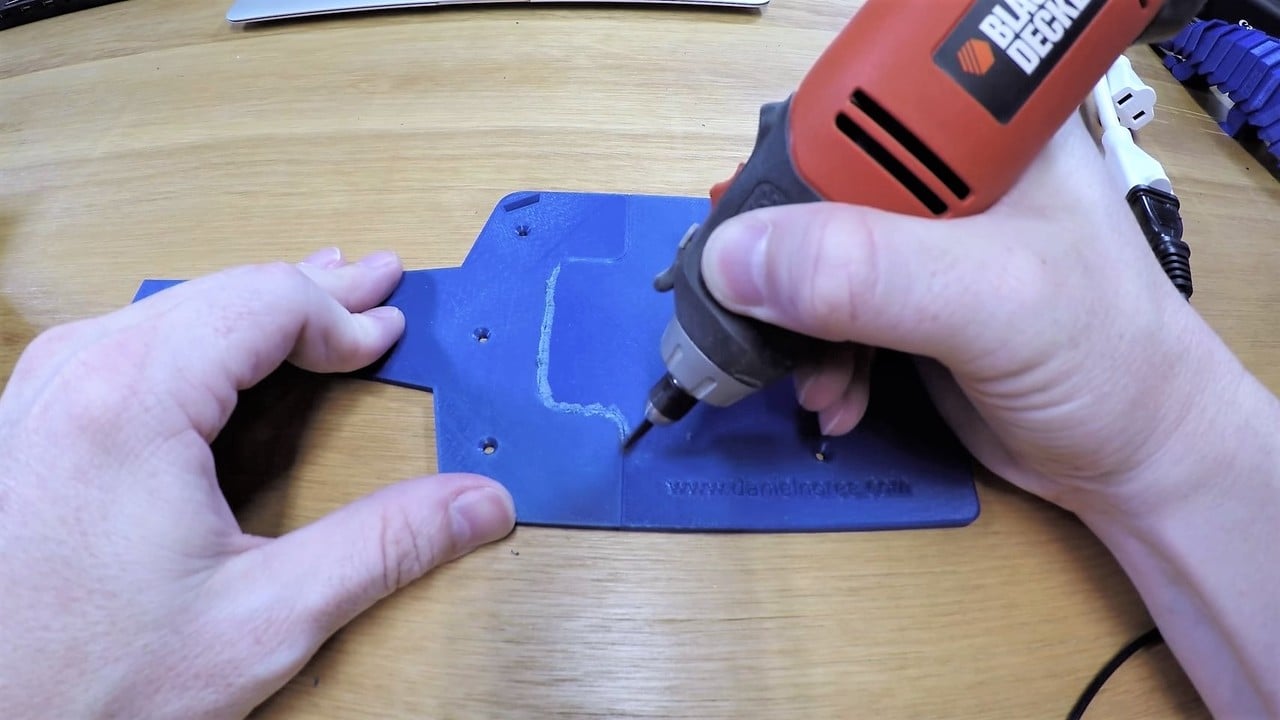


PLA Welding – How to Fuse PLA Seams and Cracks

Tian Ooi  
PLA welding is a way to fill in gaps or “glue” 3D prints together.
Using a power drill with a small piece of PLA filament instead of a drill bit, the rotating filament is pushed against the 3D printed plastic. This generates friction, which heats up the filament and softens it. The filament is then free to fill in a crack or weld plastic together. After cooling, this creates a strong bond, as if it had been part of the piece all along. 
Inspired by friction welding, a welding technique typically used to fuse metals, PLA welding applies the concept of utilizing rotational friction to plastics instead. Friction welding is often used in industry to join dissimilar materials at more stable temperatures than other welding methods. Applications include the aerospace and automotive sector, joining together turbine shafts, car frames, and more. 


Algo de bem ùtil, fabricarem o vosso próprio Carvão, a partir do super-económico Rocket Stove, que aproveita TUDO duma Combustão, o Comcustível, os Gases, as partículas, tudo!


Charcoal RetortKuzmanic
I have had a couple of attempts making charcoal using 44 gallon drums and they have worked okay, but needing a new project after buying a mig welder, I decided to make a retort.
The theory of a retort is that you heat the wood to be made into charcoal up to a point where it starts expelling all of the wood gas and impurities, which is then fed back into the fire to keep the process going.
After reading up and watching a number of videos on rocket stoves and retorts, I decided to make one with the idea of combining the two into one rocket stove powered charcoal retort.
https://www.instructables.com/id/Charcoal-Retort/


Se já têem o Fusion 360, podem idealizar algo, e passar à Fresa CNC, porque o programa tem essa funcionalidade, e aqui está como lá chegar, com um exemplo simpes:


Creating a Simple 3D Model on Fusion 360 and Creating a Toolpath MYDIYCNC 
Tory MYDIYCNC 
Hello there,
Tory at MyDIYCNC here. Today I want to show you how to use a very useful piece of software from Autodesk called: Fusion 360. With this software you can create simple 3D Models, to elaborate and complex 3D models.
What I hope to teach you today is how to create a simple model on Fusion 360, and then create a tool path in which you can then run the G Code on your MyDIYCNC machine or another CNC machine.
Let's get started! 
https://www.instructables.com/id/Creating-A-Simple-3D-Model-on-Fusion-360-and-Creat/


Para algo como desenhos repetivivos, cá está como fabricarem as vossas texturas ou mesmo Mosaicos, Grades, etc a partir duma App na Net:
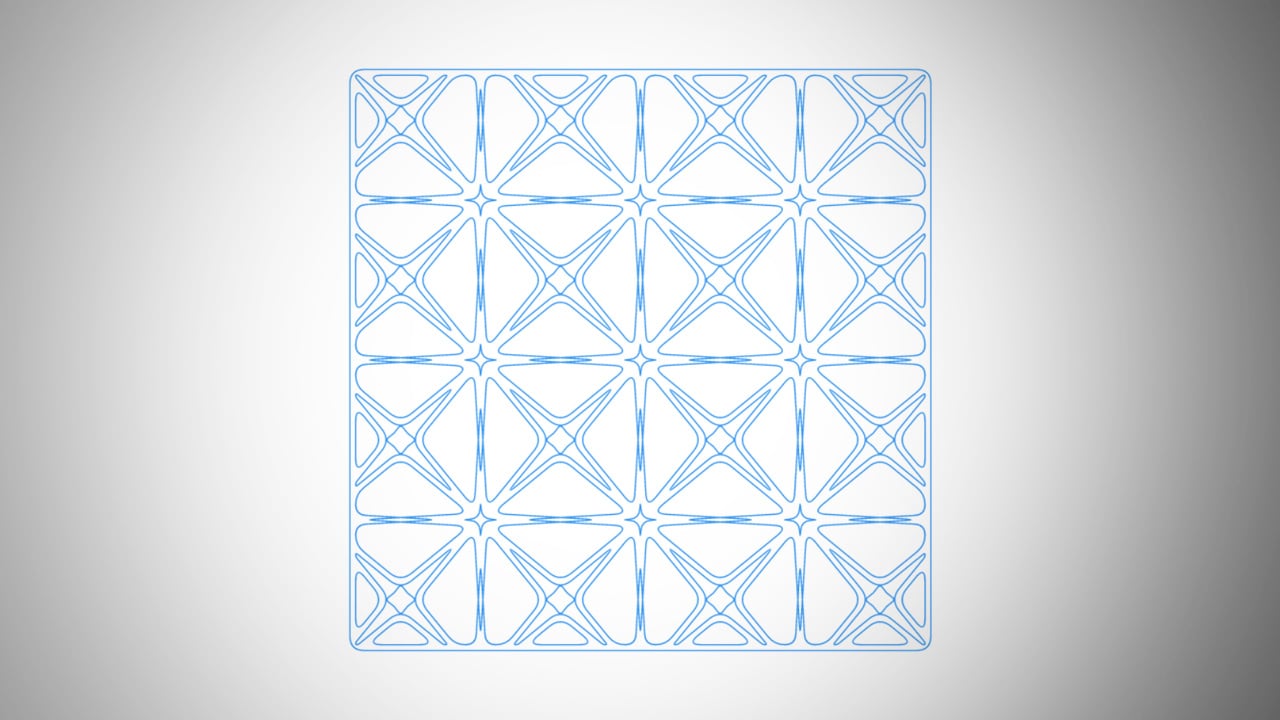


[STUFF] Polygonia Design Suite
All3DP  
Offering possibly the simplest way to sketch repeating geometric patterns, this browser-based web app is a surefire resource for intricate 2D designs.
We’re not ones for lattice room dividers, but after spending some time toying around with Polygonia Design Suite, it’s just a matter of time before the All3DP office is a maze of fancy laser cut obstacles. A browser-based vector drawing tool for quickly creating geometric patterns, Polygonia is the result of a visit to the Smithsonian and a smattering of high school math and software engineering by its creator, David Kaufman.
Through the simple UI of an online design app, you can sketch out simple line inputs which get instantly translated into rad looking tiled designs. Multiple parameters allow you to customize the design to suit your project and a variety of output formats including SVG and PNG give flexibility for further design software you use after. 


quinta-feira, 8 de junho de 2017

Faz-tudo CNC! One for all CNC! Aroundinspire, inspiração nacional, 3D scan da Câmara, Modelshop, e medir Campos Magnéticos


Yup, you'll have English intros to these posts, now
Hope you'll like it...


Tudo o que for CNC, é o que esta magnífica Iniciativa e Engenhoca nos oferece:
Corte e/ou Gravação Laser, fresa, Impressão 3D, plasma, etc. 
E por ser baseada num Braço Robótico, ainda por cima, pode ser a base para a vossa própria Fábrica Automatizada...
E como é tudo Open Source, podem fazer e vender umas tantas!


Anything CNC, that's about what this Gizmo can do...
Primarily a Robot Arm, so it can stack stuff and what not, the innovation is that it also can be fitted with a 3D Print head, a Laser Engraver and/or Cutter,  for Milling,  Plasma, etc...
And, it's Open Source, so YOU can build and sell one!
Or plenty of'em, and make your own automated Factory.

Neat.


Evezor is a go-to tool for all your building needs

Cabe Atwell  
Evezor is an open sources robotic arm that can cut, etch, engrave, 3D print, and carry out various tasks for your project needs. This robotic arm can help take your product from the prototype phase to the final stages (Images&Video via Evezor)
Sometimes you have an idea for an invention or product, but don’t know where to begin getting it off the ground. Andrew Wingate has been there and wants to help fellow creators with his latest project, Evezor. Evezor is a new tool that aims to simplify the building process. The tool is an open sourced robotic arm manufacturing platform with the ability to pour, pick, cut, weld, engrave, grab and do other tasks you need to get to your end goal.
The robotic arm is powered by Raspberry Pi and boasts some impressive internal hardware with a 64-bit ARM Quad Core Processor and 1 GB of RAM. It’s also equipped with four USB ports, an HDMI outlet, Wifi and Bluetooth low energy connectivity. It even has a 7-inch multitouch screen and a wide-angle camera along with a toolhead to support a macro camera. Thanks to its open source hardware, the arm has the capability to share and automate hand tools you already own. You can even make your own toolheads to use with the machine. 


 Mais uma vez en destaque esteve esta ideia genuínamente Lusitana, obra de João Guerreiro, da Aroundinspire, permite-vos ter àgua quente a sair da torneira, só quando está MESMO quente, e isto, sem obras em casa..
Está à procura de Distríbuidores por todo o Mundo:


 Having your hot water faucets pouring only when the hot water is really hot, without any plumbing work needed, that's what João Guerreiro, of Aroundinspire, offers you, and he's now searching for Distributors worldwide:


Email:  aroundinspire10@gmail.com


Muita gente quer usar as suas Impressoras 3D para a primeira coisa de que eles se lembram, um Retrato 3D! 
E é o que se faz aqui, e com uma Câmara, por isso, aprendam:


A lot of folks wants to use their 3D Printers, for the first thing that comes to their mind, a 3D Portrait!
And that's what is done, and with a Camera, so learn:


3D Scanning Yourself in High Resolution With a Camera

shuang peng 
In this instructable, I'll share with you how to create a 3d model of yourself with a camera. Then clean up, fix the mesh make them printable models.
Things you'll need:
A camera (or a phone with camera function)
Autodesk Remake
Autodesk Mudbox
Geomagic studio (optional)
A 3d printer (if you want to print them)

https://www.instructables.com/id/3D-Scanning-Yourself-in-High-Resolution-With-a-Cam/


Podem fazer valer a vossa veia poética, ou demonstrar Mecanismos, como neste excelente Site, Modelshop, se os fizerem em Papel, o que não é tão difícil quanto possa parecer...

Basta fazerem o Download deste App: http://dxf2papercraft.sourceforge.net/, que vos forneçe planos para o corte e colagem em papel, a partir dum Objecto 3D, no formato DXF.

Por isso, contactem este Site, ou façam a vossa própria loja online!


A good idea and an Excellent Site, Modelshop, Models and Gizmos in Papercraft, and making those is not as hard as it seems...
Just download this App: http://dxf2papercraft.sourceforge.net/, that will cough up Papercraft Plans, from a 3D Object in the DXF format.


The Pioneer of DIY Creative Models – Modelshop 
Paper automata are not just toys. They are works of art and demonstrations of science. A lot of thought goes into the design of every model. Each is marvelous on its own, and shines even more brightly as part of a collection.
All Modelshop automata are constructed from paper rather than plastic. Paper is lightweight, strong, easy to work with and environmentally friendly.
From Famous Ships and Cruises to Taiwan Vintage Model Houses and European Automata Art Masters Collections, all Modelshop collections recall poignant moments in history. They are equally appealing to adults and children.
Pull the levers, turn the crank and watch with delight as the model springs into life.


Um Engenhocas vai sempre ter de medir a força dos seus Ímanes e Electro-Ímanes, por isso, saibam como o podem fazer com precisão:


Gizmo Makers will all eventually get to need to measure Magnetic Fields, of their static and electro-mangetic Magnets, so learn how to do that accurately:


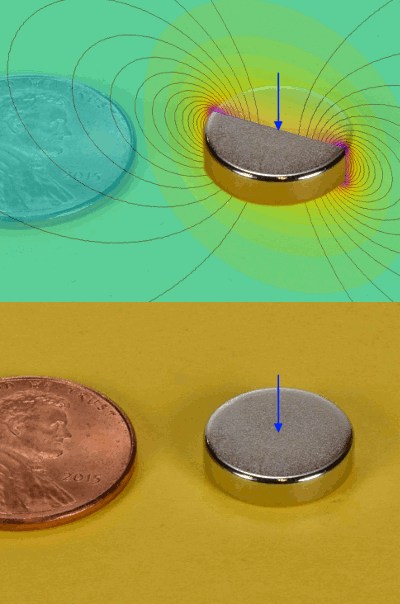
Measuring Magnets 
We like to use this blog to answer common magnetic questions in a bit more detail.  Here we can provide a fuller explanation than might be possible in an email or brief conversation.  It’s also nice to share this kind of stuff online so people can find it for themselves while searching!
In this installment, we’re going to focus on questions about measuring the field strength of a magnet.  Perhaps the most common question is:
I’m measuring the Surface Field of a specific magnet with magnetometer, and I’m measuring less than the specified Surface Field.  Why are my readings low?  Is something wrong with the magnet?
Let's dig down into the details and see how these measurements can be useful.  We'll also learn about what their limitations and pitfalls might be. 


quinta-feira, 11 de junho de 2015

Máquina-Maravilha! E façam uma Lixadora de Cinta, Ebooks sobre 3D, mais um Misturador acessível.

Rida Banaki partilhou um Vídeo que figura em Hergunyeni.com, e ficamos agradecidos a ambos, porque esta Engenhoca é FENOMENAL! 
Não será preciso enunciar as vantagens duma multi-mãquina que se leva numa mão, para todo o Engenhoca com pouco espaço ou pouco tempo, ou para o Modelista que leva tudo para onde possa testar os Modelos, e ainda menos para os Inventores, que tẽem de expôr as suas Invenções em Exposições onde falta sempre alguma coisa por fazer, ou precisam de consertar algo à última hora...
Boa ideia! 


POWER8® Workstarion
The world´s first cordless workstation. Ideal for professional tradesmen and DIY enthusiasts, the set includes a stainless steel armoured case which when combined with the four 18-volt cordless tools transforms them into their powerful benchtop equivalents..


Uma Lixadora de Cinta que fazem em casa, é o que podem fazer, se seguirem as ideias bastante fáceis de implementar expostas neste Vídeo de Marcos del Aguila, que tem o detalhe de poderem lixar à volta duma roda, ou a direiro, e muitas outros detalhes a notar:


Homemade 2x72 belt grinderMarcos del Aguila
My name is Marcos. I made this from and old bumper, some scrap metal and a treadmill I bought for $50. Check it out.
https://www.youtube.com/watch?v=BKsqyPbo0Lg


Podem ter à vossa disposição todos os E-Livros seobre Impressão 3D, nesta página, e olhem que vale a pena, para não perderem tempo a aprender o que já lá vem, e sobretudo, não perderem a paciencia com Impressões falhadas...


All the Sculpteo eBooks in One Place 
Sculpteo not only provides one of the most elite 3D printing services on the market today, we also have a wide berth of expertise that we love to share. So if you’re looking for some light reading on the 3D happenings of the day check out our eBook Collection!
To date Sculpteo has released four eBooks (listed below), this article will give you a quick summary of each – but for the complete thing go ahead and click on it directly!
  • 3D Printing vs Injection Molding
  • Top 20 3D Printing Stories of 2014
  • Design Guidelines for 3D Printing
  • Fix your Files for 3D Printing


Vai ser preciso, um dia, melhorar o acabamento das vossas Impressões 3D, ou então,  pulverizar ou misturar algo, por exemplo, Bentonite, para Fundição em Areia, ou Ferrugem e Alumínio para Thermite, (MUAÁHÁHÁ, grandes pedaços de Sucata convenientemente cortados, e em segundos!).
Para isso, não gastam quase nada, se seguirem este simpático Instructable: 


Affordable Rock Tumbler
onkelgeorg 
 
This is my affordable rock tumbler designed to tumble 3D printed parts, printed with ColorFabbs metal filled filaments (BronzeFill, BrassFill, CopperFill). It is also possible to add a 'golden' shine to regular PLA when the parts are tumbled with brass screws. It should be possible to build this tumbler for less than € 40.- which makes it much more affordable than 'professional' tumblers that can do nothing better than this one ;-)
With the 110mm drum it turns with approx. 22rpm - feel free to adjust the speed with different gear wheels (see note below).
You can go with a drum of your choice (i.e. old tins, etc.) but I found that PVC pipe couplings that are sold in hardware stores are perfect and cheap. This tumbler is designed to run with either diameter of coupling like 110mm, 125mm or 160mm (latter not tested yet). The 110mm drum is large enough for most of my parts and should be the starting point for your first try. For those who like a rubberized drum it is a good idea to print the inset for the drum with flexible filament. 


sexta-feira, 15 de outubro de 2010

MIT, é muito bom!

MIT, é muito bom!
Vejam só esta página, para quem quer  aprender a mexer num Engenho...

E tem secções para toda a Oficina, Torno, trabalhar Chapa , etc.

O texto está cheio de Links com Vídeos explicativos, é só carregar, e ver!

Por exemplo o Link Hand feed vai-vos mostrar isto:

Não há que falhar.


Vão lá ter, e atenção ao Índice, à esquerda:
http://electron.mit.edu/~gsteele/mirrors/www.nmis.org/EducationTraining/machineshop/lathe/intro.html

sexta-feira, 11 de junho de 2010

Lego voador, ou O ENXAME...

Individualmente voam mal, mas juntam-se para voarem melhor, e poderão juntar-se quantos necessários para uma determinada tarefa:


The mini flying robot drones that join forces before takeoff - all without human help

By Niall Firth
Last updated at 1:49 AM on 10th June 2010
It conjures up a rather frightening vision of a future where intelligent robots work in packs without the need for human intervention.

But scientists are developing robots which can 'dock' with each other and fly together in a swarm.

Using infrared beams the drones are able to find each others' location and connect with one another using magnets, completely autonomously.
The individual vehicles - or quadrocopters - have fixed propellers that can lift them into the air, but the resulting flight is erratic and uncontrolled.
But once they are joined together these relatively simple little robots evolve into a sophisticated multi-propeller system capable of coordinated flight.
Each helicopter unit has its own motor, computer, and sensors.
As well as a mini-propellor duct system for flying they also have little wheels underneath to let them crawl around the ground and find each other.


http://www.dailymail.co.uk/sciencetech/article-1285197/The-mini-flying-drones-join-takeoff--human-intervention.html


Faz lembrar a história de "A nave Invencível", de Stanislav Lem, livro nº 264 da Colecção Argonauta...

segunda-feira, 7 de junho de 2010

Intrigante! Um Server em casa?

Parece ser a solução para Individuais e Micro e Pequenas Empresas, um Server em casa, para o vosso Blog ou Site.... É BOM!

Cinco em um... só não faz café

O Memup Q-One quer ser uma solução completa de armazenamento com muitos extras 
Um gadget multifacetado 
A Memup chama-lhe “cinco em um”. Trata-se de um disco rígido externo (neste caso, de 1TB), um servidor Web para alojar o seu site ou blogue, um servidor FTP para partilhar os ficheiros com os seus amigos, um servidor de impressão para ligar a sua impressora à rede doméstica e um router de banda larga.
Em cada uma das suas funções, funciona bem.
Ainda assim, destaque para as quatro portas gigabit do router (muito embora seja G, e não N) e para as funções de servidor de impressão. Além disso, permite ligar outros discos rígidos externos para aumentar a capacidade de armazenamento, e para o suporte para sistemas de partilha de ficheiros como o BitTorrent.
O leitor pode deixar o Q-One ligado (e desligar o PC) a fazer download e não se preocupar com nada. Além disso, conta com uma aplicação para criar a sua homepage. O utilizador pode ainda recorrer à aplicação de Galeria de Fotos para arquivar e partilhar na rede doméstica as fotografias da sua família e amigos. Por 249 euros www.memup.pt
(powered by PCGUIA)


Tirado do Metro de hoje, vão lá:

sexta-feira, 12 de março de 2010

Mais Instructables!

Um Rato que foge!
http://www.instructables.com/id/Crazy-Mouse/

Uma Scratch Table feita de Material Reciclado:
http://www.instructables.com/id/DIY-DJ-Turntable-from-old-Computer-Parts/

Uma cama para o gato, com a carcaça dum Monitor, hé, hé!
http://www.instructables.com/id/Make-a-Cat-Bed-from-a-Computer-Monitor/

Atenção, agora:

Este Cortador CNC de Acrílico Laser, é já de si, muito bom, mas do lado direito deste Instructables podem ter acesso a toda uma série de outros Cortadores/fresas/Tornos CNC, portanto, dêem uma olhada:

http://www.instructables.com/id/Laser-cutter-start-slicing-stuff-for-under-50-dol/

Mais um CNC, em 3D, para Espumas de Poliuretano, Esferovite, ou Roofmate, provávelmente também Balsa e Alumínio:


http://www.instructables.com/id/3-Axis-CNC-Router---60x60x5---JunkBot/


.