Blog Posts

Mostrar mensagens com a etiqueta carvão. Mostrar todas as mensagens

quinta-feira, 16 de maio de 2019

3 em 1 diferente! E magnetizar e desmagnetizar, soldar PLA, Carvão dum Rocket Stove, desenhar e passar à fresa, e Mosaicos automáticos!

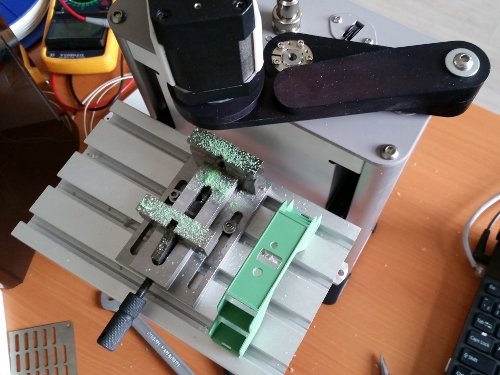
Aqui está uma máquina bem intrigante, com um mecanismo diferente, que eles dizem ser mais rápido e seguro, e parece mesmo ser assim...

E ainda vem com 3 meios de ser usada;

  • Como Impressora 3D
  • Como gravadora de Alumínio
  • Como fresa de plástico
É bom!


3D printer SkyOne 
3dlaboratorio 
Industrial 3D printer SkyOne is meant for printing by up-to-date plastics with melting temperature up to 260 °С. Fused deposition modeling technology (layer-by-layer formation of an object from as fused plastic) is behind a concept of its operation. The printer is realized according a coupled design SCARA (Selective Compliance Assembly Robot Arm), two motors control levers, which move an extruder in XY plane. Feeding along the Z axis is realized by a ballscrew transmission. Scheme SCARA provides an advantage in printing speed over printers, which use Cartesian ordinates. But at the same time the software for 3D printer SkyOne is much more complicated than for printers constructed according a standard design. 
https://3dlaboratorio.es/eng/3d-printers.htm


Às vezes, é mesmo útil ter uma ferramenta ou um parafuso magnetizados...
Outras vezes, é bem chato, só atrapalha!

Pois aqui aprendem como tanto magnetizar, como a fazer o contrário, desmagnetizar, e é um instructable bem porreiro:


Tool Demagnetizer and Magnetizer
tonyfoale 
Tools sometimes get magnetised, this can be both useful and undesirable depending on the type of tool and the actual job that you want to use it for. For example there are times when having a magnetised screw driver is helpful to hold a screw when you need to put it in an awkward place but unless you want to do that it can be a disadvantage because it will attract any ferrous swarf, nails and screws nearby. Drill bits are a tools which you would not want to ever be magnetised, it will get covered in chips when drilling ferrous material.
That said, we can see that a means to magnetise and demagnetise tools and other objects like vernier calipers would be a useful workshop addition. To magnetise a tool we only need subject it to a strong uni-directional magnetic field and to demagnetise we subject the object to an alternating magnetic field.

https://www.instructables.com/id/Tool-Demagnetizer-and-Magnetizer/


Para montarem as vossas Engenhocas em secções separadas, e juntá-las, sem cola, ou também para repararem uma Impressão com falhas, podem usar este belo deste método, a soldagem por Fricção!
Algo, portanto, que vos vai poupar a muita re-impressão maçuda...
E parmite ainda uma Engenhoca em várias partes! 
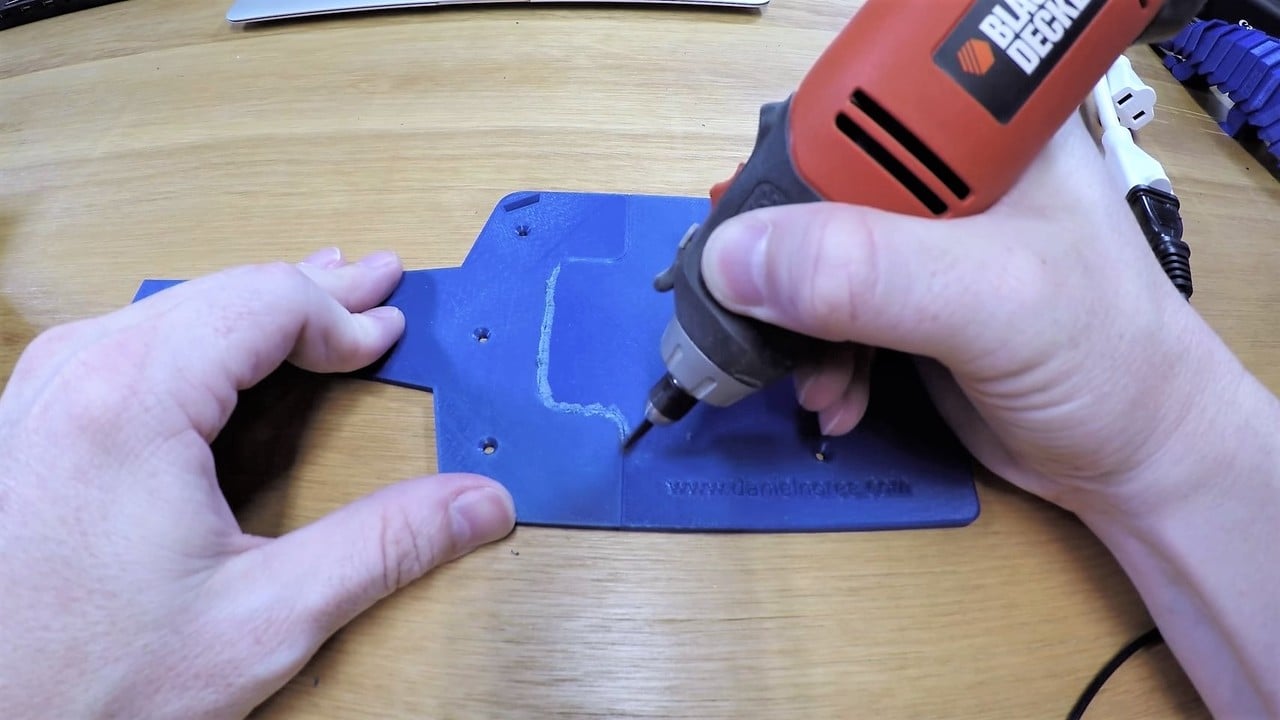


PLA Welding – How to Fuse PLA Seams and Cracks

Tian Ooi  
PLA welding is a way to fill in gaps or “glue” 3D prints together.
Using a power drill with a small piece of PLA filament instead of a drill bit, the rotating filament is pushed against the 3D printed plastic. This generates friction, which heats up the filament and softens it. The filament is then free to fill in a crack or weld plastic together. After cooling, this creates a strong bond, as if it had been part of the piece all along. 
Inspired by friction welding, a welding technique typically used to fuse metals, PLA welding applies the concept of utilizing rotational friction to plastics instead. Friction welding is often used in industry to join dissimilar materials at more stable temperatures than other welding methods. Applications include the aerospace and automotive sector, joining together turbine shafts, car frames, and more. 


Algo de bem ùtil, fabricarem o vosso próprio Carvão, a partir do super-económico Rocket Stove, que aproveita TUDO duma Combustão, o Comcustível, os Gases, as partículas, tudo!


Charcoal RetortKuzmanic
I have had a couple of attempts making charcoal using 44 gallon drums and they have worked okay, but needing a new project after buying a mig welder, I decided to make a retort.
The theory of a retort is that you heat the wood to be made into charcoal up to a point where it starts expelling all of the wood gas and impurities, which is then fed back into the fire to keep the process going.
After reading up and watching a number of videos on rocket stoves and retorts, I decided to make one with the idea of combining the two into one rocket stove powered charcoal retort.
https://www.instructables.com/id/Charcoal-Retort/


Se já têem o Fusion 360, podem idealizar algo, e passar à Fresa CNC, porque o programa tem essa funcionalidade, e aqui está como lá chegar, com um exemplo simpes:


Creating a Simple 3D Model on Fusion 360 and Creating a Toolpath MYDIYCNC 
Tory MYDIYCNC 
Hello there,
Tory at MyDIYCNC here. Today I want to show you how to use a very useful piece of software from Autodesk called: Fusion 360. With this software you can create simple 3D Models, to elaborate and complex 3D models.
What I hope to teach you today is how to create a simple model on Fusion 360, and then create a tool path in which you can then run the G Code on your MyDIYCNC machine or another CNC machine.
Let's get started! 
https://www.instructables.com/id/Creating-A-Simple-3D-Model-on-Fusion-360-and-Creat/


Para algo como desenhos repetivivos, cá está como fabricarem as vossas texturas ou mesmo Mosaicos, Grades, etc a partir duma App na Net:
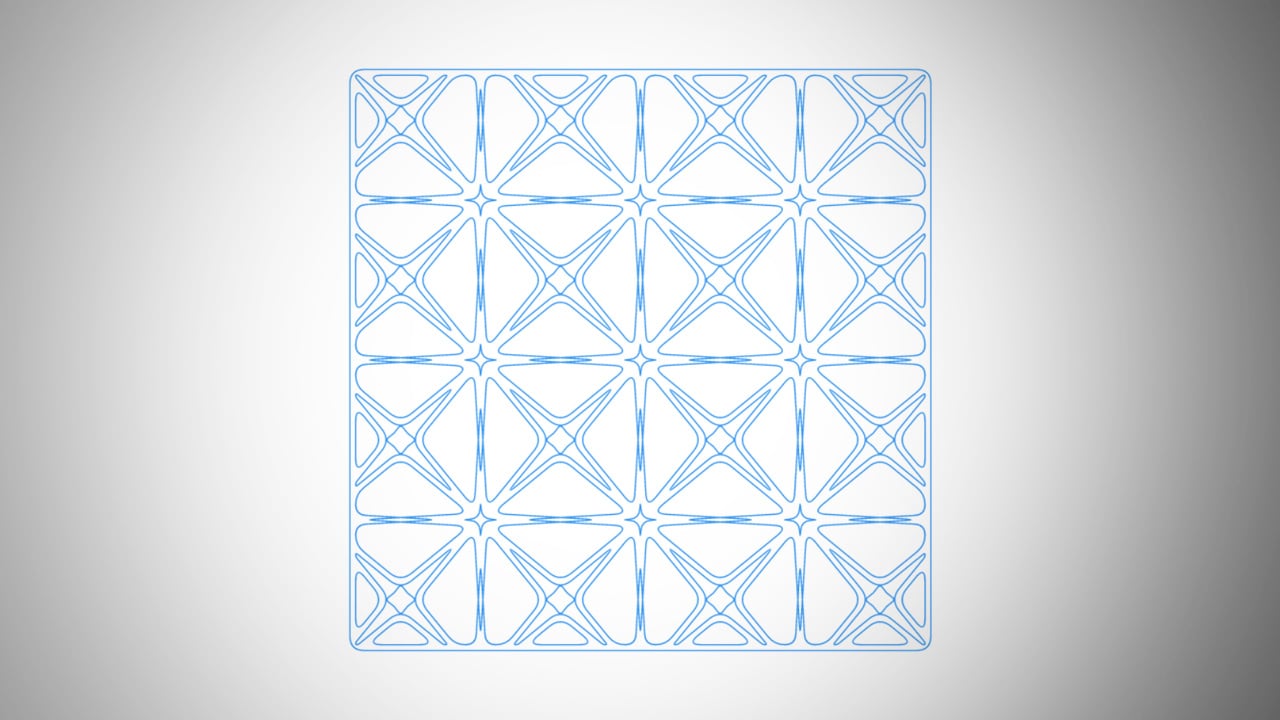


[STUFF] Polygonia Design Suite
All3DP  
Offering possibly the simplest way to sketch repeating geometric patterns, this browser-based web app is a surefire resource for intricate 2D designs.
We’re not ones for lattice room dividers, but after spending some time toying around with Polygonia Design Suite, it’s just a matter of time before the All3DP office is a maze of fancy laser cut obstacles. A browser-based vector drawing tool for quickly creating geometric patterns, Polygonia is the result of a visit to the Smithsonian and a smattering of high school math and software engineering by its creator, David Kaufman.
Through the simple UI of an online design app, you can sketch out simple line inputs which get instantly translated into rad looking tiled designs. Multiple parameters allow you to customize the design to suit your project and a variety of output formats including SVG and PNG give flexibility for further design software you use after. 


sexta-feira, 13 de abril de 2012

Areia robótica, um Concurso da Ponoko, e um Site para Hobbies

Eis uma ideia ambiciosa, Areia composta de nano-bots, que forma Moldes, um sonho prestes a realizar-se para todos os que querem ter moldes para uma Fundição, a partir de ficheiros 3D: 


Self-sculpting smart sand could assemble itself into solid replicas of objects

By Jan Belezina
Research currently underway at MIT’s Distributed Robotic Laboratory (DRL) could lead to an innovative replicative manufacturing technique with the disruptive potential equal to that of 3D printing. Imagine a sand-like material that could autonomously assemble itself into a replica of any object encased within. Incredible though this may sound, the DRL researchers have already managed to build a large scale proof-of-concept, with 10-mm cubes acting as the grains.

Before we go into how these cubes - or "smart pebbles" - work, let’s sketch out the general concept. The idea is to create objects using a subtractive method, where excess material is removed just like when carving in stone. Each grain of smart sand would be a self-contained micro computer. These tiny machines would use an elaborate algorithm to communicate with the neighboring particles in order to establish the exact position and shape of the input object so that it can be replicated.


A Ponoko oferece como Prémio, um Cortador de Papel CNC, vejam este Concurso:


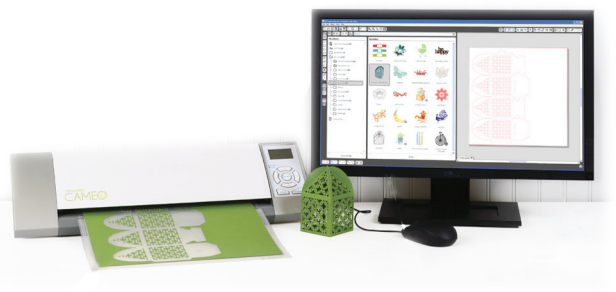
Make a lasercut paper project with Ponoko to win a Silhouette Cameo electronic cutting tool!

If there’s one essential material for creativity it’s paper. It’s so approachable, so familiar, so versatile. And you can lasercut it! : )
We’ve added paper cardstock to the materials catalog at both the Ponoko US and Ponoko NZ laser-cutting hubs. And we’d love to see what kinds of stuff you can make with it: artwork, business cards, product packaging, maybe a Mother’s Day card? We’re even throwing in a nice little prize…
Make a lasercut paper project and you could win a Silhouette Cameo!


E um Site com muitas coisas para engenhocas:

Hobbies

Find what you need at Hobbies.com! Here you will find all of the Hobbies you can't find anywhere else, including RC Cars or RC Planes. With our help you can find the right products and brands at the lowest prices online only at Hobbies.com. Let us help you meet your shopping needs while providing you with the best selections available online today. All this in a simple to use shopping interface. Checkout securely online with the help of Hobbies.com. Have a great day!
http://productportals.wishpot.com/?name=hobbies.com

quarta-feira, 21 de dezembro de 2011

quinta-feira, 1 de dezembro de 2011

Instructables!

O Primeiro, um Projecto muita louco, façam vocês mesmos os vossos  Bonecos Gigantes insufláveis... 
Ou até um Castelo para a Míudagem!

Giant Inflatable Robot

Otherlab has been doing a lot of inflatable fabrication lately, and we thought it was about time to write an Instructable about it.  What better subject to inflatable-ize than the Instructables robot itself?  Here's the high level view of the fabrication process.

...E vejam, do site destes autênticos Génios, é do caneco, orgulho-me de ter descoberto estes gajos!

Lightweight,low-cost inflatable robotic arm

Otherlab’s “pneubotics”program has produced the world’s first inflatable, robotic arm. We’re refining fabrication techniques and design, but this prototype demonstrates the potential strength and dexterity of this low-cost, safe robotics technology.

http://www.otherlab.com/news/2011/10/27/lightweight-low-cost-inflatable-robotic-arm/


O que fazer com todos os Microondas que os Engenhocas apanham, sem parar, para desespero das Patroas?
Então, nada mais, nada menos do que... 
Uma Máquina de Soldar!
MUÁHÁHÁHÁ!


Spot Welder from a microwave oven transformer and water tank


I have seen a few projects which use an old microwave oven transformer re-wound with a low voltage secondary to make a hobby spot welder, and I decided to have a go at making one. I ended up designing my own using copper sheet to make the secondary, following an unsatisfactory experience attempting to use wire I made from about 100 strands of stripped down CAT5 cable, which at nearly 6mm diameter wasn't thick enough and melted its insulation, causing the winding to short circuit.


E eis mais um projecto de Fundição de Metais, faz sempre falta, nestes tempos, em que não se sabe se não vamos voltar ao Séc. 19...
Um gajo não sabe o que é um Hobby Engenhocas Macho, enquanto não derrete Metal, é como Churrascada, mas com Esteróides, e que até nos dá coisas úteis, a temperatura, o cheirete, o perigo... Ahhhhh!


Dual Fuel Metal Melting Furnace

I got such a great response from the Easy Dual Fuel Furnace Burner that it only made sense to follow it up with the rest of the furnace.

This furnace will be able to handle melting aluminum and bronze with no trouble. In theory it should be able to melt iron too but that's probably pushing it.

I've been using my furnace for a couple years now and it has worked out quite well. My design is based on information I picked up from the backyard metalcasting forum. It's a great resource and community. There are a bunch of furnace builds there exploring a variety of ideas. I recommend checking it out. I'd also read this comprehensive guide for a general overview of metal casting and furnace design.

http://www.instructables.com/id/Dual-Fuel-Metal-Melting-Furnace/


Um novo Material da Sculpteo:


New material on sculpteo.com : White detail resine

Sculpteo is proud to announce the immediate availability of a new material for 3D printing in high definition : white detail resine.

Creations are printed by using Objet technology. It works by jetting photopolymer materials in ultra-thin layers, layer by layer, until the model is completed. In the final stage, each photopolymer layer is immediately solidified by UV light.

The printing resolution is 28 microns. The object is rigid, opaque, with a smooth surfacing, high detailed. It’s very close to standard plastic.


quarta-feira, 22 de setembro de 2010

domingo, 30 de maio de 2010

Instructables!

Eis alguns Instructables, e alguns podem ser usados, se modificados, para a nossa realidade:

-Um assador de "marshmallows" , pode servir para assar chouriços:

Uma Bandeira para o PC, com vento, e tudo, podem por as dos vossos Países respectivos, para o Mundial de Futebol:
Fica assim:

http://www.instructables.com/id/USA-USB-American-Flag-USB-Memorial/

...Mas este, é universal, um Morteiro de Àgua:
 Hé, hé, hé!
Toma lá, que é ecológico!
http://www.instructables.com/id/Build-a-water-mortar/

segunda-feira, 23 de novembro de 2009

Àgua fria e clara de ovo para queimaduras

Uma dica boa para todo o Engenhocas, que mais cedo, ou mais tarde, lá se torna a queimar...
Àgua fria,já toda a gente sabe, mas CLARA DE OVO?

Pois é. Clara de Ovo é Colagéneo, do melhor que há para queimaduras, pois a pele é feita de, para além da Elastina de...

Colagéneo!

E as vitaminas na clara de ovo regeneram a pele, e em pouco tempo!


É bom!


.

quarta-feira, 4 de novembro de 2009

Super "Foguete" de Serradura!

Ora isto é que é um Foguete, para uma Fundição de Alumínio!


...Mas ESTE Vídeo, explica tudo, até como fazer Tijolo Refractário!


Este Vídeo vem desta malta impecável, que faz mesmo alguma coisa de Útil no Planeta Terra!

http://www.aprovecho.org/lab/index.php


.

sexta-feira, 26 de junho de 2009

Fundição Japonesa


É dos melhores Sites para quem quer fundir metal que eu já vi, primeiro por causa dos vídeos, e depois, por causa da boa ideia de usar CO2 para solidificar os moldes em Areia Verde, de forma a evitar muita frustração...

Solidificam a Areia, e também fazem cortes e saliências especiais, para que as duas metades do molde encaixem perfeitamente:


É só ir AQUI:

segunda-feira, 22 de junho de 2009

Como fazer um Molde


Aprendem-se coisas úteis, de vez em quando, na TV.

Quando no Canal Discovery se fizeram estes modelos de crâneos, em Alumínio, como se fizeram os Moldes?

Elementar, realmente, Trabalhos Manuais da Escola Primária!
Eis um exemplo:

1 - Corta-se primeiro um Paralelepípedo em Esferovite, com as dimensões do que se queira fazer. Por cima das faces, colocam-se desenhos com vistas de lado, de cima, e de frente do sólido;


2 - Cortam-se essas projecções, sempre à esquadria, de forma a que os perfis cortados sejam iguais a todo o corte;


3 - Arredondam-se todos os detalhes que sejam arredondados;


4- Como o Esferovite desparece em fumo, quando em contacto com Alumínio derretido, serve de Molde Sacrificável.
É posto numa caixa com Areia, seca, e de Quartzo, enterrado a 10 Cm, deixando apenas uma entrada para o Alumínio, e uma saída para os gases.

Verte-se o Alumínio, espera-se meia-hora, e já está!


Claro que não sai acabado, e o Alumínio também enche a entrada e a saída, mas é uma questão de serrar, lixar, e polir.

Bom trabalho!

segunda-feira, 15 de junho de 2009

Construir uma Fundição de carvão

As boas soluções têem vida longa...

Talvez não saibam, mas pode-se fundir Alumínio, só com o vulgar carvão de Churasco; O truque é forçar ar para dentro do compartimento onde está o Carvão a arder.

Começa-se com uma lata de tinta de 25 Litros, e um tubo de ferro grosso, como na primeira foto, e o tubo é cortado em viés, e posto assim:


Toda a lata vai ter, no interior, uma camada isolante de cerca de 5 Centímetros de largura, duma mistura de 50% / 50% de Barro Refractário e Areia, misturadas primeiro a seco, e depois com um pouco de Àgua.
Começa-se por baixo, é claro:

Podem moldar uma cavidade no centro, para algum Alumínio que caia do Cadinho.

Passa-se para a cobertura dos lados do balde; Uma chapa fina de metal, ou outro material que se enrola num canudo, é posta no meio do balde. Depois, vão-se juntando porções da mistura, em camadas, à roda da cavidade, até chegar ao cimo.

O tubo de ferro é coberto também, mas com a ponta a tocar no rolo, de modo a deixar uma entrada de ar livre de barro.


A partir daí, é sempre o mesmo, até ao rebordo do balde:


Agora a tampa!
Como o ar entra forçado, tem de sair, por isso a tampa é um outro balde de tinta, mas furado e com uma lata menor no meio, e com uma barra de ferro a atravessá-lo.
Como é melhor que a tampa seja leve, e à prova de pancadas, usem Lã de Rocha para forrar esta tampa.


Podem usar um Secador para forçar o ar para dentro do tubo, ou fazer isto:

Parece complicado, mas é só arranjar um Motor Eléctrico, e fazer tudo isto com Folha de Flandres, ou outra chapa, um Berbequim ou Punção para os buracos, e uma Rebitadeira.

O Cadinho pode-se comprar, ou fazer com tubo de Ferro e uma base em chapa de Ferro de 1 Cm soldada ao tubo.

A primeira dose de Carvão é para secar todo o barro e areia, podem aproveitar para derreter Alumínio em Lingotes, para dentro de cavidades num monte de Areia. É melhor que o balde seja posto por cima duma camada de Areia de 5 Cm, que cubra todo o espaço de trabalho.

Até se faz disto:


TODO O CUIDADO É POUCO, quando se mexe em fogo, e mais ainda com Metal Fundido...
Isto é para ser feito AO AR LIVRE, e com cuidado.
Não trabalhem sem luvas, usem um Avental em Couro ou material à prova de fogo, e sapatos e roupas grossas. Não deixem cair Alumínio fundido para cima de Terra ou Cimento, se não estiverem completamente secos, Metal Fundido e qualquer solo molhado... Dá bronca!

É melhor um duche depois, (de qualquer maneira, com o carvão, tinha mesmo de ser), que uma ida ao Hospital!


Todos os que derreteram Chumbo em Latas de Sardinhas, sabem como é, os outros, o respeitinho é uma coisa muito linda...

Uma nota final, vem duma pergunta bastante relevante, e vai aqui para toda a gente:
A melhor areia è areia de Sílica da mais fina que se arranjar, misturada com Bentonite, que se arranja em Lojas de Animais, é aquele granulado para os Gatos fazerem as necessidades.
Areia já feita, é ver este Link, e dirigir-se à Fundição mais perto de onde vivam:
http://www.hotfrog.pt/Produtos/Fundi-o 

MAIS UMA NOTA:
Neste  Vídeo, podem ver como se faz, é uma maravilha de Tutorial num só Vídeo, tanto a Moldagem, como a Fundição, quanto a Maquinagem!


Metal Casting at Home Part 21 Core & Mould Making Casting & Machining
myfordboy

Making a cylinder head for a single cylinder hit and miss engine.
Core making moulding casting and machining operations.
The engine is an Olds Gearless, a 4 srtoke with no gears.