Blog Posts

Mostrar mensagens com a etiqueta kickstarter. Mostrar todas as mensagens

segunda-feira, 30 de outubro de 2017

CNC sobre rodas! E reparar Stl, Moldes para Resina, Resina transparente, e Impressão 3D para tudo!

Isto é uma maravilha!
Só precisam de pousar uma destas máquinas no Material que quizerem trabalhar, e não há limite para o que possam fazer!
Mais portátil que isto, só a máquina seguir-vos de casa, como um Cão!
LOL
Já vai quase em 10 vezes a quantia necessária, só por isso, se vê o interesse que já despertou, e com toda a razão...
Quero uma.


Trailer video of Goliath CNC, a portable and autonomous CNC machine designed to make any idea of any scale, in every space.

Goliath CNC - An Autonomous Robotic Machine Tool for Makers
Springa

A portable robot that mills, cuts, and engraves to turn BIG ideas into tangible items with any materials and various CAD file formats.

https://www.kickstarter.com/projects/2130625347/goliath-cnc-an-autonomous-robotic-machine-tool-for/description


Tudo funciona, no papel, mas quando passa à Impressão 3D, surgem as dores-de-cabeça...

Cá vão mais 7 maneiras de editar e reparar os vossos Objectos em formato Stl, e todas elas, à borla, que é o mesmo que dizer, grátis:


7 Free STL Editors + How to Edit and Repair STL Files
Frederik Bedrich

How do I edit STL files? That is something any 3D printer owner sooner or later wonders. After all: Ready-made STL files are fine. But what if an STL file you downloaded lacks some features, is damaged or you need only a part of it? That’s when you need an STL editor.

https://all3dp.com/1/7-free-stl-editors-edit-repair-stl-files/


Acho que é um desperdício de tempo e dinheiro, fabricar em série, usando uma Impressora 3D...
Que pode muito bem fazer apenas UM Molde, para daí, se criar um número infinito de peças!

Por isso, este método é uma boa maneira de lucrarem a sério com a Impressão 3D:


How to make resin copies of a 3d printed object. Mold-Making Tutorial.
gordontarpley

Long, boring video about taking a 3d printed part and making a mold of it. So far, all of my 3d printed parts have been modeled in Autodesk's 3d Studio Max and printed at Shapeways.

https://www.youtube.com/watch?v=_VsAXHbzZeA


Há Materiais que se encontram nos sítios mais exóticos, e que servem mesmo a calhar para uma data de Engenhoquices...
Por exemplo:
Esta Loja de Artesanato dá-nos esta notícia dum material, uma Resina para embutidos transparentes, MAS, lembrem-se que podem fazer muita coisa com isto, de Cockpits para Modelos de Aviões, a Objectos Transparentes de toda a espécie, ou peças transpartentes:


NEW Easy to Use, No-Mix Resin Product!!!
Gifts of Avalon

We are delighted to be carrying a few different sealers and lacquers that open up all sorts of doors for creative projects using bezels, metal blanks and just about anything else your imagination thinks up!
The first product is a 3D lacquer that is FANTASTIC for sealing projects! It dries to a crystal clear finish that both enhances and protects your projects. And no mixing required! I use it all the time to protect my metals when I apply Gilders Paste or do embossing.


https://giftsofavalon.wordpress.com/2012/07/31/new-easy-to-use-no-mix-resin-product/comment-page-1/#comment-36


Se leram tudo isto até aqui, cá vai a recompensa, uma grande ajuda, como aproveitarem as vossas Impressoras 3D para substituír toda a espécie de peças que já não há, ganhando alguns cobres, e a admiração de muitos que ainda acham essas Impressoras 3D um "Brinquedo"...


How to Make DIY 3D Printed Parts for Just About Anything
Frederik Bedrich

We’ve all been there. You fiddle about with a gizmo or furniture piece of some sort in the home and a piece just snaps off. Shoddy flimsy plastic is the culprit, and the irritation it brings is endless. Gluing the piece doesn’t help, and you resign to living with the original doodad as a shadow of its former self; functionally fine, probably, but still not quite right.
What if we were to tell you that there’s an answer to replacing such non-essential but easily missed parts? It’s rather simple — make it yourself! With the lowering in costs for personal home 3D printing, and the rise in competitively priced print bureaus, acquiring replacement 3D printed parts is a cinch.
So settle in and read along as we outline the ins-and-outs of creating 3D printed parts for games, toys and other such home objects.

https://all3dp.com/diy-3d-printed-parts-spare-parts/


terça-feira, 28 de março de 2017

Museu da Música Mecânica! E o FlashForge Inventor, uma DLP acessível, uma Dremmel de fazer em casa, e um Motor impresso em 3D!

Museu da Música Mecânica?
Eis algo de imperdível, para os lados de Palmela, uma Colecção de Caixas de Música, que só visto, obra do nosso amigo, o Prof. Luís Cangueiro, e só para terem uma idéia, visitem, para já esta Página, cheia de sons maravilhosos, de máquinas incríveis:

Mechanical Music Museum?
Something not to miss, near Palmela, Portugal, a Music Box Collection, you have to see, the work of our friend Prof. Luís Cangueiro, and just to give you a hint of the fun in that Box, here's ta page of the Bilingual Site, English version, too, hear the wonderful sound of some Glorious Gizmos:


A Colecção 
É constituída por mais de 600 peças que se movimentam por sistemas exclusivamente mecânicos, e abrangem fundamentalmente o período de finais do Séc. XIX até à década de 30 do Séc. XX, todas em estado de funcionamento. Trata-se de uma coleção particular, reunida ao longo de uma vida e representativa de toda a música mecânica. As diversas tipologias distribuem-se pelos mais variados instrumentos, desde as mais antigas caixas de música de cilindro de madeira ou de metal às mais recentes e populares grafonolas. É um privilégio podermos ver, ouvir e sentir peças centenárias que poderemos interpretar como um sinal da vida do homem através dos tempos, a expressão da sua cultura, a manifestação livre do seu poder criador.

http://museudamusicamecanica.com/a-colecao/


Eis uma Impressora 3D didáctica, com recuperação após paragem, opção de dupla cabeça de extrusão, câmara para visionamento da Impressão e mais uma data de coisas bos:


FlashForge Targets Education With Inventor 3D Printer LineTyler Koslow 
FlashForge has unveiled their latest 3D printer line. It includes the Inventor, a desktop printer geared towards educational use.
Like many other Chinese 3D printer manufacturers, FlashForge has thrived by balancing its efforts between affordability and performance. At the recently held Inside 3D Printing New York conference, the company was on the scene with their latest product line.
The new Inventor series is comprised of two different desktop 3D printers, both of which seem exceptionally intuitive. The Inventor is engineered for the educational sector, while the “II” 
model is said to operate with the intuitiveness of a smartphone
...
The build volume of this printer is 230 x 150 x 160 mm, and even includes dual extrusion via a MK9 extruder head. This allows for multi-color prints, as well as use of soluble support structures. It’s compatible with PLA, PVA, ABS, HIPS, and other speciality materials.
This new printer is also equipped with a heated build plate, while offering 0.1 to 0.4 mm layer thickness.
https://all3dp.com/flashforge-inventor-3d-printer-series/


Grande volume, acessível, cerca de 1600 dólares, e já à disposição no fim de Maio, eis um sonho de Impressora DLP, que imprime numa resolução incrível:


D2K Plus - Affordable DLP 3D Printer

Large Build Volume - 2K Resolution - Soonest Delivery in May, 2017 
To continue our success in the campaign "D2K Illuminate 3D Printer" in 2016, now we are glad to launch "D2K Plus 3D Printer" which is designed for those who demand larger size of printing, the build platform is much larger "198 x 120 x 150mm" whereas D2K Illuminate is only 121 x 68 x 130mm.  "D2K Plus" could satisfy most of designers or gadget lovers to accomplish their great ideas.  Not only large print platform but 2K resolution is kept unchanged, this is indispensable device for your development job . 
It's time to upgrade your printer to DLP technology, it brings along with lots of advantages that get rid of daily maintenance and fine-tuning. 
Our considerate design of "D2K Plus", you could be very easy to make further maintenance or proceeding with future upgrade by yourself.  Either electronic module or UV resins you can buy those replacement very easily in your local market or get it from us.   


Já não há desculpa para não fazerem aquela engenhoca que imaginaram, por não terem uma Dremmel, façam esta, m casa, por cerca de 10 Dólares...
É bom! 


$10 DIY Dremel /RotaryTool

geekrex 
A Rotary Tool is perhaps the most used tool. It can Cut, Grind, Sand, Polish, Engrave with the Different types of bits.This small little DIY Dremel is easy to hold and cut metal, Acrylic, Drill PCB. Sand And Engrave too.
It is Easy to make and is very powerful.
It can work both with an adapter or with any battery Lipo, Lead Acid.
Mostly It will come really handy for future projects. 


E acabamos, por hoje, como começámos, com Maravilha Mecânica, desta vez...
Um Motor a Ar Comprimido, dum simples balão, que vicês imprimen em 3D!

Impecável:


Single Cylinder Air Engine
gzumwalt 
Before starting with this Instructable, I would like to express my sincere thanks to Instructables for featuring Single Cylinder Air Engine. I am indeed honored and humbled, again, many thanks.
Single Cylinder Air Engine runs on compressed air, a vacuum cleaner, a balloon, or even lung power. I've included three adapters in the design to interface with each. Please note the friction test video; your engine needs to pass this test before being successfully operated on balloon power.
The design incorporates two ports, one upper and one lower. When Single Cylinder Air Engine is viewed from the port side, "Wheel Piston.stl" rotates clockwise when pressure is applied to the upper port, and counter clockwise when a vacuum is applied to the upper port. As pressure or vacuum is applied to the upper port, the lower port functions as an exhaust (when pressure is applied) or an intake (when vacuum is applied). The opposite occurs when the lower port is used for pressure or vacuum. 


segunda-feira, 12 de outubro de 2015

3D, do Smartphone! E as maravilhosas máquinas de Del Short, IoT Open Source, e Linux sem dar por isso

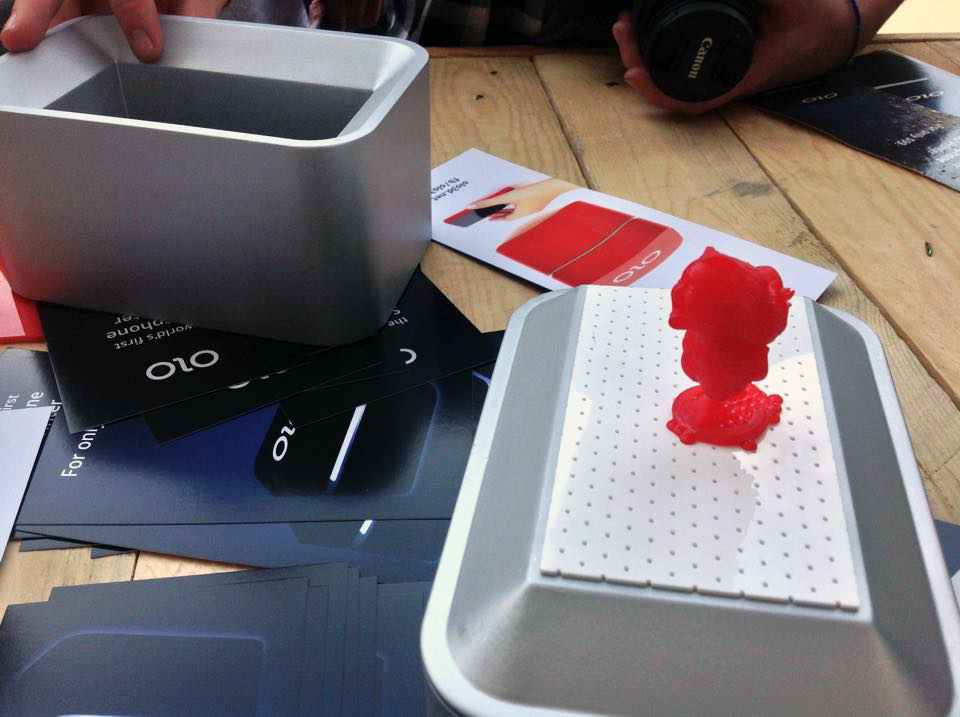
Não vos fica mais facilitado do que isto, imprimirem em 3D, a partir do vosso Smartphone!
pois é como podem ver, e por apenas 99 Dólares, podem ter esta entrada nível Zero, para a Impressão 3D:


Transform Your Smartphone into a 3D Printer with OLO… Seriously
MICHAEL MOLITCH-HOU  
The title of this article may sound like post-modern gibberish, but transforming your smartphone into a 3D printer is exactly what OLO is designed to do.  Developed by Solido3D, a rapid prototyping and digital fabrication firm that describes itself as “the first Italian ‘digital factory'”, OLO is a device that its designers claim can turn any smartphone into a 3D printer.  And, in about a month, OLO will be available for purchase for only $99 on Kickstarter. 
Though the actual mechanics of OLO have yet to be revealed, the OLO 3D team tells me that the battery-powered device consists of only 7 components and one motor and uses “smartphone electronics to their full potential”.  The app behind the printer will be free to download and allow users to upload and manage their 3D models, as well as send them to print.  Additionally, they will be able to share their models and make their skills available to the OLO community, making the printer itself a social device. 


É um regalo para os olhos e a Mente, cortesia da Woodworking Tips, no Facebook.
Esta Máquina maravilhosa do Génio chamado Del Short, e ele há um Canal Youtube só das suas maquinetas, por isso, tenham atenção, ainda mais porque estes Movimentos todos podem ser a solução para algum problema nas vossas próprias Máquinas:


YouTube - Del's Beautiful New Wooden Machine.flv
Del Short 
An all wood mechanical machine. One of a kind. 


..E se estão metidos na IoT, ou seja, ligarem isto e aquilo à Net, nas vossas casas, ou fora, têem agora este SensorTag com 10 sensores, que corre este Sistema Operativo Open Source, Contiki, feito mesmo para isso:


Contiki on the CC2650 SensorTag
Andrew Back  
The open source operating system for the IoT on the new TI SensorTag
TI's second generation SensorTag is crammed full of features and boasts no less than 10 sensors, together with a capable CC2650 2.4GHz multi-standard wireless MCU at its heart, making it a powerful platform for prototyping IoT applications. There is no shortage of options when it comes to developing firmware for the SensorTag either, and in this post we'll take a look at the equally featured packed open source O/S for networked memory-constrained systems, Contiki
http://www.rs-online.com/designspark/electronics/eng/blog/contiki-on-the-cc2650-sensortag/


Para quem tem medo do Linux, e um Computador velho, que já não dá nada, e quer ter algo como o Windows XP a corer nele, para ainda fazer alguma coisa, o melhor é fazerem como diz neste Instructable, pois vão ter um Linux que funciona tal e qual como um Windows!


Lets Give Linux a Try (aka Lets Get that Old PC Going Again)
tonep 
Are you one of those people who shrink and hide from the word "LINUX"? I know there are still some of you out there. Don't worry, your fear is treatable. Believe me. I was one of you!
This Instructable is for people like us.
I am going to show you a way to easily get over your fear while at the same time learn some new skills, create for yourself a computer tool and also get that old obsolete computer or laptop working and useful again - all in one go.
The instructions seem a bit long, but it is just a one time setup and you will see after you have read the details that you don't really have much to do to get started. 
http://www.instructables.com/id/Lets-Give-Linux-a-Try-aka-Lets-Get-that-Old-PC-Goi/


quinta-feira, 2 de abril de 2015

Impressora monobloco, um Corrector de Impressões, um Mini-Torno de Madeira, e Tekever na Fox!

Eis uma Impressora 3D que aposta na simplicidade, e assim há pouco que estar constantemente a calibrar...
Para além de outros truques porreiros:


Tiko "unibody" 3D printer hits Kickstarter

Dario Borghino 

Tiko, a new budget 3D printer seeking funding through Kickstarter, takes a number of interesting design choices to minimize costs without sacrificing the quality of the print – chief among these is the use of a cheap, single-part "unibody" frame that requires very little calibration.
Ordinarily, the frame is one of the most expensive components of a 3D printer. To allow for precision printing, the multiple beams that make it up need to be machined to a high standard and then regularly aligned during their lifetime to ensure a consistent performance. This raises costs and makes it so that users often need to spend time calibrating the beams before they can start using their printers.
The Tiko gets rid of these complications with an enclosed "unibody" design that incorporates the pre-aligned beams on the inside of its frame. According to its creators, the result is a strong and lightweight chassis that is virtually impossible to misalign and that can 3D-print with accuracy (down to 50 microns) despite the lack of high-precision components.


Algumas Impressoras, algumas Impressões deixam muito a desejar, em termos de Qualidade...
Pois agora, podem corrigir isso com este Corrector de Impressões!
Alguém tinha de pensar nisto.


Retouch3D cleans up the glitches on 3D-printed items

Ben Coxworth

If you've never used a 3D printer, then you might not be aware of the fact that the objects they create don't always emerge in their final, flawless form. They often contain small printing errors, fringes of stray material, and supporting structures that need to be removed. Retouch3D uses heat to melt away those imperfections.
People already use things such as soldering irons, razor blades and sandpaper to finesse their 3D-printed creations. According to the designers of Retouch3D, however, their device allows for much more precise control.
This is partly because its heat level can be set to the melting point of the printing material in question – examples include things like PLA (polylactic acid), ABS (acrylonitrile butadiene styrene), resins or even wax. Users can look up those temperatures on the company website.


E que tal terem em vossa casa um Mini-Torno?
Este é para Madeira, e já ajuda muito, para uma data de coisas, como Modelagem, e trabalhar Plástico e até Alumínio.
Parece que com cera de Parafina, nas Ferramentas de Madeira, pode-se trabalhar Alumínio, sem arruínar as tais ferramentas...
Lembrem-se é que o Alumínio não muda de cor, quando aquece!


Mini Wood Lathe
laffinm 

Before I begin, I would like to ask you to vote for this instructable. It was made as an entry for the Tools Contest here on Instructables, and I would very much appreciate your vote. Winning contests helps me build, upgrade and stay interested in this hobby, and continue creating more content for you readers. Thank You

A little over two months ago, I found plans for this mini lathe in an issue of Shopnotes, and decided that I would try to build it in time to be entered in the Tools Contest. I had never built a wooden machine before, but seeing lots of them over on woodgears.ca, I was very excited to try one on my own. I am only 15 years old now, so my experience in woodworking is quite limited, but I still managed to complete it without too many problems along the way. Along with the lack of experience, I also do not have a large lumber supply. I built the entire lathe out of scrap plywood found in the garbage. My dad occasionally finds cut-off pieces of 3/4 inch plywood on job sites, and having a few around was enough to complete the project. (The only parts I had to purchase was a longer v-belt, and some large nuts and bolts.)

http://www.instructables.com/id/Mini-Wood-Lathe/


E apareceu na Fox, esta Empresa Portuguesa, por isso, cá vai a Notícia, para vos inspirar a fazerem aquilo que sonham fazer, sem medos, nem complexos de Inferioridade!
Vão à luta!


Tekever CEO on the company’s brain-controlled drone

Mar. 26, 2015 - 4:10 - Tekever Co-Founder and CEO Ricardo Mendes on the ‘brain drone’ allowing users to control a drone using brainwaves.


http://video.foxbusiness.com/v/4136135741001/tekever-ceo-on-the-companys-brain-controlled-drone/?#sp=show-clips


quinta-feira, 19 de fevereiro de 2015

5000 Dólares para o vosso Protótipo!!! E OpenPi, Ponoko, agora, Corta Metal, 10 usos para o VLC, Uma Oficina num só móvel, e um Fogareiro.portátil

Querem 5000 Dólares para construír a vossa Engenhoca, ou o vosso Protótipo?
Concorram, DEPOIS de patentearem a Ideia, a este Concurso da Make, e habilitam-se a ter o Protótipo dos vosso sonhos...
DEPOIS de patentearem a Ideia!


Pitch Your Prototype… And Win $5,000
Jon Christian

Want a chance to win $5,000 and be featured at MakerCon New York this September? If so, consider entering the Pitch Your Prototype contest, a collaboration between Make: and Cornell University with the goal of digging up promising prototypes from the Maker community. Maybe you’ve been working on a wearable, or wrestling with a Raspberry Pi. Regardless, don’t be afraid to put yourself out there by entering—contestants in previous Make: contests have included an aerial film platform, plushies modeled on video game characters and an outrageous four-wheeled bicycle made from recycled materials.


Maquineta fantástica, dica do nosso amigo Fernando Mattoso Lemos, eis uma Ferramenta para os Inventores, que vos permite juntar Controle programável ao que precisem, como queiram, e au um preço bacano!
É bom, ou não?
Até a Microsoft está usando...


Open source design lowers cost by 2/3rds of building Raspberry Pi Compute 1&2 powered cool stuff.
Update : We are adding to the design support for Bluetooth Low Energy
Update : We are adding an IR receiver to OpenPi
Update : Check out OEM and EmonCMS running on OpenPi read more
Update : Microsoft are using OpenPi on Tech Days read more

Wouldn’t it be great to build hardware at the speed or cost of software?
OpenPi is an open source project, and a neat alternative to the Rasberry Pi Compute development kit. The holistic approach for non-embedded engineers, guides people who love to write software, through the problematic stages of getting small scale products to market. On offer are reference PCB’s, a customisable ABS case, open-source design files and collaborative design support. When it’s as easy to get up and running as a games console, and affordable enough for cottage industry inventors to profit from, OpenPi is forging a new way of bringing cool ideas to the masses.


Pois é, podem mandar agora os vossos desenhos para a Ponoko, e recebem em casa as peças cortadas, em Aço, Cobre, ou Bronze!  
Por isso, inscrevam-se e mandem vir as vossas engenhocas 


New! Streamlined Support for Photochemical Machining

Making with metal just got a whole lot easier.

We are thrilled to announce new streamlined support for Photochemical Machining. Previously, if you wanted to create something using Brass, Copper or Stainless Steel, you had to take an extra step to email us the extra details of your order.
Now you can upload PCM design files directly to your Personal Factory account. In addition, you can now upload and get a quote for metal parts along with Laser Cut & 3D Printed designs at the same time, all in one order.
How to make with Photochemical Machining (PCM):
  1. Prepare and save your vector design as a PDF using our Metal Machining Starter Kits.
  2. Upload your PDF to your Personal Factory account.
  3. Select your choice of metal materials and proceed to checkout as usual.
That’s it! You’re now on your way to receiving some awesome metal goodies in your mailbox. Please note: The design requirements for PCM are slightly different from laser cutting with other materials. You’ll want to be sure to read through our design guides before uploading your designs.


Achado através do Stumbleupon, o Site HowToGeek vem-nos ensinar como fazer de tudo um pouco, em Vídeo, com o programa Grátis VLC Media Player!


10 Useful Features Hidden in VLC, The Swiss Army Knife of Media Players

There’s a good chance you already use the VLC media player. But VLC isn’t just a media player — it’s a complete Swiss Army Knife for digital videos and music, filled with useful and fun features you haven’t found yet.
If you’re just using VLC to play back local media files, you’re only using a tiny fraction of VLC’s capabilities. There’s so much more you can do with VLC, whether you’re using it on Windows, Mac, or Linux.


E só porque sim, cá vão de embute, dois Instructables impecáveis...
Este, como fazerem uma Oficina num Móvelzinho articulado e cheio de truques, com rodas e tudo!


Complete workshop in a shelf
sachsie

Most Instructables projects require you to have some basic tools and a workshop available - unfortunately, most people do not have the space for these bare essentials available. Just like me.
My girlfriend and I live in a moderate sized apartment for some years now. We have got a spare room that offers sufficient room for our hobbies. Now we expect a baby and this room is assigned to it. As a consequence, I have to move all my tools in a tiny compartment of an IKEA shelf and have to find a new workspace too.
I approached this problem, by building a compact yet solid frame made of low-cost aluminum extrusions. It offers some very handy features:
  • storage space and organization for my tools
  • frame acts as a multi-purpose workbench. It offers:
    • a drill press
    • a router table
    • a bench vise
  • Concept is very flexible and may find further extensions.
Everything is designed to fit the size of the compartment. Total costs of this project are about 150 EUR.


Faz frio que se farta, pelo menos em Portugal, mas eis como terem, e até fazerem, a vossa comida quentinha para onde quer que
forem, com quase lenha nenhuma!
E facílimo de se fazer:


UPDATE! Backpacking Gasifier Stove
Quark-

Hello, this is Quark- and I am here to show you how to make your own TLUD (Top Level Updraft gasifier stove), and you can look them up at http://www.build-a-gasifier.com/gasifier-wood-stov.... They are essentially a stove that burns the fuel not once, but twice. The base thermos holes allow air into the fuel, while the top holes allow preheated air down into the stove to basically burn the fires smoke. I recently learned about the design while looking up specification for the popular Biolite Campstove, a design which I sought to make. Only then did I learn that it was a gasifier, and the rest is history. They are often used in third world countries, due to the fact that they are incredibly cheap to manufacture and are 10x more efficient than just a plain fire. Because of the double-walled construction, it is easy to use a simple food thermos to make one of these beauties. Enough talking, Onward!


Publicidade, eis um jogo bacana:


Game of War - Fire Age - iOS
Join the ULTIMATE battle for domination of the Kingdom in Game of War – Fire Age! PLAY FOR FREE in the most addicting, interactive Action Strategy MMO GAME!


quinta-feira, 12 de fevereiro de 2015

Reparar rodas dentadas? E 2 pró Raspi, um Forno Português, e um Centralizador

Este Instructable, pela sua simplicidade e eficiência, é uma Obra-Prima de Reparação Engenhocas... 
Olhem que usar os dentes das outras Rodas dentadas, como Molde para a roda dentada partida, é de puro Génio!


Broken Gear Repair
Fab Muchada

Simple way to fix broken gear
you need a plastic steel epoxy, Popsicle stick, any mixing medium for your epoxy mixture and brush and detergent soap or dish washing liquid.


www.instructables.com/id/Broken-Gear-Repair/


Duas dicas de Fernando Mattoso Lemos, 2 Adaptadores que unem o Arduino ao Raspberry Pi;
O primeiro, é o Raspio, um projecto que já ultrapassou quase 3 vezes o seu Objectivo de 3.456 Libras, e pode funcionar autónomamente, uma vez programado, ou comiunicar com o Raspi, como periférico:


RasPiO Duino Affordable Arduino Programming On Raspberry Pi

Alex Eames 

I want to get you into the wonderful world of Arduino programming, using your Raspberry Pi as the programmer. There's so much you can do with the ATMEGA 328 microcontroller - it complements the Pi perfectly and for many applications it doesn't even need to be connected to the Pi, once it's programmed. So I've designed the RasPiO Duino, which...
  • Has a capable microcontroller: ATMEGA328P. 32KB flash. 20MHz
  • 6 analog inputs for reading sensors (light, temperature,  pressure etc.)
  • 14 digital input/output pins for controlling and switching things
  • 6 PWM outputs for variable LED brightness or motor speed control
  • Can control up to 12 servos
  • Can exchange the microcontroller as it is socketed
  • Fits on the GPIO header and is programmed directly from a Raspberry Pi
  • Uses the Arduino Integrated Development Environment for programming
  • Is very keenly priced

O segundo, é o Arduberry, que já está à venda, com uma Empresa fundada para isso, e tudo:


Arduberry: Raspberry Pi and Arduino for the Rest of Us

Students, hackers, tinkerers unite!  The Arduberry is the shield you’ve been waiting for.  The Arduberry connects the Raspberry Pi and Arduino.
We love Arduino and we love Raspberry Pi.  We thought they should be together.  The Arduberry marries the Raspberry Pi and the Arduino.  Simple, elegant: all you need and nothing you don’t.


Um Instructable dum Forno Português, da autoria dum Entusuiasta Estrangeiro!
Ora toma!
Eis como podem fazer um Forno que serve para vários fins, bem à moda do Desenrasca Lusitano, que nos tem aguentado a todos nós, como Nação e Diàspora, contra ventos e marés, pela bonita idade de 800 anos...


How to Build a Portuguese Wood Fired Brick Pizza Oven
grillsnovensllc 

Welcome!
In this instructable we will describe how to build a real Portuguese brick pizza oven.
Portuguese ovens are characterized by higher dome than the Italian / Neapolitan ovens. What this means in practice is less intense heat. In all of these ovens the heat is reflected from the dome back onto the cooking floor and the lower the dome the higher the heat. While the Italian pizza ovens are made primarily for pizza (they cook other foods too, but most people buy them for pizza) the Portuguese ovens are made with cooking a variety of foods in mind: slow roasts, lasagnas, bread etc. For all of these you will need less heat than for pizza and hence a Portguese ovens can come in handy.


Este Instructable, vem com o seu Ficheiro 3D, por isso, podem finalmente usar as vossas Impressoras 3D num Instructable que faz sempre falta, uma gigajoga que acha os Centros em peças duma forma simples:


Center finder
mobilow

I love tools and every now and then I also love tools to make live easier. This one is based on a one time tool from woodpeckers but not available anymore. So I decided to made one by myself using my 3D FDM printer.
Its a handy tool to mark the centre of a workpiece, just place the two legs around your piece and mark a line or point or draw a line with a pen trough one of the holes in the middle bar. Due to the parallelogram, the center is always found automatically.