Blog Posts

terça-feira, 28 de junho de 2016

Um Drone "segue-me" com Arduino! E uma Serra Circular custo zero, uma Secretária Grátis, Fotografia aérea por quase nada, e repelir Mosquitos!

Ora aqui está um Drone que podem fazer e casa, e que vos segue, filmando todo, e evitando obsáculos, o que vos dá uma equipe de vídeo de ter por casa, por assim dizer...
É bom! 


DIY Smart Follow Me Drone with Camera (Arduino Based)
Imetomi 
Drones are very popular toys and tools these days. You can find professional and even beginner drones and flying gadgets in the market. I have four drones (quadcopters and hexcopters), because I love everything that flies, but the 200th flight isn't so interesting and starts to be boring, so I decided that I will build my own drone with some extra feutures. I like to program Arduino and design circuits and gadgets so I started to build it. I used the MultiWii flight controller that is based on the ATMega328 chip that is also used in the Arduino UNO, so programming was pretty simple. This drone can be connected to an Android smartphone that sends its GPS data to the drone, that compares to its own GPS signal, then starts to follow phone, so if I move on the street the drone follows me. Of course has many failings yet, because I wasn't able to make a proffesional filming drone, but follows the phone, makes a video and also has a ultrasonic distance sensor to avoid the obstacles in the air. I think this is pretty much features from a homemade drone. As soon as possible I will load up a video about a flight, but it is hard to make good quality records with an always moving drone.


Uma ideia do nosso amigo Andrea Biffi, que ainda vou construír cá para casa, uma bacana duma Serra Circular para cortarem, a direito, uma data de placas e pecinhas variadas, que uma Serra de Disco, é um bicho que leva tudo à frente...
E agora, com a possibilade de opcionalmente, ter um Disco Lixador:


mini circular bench saw from scrap [UPDATED]
andrea biffi 
Try to salvage little electric motors from scrap, because you can usually find a way to reuse them. I don't remember where this motor comes from, I've got it many years ago when I used to dismount everything I bumped into, anyway when I found it the other day I immediately pictured a small bench saw to cut metal. Not wood, because motor has a belt and a ratio so that the gear turns at a speed of about 600-1000 RPM which is good for metal, bricks, stones but wood needs very fast speed. To cut these materials you can use a disc grinder, so I bought a pair of discs to apply to my motor.
[UPDATE] I also can apply a disk of sand-paper if needed. To check speed of the disk see last step.


Vejam lá se se conseguem ainda desculpar de não terem uma Secretária decente, (ou uma que aguente muito mau-trato), se o Material para esta, são as Paletes que encontram aos pontapés, por aí!
Reparem nos espaços abertos para ventição, para lá meter, no encaixe, um Computador, à direita: 


How to build a Desk from Pallet Wood
StephenS161 
All those pallets that are thrown away....maybe they are worth their weight in gold? Seriously, is that free wood one could avail of? And recycling is good for the environment too!
So I decided to construct a desk from pallets that were going to be thrown away. This desk is intended to house a computer in the future so it has a cabinet with holes that will act as air vents. To add some style, instead of the usual plane panel as a side/leg, a mesh design is being used.
The desktop has holes to allow wires through the surface and conceal them under the surface. Instead of the usual circular holes, the word "DAD" has been routed through so as to also serve as a dedication to my father who introduced me to DIY :)
So, this instructable shows how to create a desk from pallet wood, let's go! 


Hoje, estamos no reino da Poupança, com mais esta ideia, um Papagaio de Papel que vos permite fotografar uma grande Àrea em redor, sem sequer precisarem dum Drone: 


Aerial Photography Super Affordable Kite
hertzgamma
 
Hi everyone!
Here is a very fun and super easy to build tutorial on a kite that will take a camera up in the sky and let you snap those aerial photos you’ve always dreamt of. The kite actually costs pennies to make but is very effective in what it does!
It’s good fun to learn about aerodynamics rather than some rocket science stuff that will bore you to death if you aren’t already an expert in engineering.
So all you kids, makers, creators, hackers, grandmas, grandpas, enthusiasts and of course rocket scientists – follow myjourney and make yourself a kite like this!
P.S. I don’t like much text so feel free to scroll and look through all the pictures – they are really explanatory and give you everything you need to make a kite yourself!


Mas como nem tudo no Verão são coisas agradáveis, cá vai este Instructable para se livrarem dos implacáveis Mosquitos!
Uma boa ideia. 


Arduino Mosquito Repeller
webgeeks 
In this instructable I'm going to show you how to build a mosquito repeller using an Arduino. The repeller is in the form of a shield that plugs into the Arduino board and the frequency of the repeller can be changed easily.
This project is ideal if you are going camping or hiking outdoors, this device produces a sound of 31KHz Frequency which acts as a mosquito repellent. The frequency of this device can be adjusted and at 23kHZ to 54 kHz it also acts as a dog whistle. Human ears are not sensitive to these frequency ranges.
You can also view the video below on how to build this project. 


quarta-feira, 22 de junho de 2016

Attiny programado com Arduino, Circuitos, Bancada, Oficina, e Sucata

O Attiny é um Chip programável, que vos ajuda em muito  Projecto onde o tamanho é um factor essencial, mas programá-lo pode ser uma embrulhada...
Já não  é assim, com este simpático Instructable dos nossos amigos Webgeeks, que vos vai dar asas, porque o passam a programar com um Plug-in para o Arduíno:


Arduino Attiny Programming Shield

webgeeks 
An Attiny is a great alternative to the atmega328, it is for those projects that need few GPIO pins and need to be portable. But unlike the atmgea328 the attiny cannot plug into an Arduino board and be programmed. Another way would be to use a breadboard and an Arduino uno as ISP, but it would be really messy and it would be hard to program it this way multiple times.
A better way would be to program it on a shield and in today's instructable I'm going to show you how to build an attiny programming shield. The shield is easy to build and plugs on to an Arduino to program. So all you have to is plug the attiny on the IC Holder and you can program it. 
http://www.instructables.com/id/Arduino-Attiny-Programming-Shield/


E se não pescam nada de Circuitos Integrados?
Podem então, começar por esta Introducção aos Circuitos Integrados, e aprender a partir daí:


Intro to Printed Circuit Boards

tedmyers


In this instructable, I'll go over what a printed circuit board is, where they are used, and the basics of how to make one yourself. So sit back, strap in, and enjoy learning about this very important and interesting method of making electronics!
Note: this is an introductory guide. I'm sure that there is a lot I did not cover, and if you find something you think I should mention in this guide, make sure to put it in a comment below!


Ser-se Engenhocas é uma tristeza, se se tem de montar a Engenhoca na Mesa da Cozinha, com uma tábua encima, sim já o fiz, no início...
Para trabalhar com gosto, façam mas é ISTO, que é uma enorme ajuda, e um gosto para os olhos de qualquer Geek!


Ultimate Workbench

mikeasaurus


The ultimate workbench is your go-to place when you need to get a job done. It's got a solid wood work surface, great lighting, a vice to hold down your work, and of course all the important tools at the ready in drawers underneath. Also, it's on casters. Which is really the best part about this workbench, the mobility it provides. 
http://www.instructables.com/id/Ultimate-Workbench/


...Mas se já têem um Espaço de parte para a Engenhoquice galopante que nos consome, pois o melhor, é arranjarem tudo como deve de ser, e aqui está como, mas que maravilha!

É concebido tudo isto para a Carpintaria, e sigam o Link que lá está para a Woodskills, mas é claro, primeiro, a Carpintaria é a base de muito Porjecto, e segundo, para Serralharia, Fabbing, Impressão 3D, electrónica, etc. o conceito é o mesmo... 


Setting Up a Workshop

woodskills


This Instructable on Setting Up a Workshop is brought to you by WoodSkills. For woodworking plans, woodworking courses, books and tutorials, please visit WoodSkills

The first step in setting up a workshop is to establish your needs. A suitable location for the workshop must be determined. Workshops can be located in any part of the home or garage, but ideally the basement or garage are very suitable locations. You should plan for future expansion prior to designing a workshop, since at some point in the future you will outgrow your present shop. Many factors are taken into consideration in designing a workshop. Storage, lighting, ventilation, power requirements, and noise reduction are important considerations.

The typical woodworking shop requires a lumber storage area, a workbench, tool storage, stationary machine area, and a finishing area. Ample space should be provided to move between the bench and walls, and to provide the necessary clearance to be able to use long, wide boards and panels. 


O Engenhocas que nunca aproveitou Sucata que atire a primeira pedra, sem Sucata, não há peças para estragar, pois aqui está como aproveitar Ímanes de Neodímio de Discos Rígidos da Sucata, para só comprarem os Ímanes, depois de terem a certeza de quais e quantos precisam...
E de terem partido uns tantos, a montarem os 5 ou 6 primeiros Protótipos! 
Muáháháháhá! 


Rare Earth Magnets From Old Hard Drives

Lorddrake


It happens to all of us eventually.
You've upgraded your laptop from that ancient cinder block to a sleek new light weight model.
You got a new desktop PC to replace the one that was so old the keyboard was in Sanskrit.
You have moved over all you family pictures, every song you've collected since high school, all those movies you download ... completely legitimately .. *cough cough* .. no really ... OK ... moving on
So what do you do with the Hard drives you removed before sending the rest of your old computers to be recycled?
I'll tell you what to do .. You grab your tools and gut them for the glorious rare earth magnets (As well as a few other goodies) that are hidden inside.


segunda-feira, 20 de junho de 2016

Fresa DIY CNC 3! E um Drone DIY, automatizar a Net, GrabCAD Print, e a FromBox

Ora aqui está uma pequena Fresa CNC topo-de-mesa, 22x24 Cm, por cerca de 300 Euros, e controlada por Arduino, que vos pode ser útil, para as vossas Engenhocas!  
Portátil, pode servir para levar a muita Exposição, FabLab, Clube e Oficina: 


DIY CNC 3 Axis PCB Milling Machine Engraver Wood Carving Router
 
The Mini CNC engraving machine laser engraving machine is suit for make non-metal processing such as plastic, wood, acrylic, PVC, PCB, wood or the like material, etc.And airframe adopt profiles + plastic? Small size, light weight, USB interface, open source grbl control.
The repeat positioning accuracy is with in 0.1mm under no-load, usually you is about 0.05mm. Laser is Considered no-load. If you use graver, the precision is Depending on the hardness of the material
Grbl is a no-compromise, high performance, low cost alternative to parallel-port-based motion control for CNC milling. It will run on a vanilla Arduino (Duemillanove / A) as long as it sports an Atmega 328.
The controller is written in highly optimized C Utilizing every clever feature of the AVR-chips to Achieve precise timing and asynchronous operation. It is incendio maintain up to 30kHz of stable, jitter free control pulses.
It accepts standards-compliant g-code and Has Been tested with the output of several CAM tools with no problems. Arcs, circles and helical motion are fully supported, as well as, all other primary g-code commands. Macro functions, variables, and most canned cycles are not supported, but we think GUIs can do a much better job at translating them into straight g-code anyhow.
Grbl includes full acceleration with management look ahead. That means the controller will look up to 18 motions into the future and plan ahead to its velocities deliver smooth acceleration and jerk-free cornering. 


E quem não quer, nos tempos que passam, ter o seu Drone?
Aqui está como podem fazer um, em casa, e com Material re-aproveitado, o que sempre é bom, porque sabe-se lá QUANTAS vezes o bicho não irá caír...


Building The Go Drone Version 2 (updated)
Drews View 
Hello, this is my first instructable, so don't expect this to be too perfect. If you liked it, give me some feedback! Oh and Vote for me in the "make it fly" contest!
I've always had a great interest in Drones, Uavs, and just about anything that flies. Being a college engineering student, I finally decided Im tired of just learning concepts of how these things work, with no hands-on fun. I wanted to build something like that of my own and test my design to see what I'm capable of.
The real motivation to build what I called "The Go Drone" was seeing some aerial photography from RC aircraft on the internet. It looked good enough that I set my sights on building my own, and giving it a "Genuine" Go Pro look to it. So, I did just that, and designed a plane around my Go Pro Session. 


Isto é INDISPENSÁVEL!
Um Site onde, por meio da simples programação IF-THEN, (se acontecer isto, então faz aquilo), vocês têem a possibilidade de ligar um Post novo nalgum lado, a uma mensagem pare  o Gmail, ou vice-versa, etc.
Também tem simples Do, ou faz isto, com um toque num botão no vosso Smatphone! 
Para quem vê, para quem publica, para todos, um achado.
Vejam só, como exemplo, esta colecção de If-Then, para ligar o Gmail ao Facebook:


What is IFTTT? 
IFTTT gives you creative control over the products and apps you love 
What are Recipes?
Recipes are simple connections between products and apps. There are two types of Recipes: DO Recipes and IF Recipes
 
 
DO Recipes
DO Recipes run with just a tap and enable you to create your own personalized Button, Camera, and Notepad. The DO apps are available for iOS and Android. 
 
IF Recipes
IF Recipes run automatically in the background. Create powerful connections with one simple statement — if this then that.


Para garantir o melhor desempenho possível das vossas Impressoras 3D, a GrabCAD oferece-vos este Programa em versão Beta, que vos ensina a escolher Definições, imprimir directamente dos vosso Programas CAD, e em geral, ter um SDerviço Profissional, numa Impressora Económica.


A smooth 3D printing workflow
Get the 3D printed parts you want, obstacle-free

Print directly from CAD
GrabCAD Print allows you to print directly from your favorite professional CAD formats, saving hours of time usually spent converting and fixing STL files.
Get started fast
Lean on smart default settings, tooltips, and notifications to guide you through a seamless printing process.
See what you’re making
Work with detailed views of your model, tray, and slice preview so you can make necessary adjustments before going to print. 
Print directly from CAD
GrabCAD Print allows you to print directly from your favorite professional CAD formats, saving hours of time usually spent converting and fixing STL files.
Get started fast
Lean on smart default settings, tooltips, and notifications to guide you through a seamless printing process.
See what you’re making
Work with detailed views of your model, tray, and slice preview so you can make necessary adjustments before going to print.


Esta caixinha vai-vos abrir todo um mundo de possibilidades, para criarem um sem-fim de Objectos por Moldagem a Vácuo,  com um simples Aspirador caseiro.
Aquece a Placa, pôe-na por cima do Molde, e forma o que queiram, usando Materiais para o Molde que tenham por casa.
Pode ser o ínicio de muita Empresa Caseira..
Porque, convenhamos, é muito mais rápido e económico produzir Objectos assim, que por Impressão 3D. 


The FormBox + Your Vacuum Cleaner = Blowing Up Kickstarter 
Bridget Butler Millsaps
 
“As Mayku’s desktop machines get sold and begin to produce parts in customers’ bedrooms, workshops and classrooms, there’s a chance here, finally, that the reputation of manufacturing skills will rise from the basement with them.”  – Stephen Holmes – Develop 3D
While many eschew vacuum cleaning, I find it a rather mesmerizing, almost relaxing, task. As the machine roars on monotonously, cutting out the chatter—and stresses—of the big bad world, one also has the great satisfaction of performing a repetitive motion that yields nice results (just don’t be messing up those long, lovely tracks, please!).
Now, in combination with the FormBox, your vacuum can be freed from the constraints of the utility closet, becoming a crossover star. The folks at Mayku, a startup headquartered in London, are responsible for this household disruption, explaining quite simply that they want to change the way things are made.
Just launched on Kickstarter with hopes of raising a modest $50,000 by June 3, the FormBox renders appeal because most everyone has a vacuum cleaner in the home and knows how to use it to some extent. Able to bring something to the table right away, potential users will most definitely be taken with the curiosity of how their vacuum and the Mayku team’s contraption are going to work together in creating a tabletop factory. Response on Kickstarter has been quite staggering already too, as at this time of writing they need less than $5,000 to meet their goal—with over a month to go. Can you say stretch goals?


terça-feira, 14 de junho de 2016

Impressora 3D King Size! E Aulas do Instructable, desenhar Caixas em Metal, Ar Conicionado Faça-você-mesmo, e Vídeos de categoria!

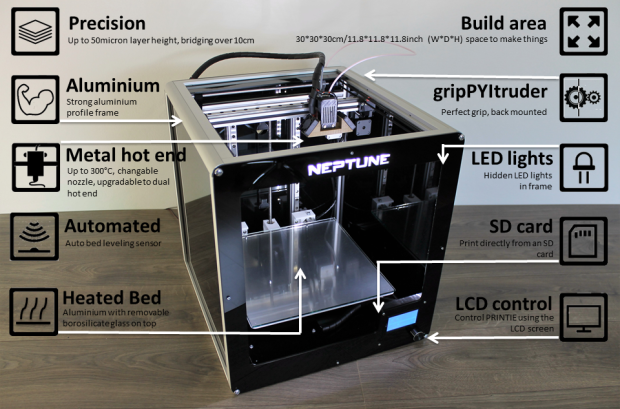
Está agora ao vosso dispôr, esta grande Impressora 3D, que apesar de permitir maiores tamanhos de Impressão, 30x30x30 Cm, não vos vai pesar muito mais na Carteira, que as outras Impressoras...
Vão ver como é, que tem todas as especificações técnicas no Site, e se gostarem, podem já encomendar: 


NEPTUNE 
Are you full of crazy and exciting ideas but don’t know how to bring them to life? Maybe you think about 3D printing them, but then you realize that 3D printers cost too much money? Maybe you already have one but it's not working properly (or like they said it would), or you are new to 3D printing and want an easy to use 3D printer?
That's exactly why we created ! 
We have been active followers of 3D printing in the past few years. After monitoring news, reading comparisons, testing different models, we really couldn't decide which 3D printer could be the most appropriate one to buy for everyday use as well as professionally. Whilst there are many advantages and disadvantages of every single model, we realized that many of them were not worth the price they were selling it for. So, we developed the which is the best you can get for your money! 


E se sempre quizeram aprender Carpintaria, Impressão 3D, ou mesmo Costura, etc. vão agora poder aprender tais Artes, no Instructable!
29.95 Dólares por matéria, ou Grátis, se já forem Premium, e aprendem como deve de ser. 
É bom! 


We just launched online classes!  
We're thrilled to announce the launch of our online classes!

Learn new skills by completing fun, guided projects
designed with beginners in mind!
Try out our first batch of online classes, and stay tuned for more. 
http://www.instructables.com/classes


Para fazerem as Caixas em chapa de metal, em 2 peças, para as vossas Engenhocas, cá está a EmachineShop para vos ensinar como o fazem, que já têem um Wizard só para isso, no seu Programa Grátis de CAD!


Sheet Metal Box
 
To create a sheet metal box:
  • Choose File | New | Box.
  • Fill in the desired parameters.
  • Choose View | 3D.
To create other sheet metal designs with bends:
  1. Draw the flat shape (something like shown here).
  1. Multiple select the above lines.
  1. Draw straight lines where you want bends.
  1. Multiple select the above lines.
  1. Choose Line | Machine | Bend.
  1. Choose View | 3D.


...Com um simples Balde de Plástico, e mais umas  coisinhas, podem ter o vosso Ar Comdicionado feito em casa, o que convém, para este Calor!


5 Gallon Bucket Air Conditioner
danolanater 
Hey there,
The following instructable is going to show my take on the 5 Gallon Bucket Air Conditioner/Swamp Cooler. In the picture you'll notice a small solar panel attached. I'll be creating another instructable on how to hook up a solar panel to a USB cable so you'll be able to power your bucket with solar energy. For now, this will just be about how to build an efficient bucket that actually works.
In contrast to the viral video on Youtube of the guy that built the original swap bucket, I've made a few changes to the design to make it more practical. I noticed when I first built the bucket exactly like the guy on Youtube, the ice would melt extremely fast due to the high powered fan pushing a lot of hot air past the ice. Also, a 5 gallon bucket full of ice does not provide enough of a temperature drop to cool entire rooms. And then there’s the mess that the ice leaves behind. In order to achieve maximum effectiveness, the cold air inside the bucket needed to be concentrated and aimed. 


E acabamos por hoje com esta Extravagância de Arte Geek, algo que faz a felicidade de qualquer Engenhocas, para além de vos poder dar algumas ideias para alguma Engenhoca futura, deliciem-se com as inúmeras Animações deste inspirado Artista!
Qualidade irrepreensível, um verdadeiro Luxo para os olhos dum Inventor... 


GARETH WAS HERE
Tumblr/Blog of Toronto Graphic Designer/Artist Gareth Fowler
garethwashere.tumblr.com


terça-feira, 7 de junho de 2016

Algarve DIY 3D! Elecrow, cooperar a criar Electrónica, mais um Torno, em Metal, uma Fresa CNC das boas, e Fundição de Alumínio duma Botija

Estão de parabéns o Algarve, a Reprapalgarve, e este nosso amigo, Aldric Négrier!
Sediado no Algarve, Aldric Négrier, na Reprapalgarve oferece-nos estes Planos grátis, neste Instructable, para construírem uma Impressora que pode misturar filamentos de várias cores!
É só pôr as mãos à obra!!! 

RGB STEEL - Low Cost, Steel Frame, Color Mixing 3D Printer

aldricnegrier

The RGB STEEL 3D Printer is intended to be a nice looking, low cost, strong carbon steel frame, compact, color mixing, easy to assemble reprap 3D printer.
The machine is a redesign of the famous steel frame P3Steel 3D printer, with the advantage that now it can be equipped with a Diamond Hotend that allows for color mixing 3D printing, and lodge at least 5 bowden extruders for even more color mixing.
This instructables also servers on how to install a diamond hot end onto any reprep like machine using ramps 1.4 and Arduino Mega. 


Um Site que me parece necessário visitar, é este Elecrow, onde podem encontrar toda a espécie de Electrónica Open Source, e até desenvolver as vossas ideias, em cooperação com eles, que podem criar novas Placas, encontrar componentes em conta, etc.


About Us 
Elecrow is an open hardware facilitation company based in Shenzhen, China. Benefiting from the largest electronic market, local manufacture power and convenient global logistic system, a vast number of funny and exciting products are created every day. We integrate resources to serve new era of innovation.
To make your making and innovation easier, we offer various development platform, modules, tools, electronics components,and other open source hardware.we also provide many kinds of service ,include Fusion PCB service, Component Sourcing service and PCB Assembly service etc.
No matter whether you're a curious student, a qualified engineer, or a hobbyist who loves to create, there will always be something here to meet your needs - and if there isn't ,we'd love to know.  


Eis mais um Instructable para fazerem o vosso próprio Torno, e este, todo em Metal, o que já dá para ter um Torno capaz de fazer algum trabalho de jeito...


Homemade Metal Lathe DIY Spindle Headstock by Drill Chucks

joulethief669 
A lathe is a piece of equipment used for shaping wood or other material. It consists of a base, which can be mounted on a bench or work table, and then, on either side, the headstock and the tailstock. The headstock has the spindle bearing which control the spindle, the part of the lathe which turns. The tailstock helps balance the spinning headstock, and features a stationary hollow horizontal access for a steel cylinder, which can be adjusted for accepting or stabilizing different sized tools and drill bits to cut the spinning material. 


Ora aqui está uma Fresa CNC que pode maquinar Alumínio, Metais abaixo da dureza do Aço, e até Pedra!
Já dará para uma data de usos Profissionais, e o preço reflecte isso, mas é de ver, se dispuzerem da quantia... 


SPECIAL OFFER: 3 Axis "A2" Ballscrew/ Laser CNC Router Package 
For use with: Slate, Aluminium / soft metals, Wood, Plastics/Acrylics, Stone
Specialist 3 Axis Package Includes: 
Desktop 3 Axis "A2" Ballscrew CNC Machine Router/Engraving Router and Laser
Machining Working Area - 660mm x 430mm, Z Axis 155mm 
Footprint: 1100mm x 850mm 
Gantry clearance: 150mm 
Accuracy/Repeatability: 0.01mm
Mechanical / Translation: Ballscrew, Class 5, light pre-load
Linear: Hiwin / TBI Profile Rails & Carriages
Laptop / NoteBook: Machine Control Software - Preloaded 
Design Software: VCarve Pro version 8
Controller: USB 3 Axis Controller and x3 NEMA23 3.1Nm Stepper Motors (X, Y and Z), Proximity Home Switch (X, Y and Z) and additional external emergency stop 


E se têem uma Botija de Gás à mão, nem precisam de soldar nada, este Instructable a seguir mostra-vos como construír uma Fundição caseira, que é uma maravilha...
E vem com o Bónus de ter um Link para muita mais Engenhoca do mesmo Autor.
É bom! 


Propane Tank Aluminium Smelter (No Weld).
NphRandom 
For a long time I had been watching YouTube clips and reading about people making their own aluminum smelters and figured one day I would go ahead and make my own. Time passed and there was always another project or reason why I never got around to making one.
Then I decided one cold winter’s day to go ahead and make one so that it would be ready for spring when the weather turned better and I could go ahead and start melting the aluminum I had been collecting.
The link above is to my blog page for NphRandom where you will find many other projects and Randomness.
Don’t forget that if you like what NphRandom is feel free to browse some more, go to other linked places, Subscribe, Like, comment and Favorite all that you want.
Thank you for reading this Random post and I hope that you have a nice remainder to your day.
Nph