Podem, façam!
Esta maravilha ode ser vossa, se se deram ao trabalho, e assim ficam com uma máquina bem respeitável, em Volume de Impressão, e Qualidade, e carregada de extras.
Bem melhor que comprar uma Impressora da tanga, por montar...
3D Printer Cantilever 2.0 C3Dt/cCore3DThis is my latest completed project to date. I'll be happy to build one for you (see update below), but if you must go it yourself; here is the instructions for the C3Dt/c (c for cantilever) by Core3D.tech. This printer was presented at MRRF2018
It is the culmination of many of my other intructables and I will refer/link to those as needed.
The 3D printer is a Cantilever printer with the following features:
- 200mmx200mmx260mm Build volume
- Heated bed
- Auto Bed Leveling using inductive sensor and Aluminum bed
- Linear Rails (MGN12 250mm) on both X and Y axis
- Dedicated Parts cooling
- Runing KFB2.0/Marlin 1.1.8
- Bowden Extrusion with MK8 Extruder
- 8080 Inc 1010/1020 frame
- Auto tensioning on X and Y Axis
- Double Rod Lead Screw Z axis using 12mm rods for extra stability.
- V6 All metal hotend with cooling adapter for Noctua cooling fan (ultra quiet)
- SD card reader as well as accessible USB port for direct computer access or OctoPrint
 Imprimir em 5 eixos, é, numa só frase, imprimir às curvas!
Pode parecer caricato, mas não é de beber, é antes, uma maneira de imprimir formas impossíveis com as actuais, e imprimir objectos muito mais fortes!
Porque a base onde de imprime roda, as camadas podem ser curvas, o que permite uma estrutura muito mais resistente...
Bem pensado!
 In a nutshell, this makes the Printer lay Filament in CURVES.
 Witch allows both for print jobs not possible on today's 3D printers, and for a very strong print, as it can follow a curved deposition path.
Good Idea!
5D Printing: A New Branch Of Additive Manufacturing
Jessica Van Zeijderveld
3D printing has already been around for quite a few years. Then, a bit more than a year ago, talks of 4D printing started to circulate – which we have wrote an in-depth blog post on as well that you can read here. But now, the idea of 5D printing is being talked about and experimented with. 5D printing is not an evolved version of 3D or 4D printing as it is with audiovisual aspects of different dimensions – it is less complicated than that. You can see 4D and 5D printing as roots originating from 3D printing. In this blog post, we will first explain to you what 5D printing is, then we will tell you what the benefits are and how it can be applied. Last but not least, we will tell you what the differences are between 3D, 4D and 5D printing along with how you can keep up with the latest technological advances related to additive manufacturing.
https://www.sculpteo.com/blog/2018/05/07/5d-printing-a-new-branch-of-additive-manufacturing/
Nem só de High-Tech vive o Engenhocas...
Eis como podem afiar as vossas serras de Mão, mas suspeito que este conceito ainda servirá para sabe~se lã que outros fins...
A Gizmo Maker's life will occasionally lead him into... Woodworking!
So here's how to keep those Hand-saws fit:
Filer Guide for Hand-SawsMikhandmaker.Sharpening a saw can be one of the most "difficult" tasks for a woodworker. I built this guide for sharpening hand-saw teeth at the required relief angles, for both rip saw and crosscut saw.
Inspired in an old tool from 1987 hard to achieve (at least where I live) and using materials available to anyone, I show you the step by step to make it by yourself.
- It is very important to clarify that the files work only forward. Therefore, the force when sharpening only has to be in that direction and the backwards without pressing, thus, we will avoid premature wear of the file.
Maravilhas da Net, podem descarregar este Programa Grátis, o eMachineShop, e como vem explicado, desenhar as vossas Caixas metálicas, com a certeza que vão sair como vocês queriam!
É bom!
For free, from the Net, you can download this CAD Program and design your plate boxes to your exact needs!
Neat
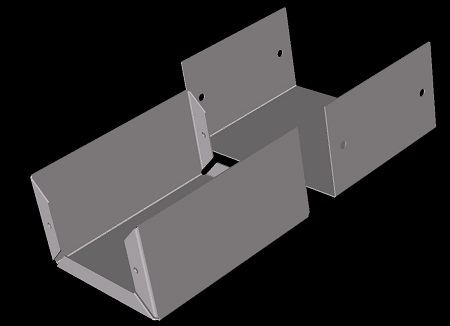
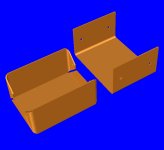
Sheet Metal Box
eMachineShop
To create a sheet metal box:
To create other sheet metal designs with bends:
- Choose File | New | Box.
- Fill in the desired parameters.
- Choose View | 3D.
https://www.emachineshop.com/sheet-metal-box/
- Draw the flat shape (something like shown here).
- Multiple select the above lines.
- Draw straight lines where you want bends.
- Multiple select the above lines.
- Choose Line | Machine | Bend.
- Choose View | 3D.
Termina-se por hoje com esta Bomba de àgua que funciona a gravidade! Tanto as Instrucções como a explicação encontram no Link, por isso, vão lá!
We end for today, with this Gravity Water Pump, both the Instructions and the working principle's explanation are down there on the Link, so go there!

Hydraulic Ram Pump
habolooby
Pump water with no electricity, no gasoline, just gravity!
Sound crazy or impossible? Don't worry, it does obey the laws of physics, but I'll try to explain the operation later. This instructable shows how to build a fairly simple water pump that needs no energy input other than water flowing from a higher point to a lower point. Most of the pump is constructed from PVC, with a couple of bronze pieces thrown in for flavor. I was able to source all of the parts from a local hardware store (Lowes) for a bit under $100.
To function, the pump does require a reasonable amount of water that will drop at least 3'-5'. The level that the pump can raise water to depends on the water's head (total drop the water will make).
https://www.instructables.com/id/Hydraulic-Ram-Pump/