Blog Posts

Mostrar mensagens com a etiqueta breadboard. Mostrar todas as mensagens

sexta-feira, 17 de novembro de 2017

Fritzing! E mais um Torno Gingery, Wi-Fi à medida, um Rocket Stove, e um Carregador Portátil

Montar circuitos electrónicos como se fosse um Jogo de Computador!

E ainda tem 3 esquemas de visualização, um, como se montassem um circuito numa Breadboard, outro com a tradicional visão esquemática, e outro inda, que permite levarem esse esquema para imprimir um Circuito numa Placa feita à medida para isso!
 
Querem mais?
Vem com vários circuitos já feitos, tanto a nível de iniciado, com o mais avançado...
Impecável.


Fritzing
Fritzing is an open-source hardware initiative that makes electronics accessible as a creative material for anyone. We offer a software tool, a community website and services in the spirit of Processing and Arduino, fostering a creative ecosystem that allows users to document their prototypes, share them with others, teach electronics in a classroom, and layout and manufacture professional pcbs.

http://fritzing.org/home/


Perdoem a insistência, mas um Torno quase de graça, e feito como um Hobby, é muito importante para um Engenhocas, tanto para obter um Torno...
Como para aprenderem como fazer uma Máquina, e qualquer outra, a partir daí!
Aprendam:


Build Your Own (metalworking) Lathe - Part I
corradini

You can make an entire machine shop worth of power machine tools, using basic hardware store/home center supplies and scrap metal. Melt aluminum in a metal-pail furnace, using sand, charcoal, and a clay flowerpot! Cast sophisticated metal tool parts using supplies from a gardening shop and modified kitty litter! End up with a full machine-shop lathe ("the only tool capable of making any OTHER machine-shop tool, including itself!") for just the cost of your time, some scrap steel and aluminum, and a motor!

https://www.instructables.com/id/Build-Your-Own-metalworking-Lathe---Part-I/


Mais numa coisa bastante útil para fazerem com as vossas Impressoras 3D!
Com isto, vão ter Wi-Fi por toda a casa, e o que é melhor, como vocês queiram, nos quartos que queiram:
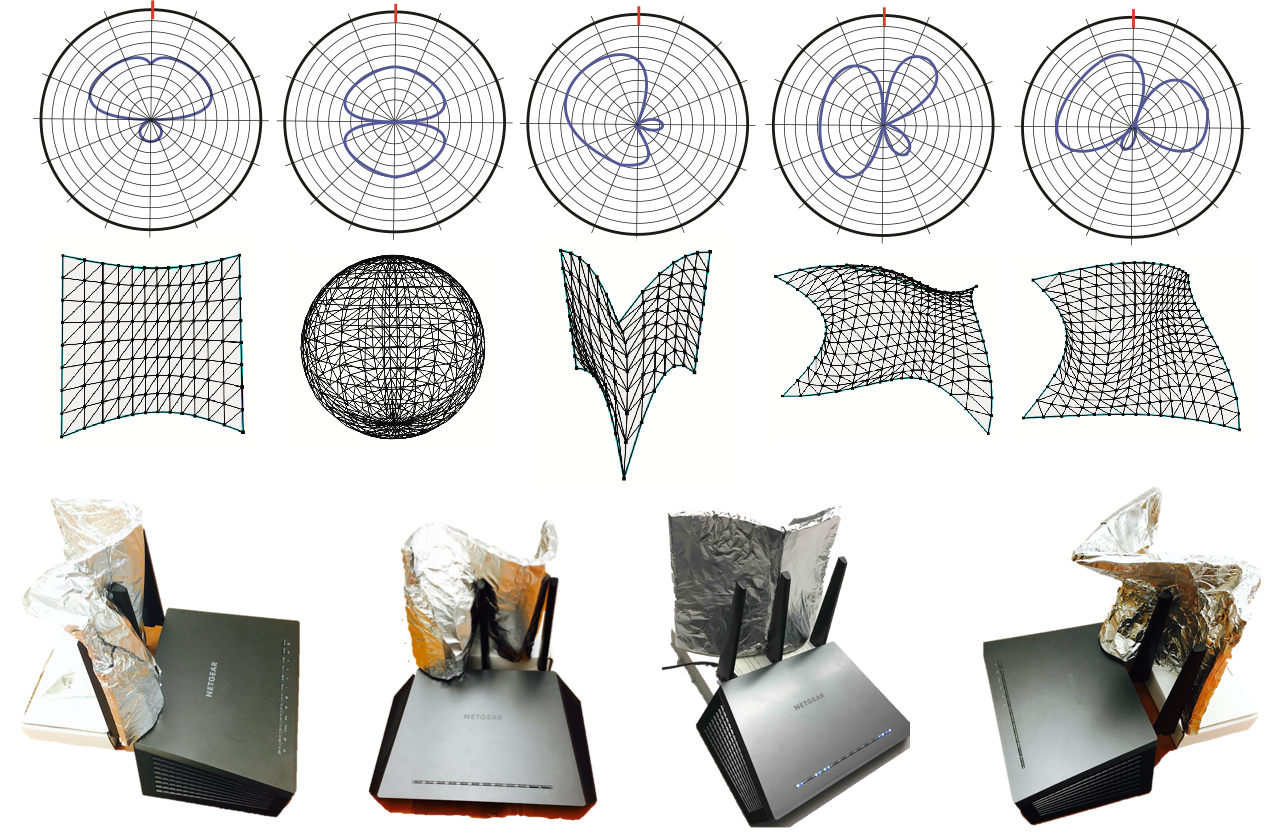


Customizing Indoor Wireless Coverage via 3D-Fabricated Reflectors
Abstract

Judicious control of indoor wireless coverage is crucial in built environments. It enhances signal reception, reduces harmful interference, and raises the barrier for malicious attackers. Existing methods are either costly, vulnerable to attacks, or hard to configure. We present a low-cost, secure, and easy-to-configure approach that uses an easily-accessible, 3D-fabricated reflector to customize wireless coverage. With input on coarse-grained environment setting and preferred coverage (e.g., areas with signals to be strengthened or weakened), the system computes an optimized reflector shape tailored to the given environment. The user simply 3D prints the reflector and places it around a Wi-Fi access point to realize the target coverage. We conduct experiments to examine the efficacy and limits of optimized reflectors in different indoor settings. Results show that optimized reflectors coexist with a variety of Wi-Fi APs and correctly weaken or enhance signals in target areas by up to 10 or 6 dB, resulting to throughput changes by up to -63.3% or 55.1%.

http://dartnets.cs.dartmouth.edu/wiprint


Dizem que este Inverno via ser o mais frio dos ùltimos 100 anos!
BRRRRR!
Por isso, é melhor terem este catrapázio no Quintal ou num canto na casa, porque um Rocket Stove;

-Funciona com galhos, cartão, e etc;
-Gasta muito mpouco combustível porque o aproveita até às cinzas;
- Como queima até o fumo, e o monóxido de carbono, é muito mais seguro, mesmo para dentor de casa!
Muito importante.
Atenção, a Introducção é mínima, mas as Instrucções, são muito completas:


Building a Rocket Stove for the Cabin
foodplotsurvival

FPS combines my passion for hunting and wildlife conservation with the overall need for self sufficiency.

https://www.instructables.com/id/The-16-Brick-Rocket-Stove-Quick-30-Second-Build-Ea/


Há Carregadores Portáteis que resultam mais baratos que construír o vosso próprio Carregador, mas se como eu, coleccionam Sucata...
É de graça!
LOL
Por isso, mãos à obra:


Build Your Own Inexpensive Powerbank with 3D Printing
Matthew Mensley

Instructables user Nematic! details how to make your own portable powerbank from laptop cells, 3D printing and a little electronics savvy.
We’ve all experienced that unique feeling of helplessness and anguish that only a dead cellphone battery can bring. Cut off from the internet and contact with others it becomes impossible to navigate, and what the heck are you supposed to do while sitting around waiting for the bus/train/plane. It sucks.
Fortunately there’s no shortage of inexpensive power banks knocking around to keep you topped up with juice on your travels. But for the thrifty with time to kill and a handful of old laptop batteries lying around (a common scenario, we know) there’s an alternative.
In a short-and-sweet post over on Instructables, user Nematic! shows us how with nothing more than a few tools (3D printer, soldering iron and glue gun), a cheap powerbank module and some 18650 cells, you can make your own smartphone powerbank lickety-split.

https://all3dp.com/3d-printed-powerbank-how-to/ 


segunda-feira, 30 de maio de 2016

Quadracóptero 3D! E o SAM, IoT e Electrónica Digital a brincar, façam os vossos Écrans Verdes, Breadboard para principiantes, e um Génio das Marionetas!

Podem imprimir nas vossas Impressoras 3D, esta pequena maravilha, que é uma boa maneira de terem justificação para o vosso Hobby...
Porque até filma os seus voos!
Podem fazer um espectáculo, com esta Impressão...
E são instruídos passo-a-passo, como montar tudo:


Micro 105 FPV Quadcopter - 3D Printed punkkills 
I've been flying 250 sized FPV (first person video) quadcopters for just over a year now. For those who aren't familiar with FPV, you outfit a camera to the front of your quadcopter and transmit the video to a pair or goggles or a monitor. You then get to pilot the quadcopter from the perspective of the aircraft. It is so much fun and lets you fly in ways that would be impossible line of site.
I wanted to build a micro FPV quadcopter that I could fly around my house and in areas where my larger copters are too big. I have a 3D printer so I was hoping that I could find a 3D printed frame that I could use. Unfortunately, I couldn't find any 3D printed frames that were exactly what I wanted. I decided to design my own! My goals were to keep it crash resistant, light weight and offer good protection for onboard gear.
I'm going to walk you through the steps to building your very own micro FPV quadcopter. You will have a blast flying it and will have the pride of having built it yourself! 
http://www.instructables.com/id/Micro-105-FPV-Quadcopter-3D-Printed/


Este nosso amigo, Shiv Kumar Ganesh‎, mandou um Link para a Internet of Things, IoT Internet of things technologies, e é algo de imprtante que importa partilhar... 
SAM, é uma maneira de desenharem e prototiparem a brincar! 


SAM – The ultimate Electronic toolkit for your IoT applications
May be you are a developer or rather you are a designer but SAM brings joy to your life. Using it you can start developing without coding. SAM is a one stop solution to get started with IoT Solutions. SAM brings you an awesome way to learn about Internet of Things, Coding and seamless integration of Hardware and software.

So one can conclude by seeing these videos as well as the content that SAM is the best one stop solution for kids as well as engineers. This can be revolutionary when it comes to education as well as the way people understand the various aspect of connected life.

http://thing.live/products/sam-the-ultimate-electronic-toolhit-for-your-iot-applications/


Esta Dica vem-nos de Henry Owen, na Promo Video Buzz, podem fazer os vossos Video-Blogs no Youtube, ou até Produções Teatrais, etc. com um ar bem mais  apelativo, com um Écran Verde, e um fundo à maneira...
Pois aqui, vão aprender como fazê-lo em casa! 


DIY Green Screen Complete Setup Guide

Brenna Clarine 

Believe it or not, setting up, filming, and editing your own DIY green screen video is actually quite simple. You don’t need any fancy software or expensive supplies. All you need is the right screen, lighting, and editor. Green screen technology is a cheap and simple way to transform your video’s setting or background in the blink of an eye. Also, creating a video that features dazzling green screen technology will only make it more appealing to your audience. So follow the steps below and you’ll be on your way to creating your own stunning DIY green screen video. 


O Sistema Breadboard ainda é uma boa Plataforma para prototiparem a vossa Electrónica, por isso, cá vão mais 10 Projectos para aprenderem como é...
E partirem daí, para o que quizerem fazer!


10 Breadboard Projects For Beginners

Saiyam 
Breadboard is a great way to construct electronic projects easily and in less time without the need of soldering. A problem that is faced by beginners in the field of electronics is that they cannot solder the components neatly on printed circuit boards. One bad solder joint can lead to the project not working. When the project does not work, they eventually loose their confidence and cease to continue making projects. Before attempting another project, they have to think twice. Another problem faced by them is that if they try to solder and make a project, it does not work because of poor soldering or the circuit that was taken from a book or magazine lacked instructions or it was wrong. Now after spending a lot of time on making it, what they have to face is dissapointment.
This instructable gives a walkthrough of ten projects that can be made easily on a standard size breadboard thus solving the problem of hobbyists. Each projects is followed by a schematic, a breadboard layout, complete description with instructions, parts list and the difficulty level. The difficulty level increases as you make each project. Before making the projects a description of breadboard as well as electronic components is given which gives a complete understanding to beginners. All the projects are tested before they were added and all of them work. 


..E isto a seguir, dá-nos esperança na Humanidade!
À espera que este jovem Génio ou patenteie esta maravilhosa Invenção, ou a torne Open Source, admirem o que é o nascimento duma Ideia que vai marcar o Mundo das Marionetas, para sempre!
Impressionante! 


NEW PUPPET CONCEPT (24/05/16)barnabydixon
Here's a new puppet concept that I designed and built during the last two months. It took some time to refine, and alterations may still be made, but it's at a stage now that I'm happy to show y'all.
 https://www.youtube.com/watch?v=-RrBiFI9FZA


quarta-feira, 8 de janeiro de 2014

Injecção de Plástico, Exaustor de Fumos, abrir uma Lata com as mãos nuas, e um Guia para Breadboards

Eis algo que me pôe logo bem-disposto, como fazerem a vossa própria  Injecção de Plástico, em casa.
Lembrem-se, quando bem feito, este método deixa-vos fabricar um Objecto em minutos, e não horas:


Home Plastic Injection Molding with an Epoxy Mold.

techkits

I made an epoxy mold of an existing plastic item. Then I was able to make copies of that item using a home plastic injection molding machine.
This process should work for many different types of items or models. Note that the original item must have a parting line without undercuts. That means the model must be able to be separated into two halves from which the new molded part can be easily removed.


Posso-vos dizer que cortar Placa por Laser CNC é uma maravilha...

Mas não os Fumos!

Façam como fizerem, ficam a cheirar a Incêndio, sem um Exaustor forte, como este, e se dá para estes, dará para outros fumos, de Fundição de Alumínio, ou até mesmo colar com Super-cola.
Atenção, isto não é só uma Ventoínha centrífuga, tem um Filtro e tudo, que vocês fazem em casa, com Material que se compra por aí, categoria:


Build a laser cutter fume extractor
Zach

I built my first laser cutter in 1996 and learned right away that laser cutters "stink". Well, at least the fumes from cutting smell awful and are quite harmful to breath. After trying several fume extraction options, back in 2002 I found the ElectroCorp RSU filter. It was a bit expensive, I think I paid $1500, but it did a great job extracting even the worst fumes from cutting acrylic. Fast forward to 2013, I called up ElectroCorp to buy replacement filters for my unit and found out that the original company was sold and is now being run by another company. This new company claimed to supply the same replacement filters, but after almost three months of going back and forth with them, it turns out that their filters are no longer the same, cost way more and look to be much less robust. Going through this challenging and frustrating process with them got me thinking. After taking a close look at how my old unit worked, it was pretty clear that I could build a similar unit quite easily that would allow me to use off-the-shelf and readily available parts. I figured I would document the process so other people with laser cutters could try their hand at doing the same. Depending on the supplies you have laying around your workshop, you should be able to build one of these for somewhere between $400 and $450. Here's how...


Dica do site The Blaze, eis como abrirem uma Lata de Conserva, só com as mão nuas, e não é coisa de Super-Homem, usa-se é de Habilidade a sério, este Russo é um Génio, em coisas práticas...

Here’s How to Open a Can With Your Bare Hands

There are still tin cans out there that don’t have the handy pop-top tab for you to pull, and thus, require a can opener.
But what if you don’t have access to the specialized, can-opening kitchen tool? What then?
Enter a Russian outdoorsman to teach you how to open that can using only your bare hands. Now, unless you speak Russian, you’re not likely to understand what he’s saying, but we don’t think the language barrier is too much of a roadblock in his lesson.


Para os Engenhocas o Breadboard é uma espécie de Esboço dum Circuito Integrado, que podem fazer, em definitivo, quando o Circuito estiver Ok, e sem problemas.
Por isso, cá vai um Guia para como o fazer ora isto está mesmo a calhar, porque vos permite poupar tempo, tentando aprender por vocês o que já cá está, à mão.
Atenção, é um Meta-Instructable, o que quer dizer que aponta para outros Instructables:


Comprehensive Guide to Electronic Breadboards: A Meta Instructable

Breadboards sometimes know as prototyping boards or proto boards are a quick way of working up and experimenting with electronic circuits. Originally breadboard circuits were circuits built on real wooden breadboards. Some commercial products like Atwater Kent radios were built this way. More recently the term refers to plastic boards loaded with connection points that accept wires and components and include some pre-wired connections. Many instructable articles have been written about breadboards and prototyping with them.  This is a pretty comprehensive guide to them ( but not in the guide format, comment? )
Not included projects that just happen to use a breadboard. ( Also I generally do not watch videos, so I have excluded them here. ) If you are an author of a breadboard instructable that you think I should have included, please let me know.

A note on the images in each step, each comes from the first instructable mentioned the step.

http://www.instructables.com/id/Comprehensive-Guide-to-Electronic-Breadboards-A-Me/


quarta-feira, 18 de setembro de 2013

Realidade Aumentada, Centrifugadoras, SolidWorks, um Simulador de Breadboard(!), e a Núvem 3D

Já saíu a nova versão do Software de realidade Aumentada, ARMedia, que faz dos vossos Androids, uma Biblioteca de Objectos 3D.
Vem com uma data de coisas novas, como a capacidade de ler QR Code:


 ARMedia Player
"ARMedia Player” is the first Android application that allows to interact with virtual models, created by means of the popular ARMedia Plugins, directly in the real physical space using AR (Augmented Reality) technology. When aiming your device's camera to the AR target image, you can simulate the setup of your models in an unrestricted way and interact with their features no matter where you are. This way models come to life letting you enjoy an immersive experience of the virtual models in your surroundings.
The software is a general purpose player suitable for studying virtual prototypes of any kind in physical locations. In addition, it is a unique tool for presenting projects and ideas in many fields including Design, Architecture, Engineering, Construction and Education.
Main Features:
(1) Touch the ARMedia icon to instantly augment your mobile view with the selected 3D model.
(2) Browse the models Library and make any model you like the default model for quicker access. You can choose any model to view from the Library.
(3) Add new models to the Library using direct upload into a device, mails' attachments, links to models on the web or any file sharing app installed on your device.
(4) Import your models directly from your preferred 3D modeling software via ARMedia Plugins available for your personal computer.
(5) When you look at the AR target image (available from the app's support page http://www.inglobetechnologies.com/android/player), the 3D model will appear on top of the AR target image.
https://play.google.com/store/apps/details?id=com.inglobetechnologies.armedia.player


A Oficina dum Bio-Engenhocas não está completa sem uma Centrifugadora, e que melhor Centrifugadora, que uma Open-Source? 
Com a opção par a construírem vocês, ou mandarem vir as peças, mas com a electrónica já toda montada:


OpenFuge

CopabX

My goal was to make an affordable, open-source centrifuge for home-use by DIY biohackers. As of now, it costs around $200 in parts only, with all parts being commercial, off-the-shelf.

Specs (Observed):
G-Force: 6000 G's
RPM: 9000 RPM
Size (closed lid): 15cm x 24cm x 20cm
Features:
Adjustable speed and power
Can hold up to 4 Eppendorf tubes
Portable
Safety Interlock
Cleanable
Live RPM monitor and countdown

For DIY people head over to http://www.thingiverse.com/thing:151406/#files  and cut out the attached panels. Check out the Bill of Materials (BOM) for the list of parts needed. WARNING: LASER CUTTER REQUIRED (40 min)
For non-DIY people head over to https://www.tindie.com/products/CopabX/openfuge/ and purchase a kit. It comes with all electronics pre-soldered and pre-programmed.


Mais um Software recém-renovado, a Solidworks apresenta a Versão para 2014:


SolidWorks 2014: Design without Limits 
Expand innovation with powerful new tools and enhancements that shorten your design process, enhance collaboration, and increase productivity for design without limits. 


O Programa 123Design permite-vos simular um Circuito Electrónico, antes de o montarem na Placa Breadboard, e ainda por cima, podem depois mandar vir um Circuito Integrado feito de acordo com esse vosso desenho, e Breadboard!
Para além de o poderem fazer em colaboração com outros, por todo o Planeta.
Eis um Instructable porreiro, que é um Tutorial de como o fazer:


Zero to Breadboard Simulation

circuitsio
This instructable is a step by step guide to design and simulate a simple electronics project on 123D Circuits using a virtual breadboard design.

123D Circuits is a revolutionary free tool for designing your electronic projects online. You can design in a familiar breadboard view and the app will guide you to make professional printed circuit boards with built in layout tools. When you’re done just click to have your boards professionally manufactured and shipped for free worldwide.

What’s also cool is how you can easily, simultaneously work on the same circuit with your friends. And at any point you can compile and emulate your Arduino code inside a live, editable circuit!

http://www.instructables.com/id/Zero-to-Breadboard-Simulation/


E eis como a Sculpteo vos p+ermite fazer Cloud 3D Printing, que é o mesmo que dizer, vocês criam um Desenho, e os vossos Clientes modificam-no ao seu gosto, e mandam-no vir a casa:


Ever wondered what our 3D Printing Cloud Engine is all about?

There are sometimes misunderstandings about what’s Sculpteo’s 3D Printing Cloud Engine. So we’ve imagined a new video lo let you know what’s behind this factory of the future.
The short clip tells you the story of Emily, the Glucose Sweet Design’s shop owner, who embedded all Sculpteo’s tools on her website.

http://blog.sculpteo.com/2013/09/16/ever-wondered-what-our-3d-printing-cloud-engine-is-all-about/


sexta-feira, 21 de setembro de 2012

FreeCad da Mecsoft, Beaglebone, e Viva Aveiro!

Faço coisas muito Cinemáticas em 3D, vem desde o tempo em que mexia no Cinema 4D no Commodore Amiga...

Mas para 3D de Fabbing, ou mesmo de Fabricação tradicional, estes Sólidos não servem!

Para todos os que sofrem do mesmo problema, vem agora mais uma ferramenta porreira. Podem importar em Vrml, e exportar em Stl, ou até STEP, e ficar por aí...
Ou ir aos poucos aprendendo a fazer Sólidos como deve de ser neste Programa Cad do caraças, e Grátis! 
FreeCad

Ó pa mim, com o Halbach 12 Ìmanes no FreeCad, no Linux Mint, através do Emulador de Windows, Wine:


Fazer o Upload para Sites de Impressão 3D, é uma dor de dentes!
Nunca acertam com as dimensões, pois agora, é só esticar o bicho, num programa mais que completo, e não nos programas que dá para poucochinho...

Vão lá!


Beaglebone? Foi lançado um ano antes do Raspberry Pi, e não tem tanta fama, mas é de ver, e comparar com o Raspi...
Vejam este, e outros artigos porreiros, na Designspark:


The BeagleBone Revisited

As the BeagleBone approaches one year old a look how it compares with its slightly younger, not-so-distant but arguably more glamorous relative, Raspberry Pi.
When the BeagleBone was announced it caused quite a stir with its combination of a reasonably powerful ARM-based SoC, hacker-friendly nature and low price point. However, it wasn't long before it was eclipsed by the similar but even lower cost Raspberry Pi, which in the UK received much coverage in the mainstream media and quickly went on to become a household name.
Since the Raspberry Pi has become so well known it serves as an excellent benchmark for other embedded platforms, and a closer comparison of the Pi and BeagleBone is useful as it brings to light their respective strengths. What follows is a comparison of just some of the major differences and for comprehensive details consult the official documentation.

http://www.designspark.com/content/beaglebone-revisited


Aveiro brilha, e pelas boas razões de ter a Inovação, não como uma Moda maricas, ou uma desculpa para sacar Fortunas ao Governo, via Cunhas, mas sim, por encarar a Inovação como uma Ferramenta para servir o País, com um Recurso não só renovável, mas Infinito:
A Invenção!

Parabéns a Aveiro, a ao Mundo Português também, pela divulgação desta Boa Notícia:


Um laboratório permanente de inovação na Universidade de Aveiro

Um processo inovador que será capaz de diminuir o tempo de transformação do bacalhau «verde» em bacalhau salgado seco, a criação de um novo biocombustível a partir microalgas existentes na costa portuguesa ou o fabrico de um dispositivo capaz de fazer a infusão de soros ou plasma sanguíneo à temperatura próxima do corpo do paciente, são alguns dos projetos de investigação que estão a ser desenvolvidos no Departamento de Engenharia Mecânica (DEM) da Universidade de Aveiro. Com mais de 350 alunos, 70 investigadores e 64 doutorandos - dos quais quase 50 por cento são estrangeiros, o DEM está em fase de internacionalização.

“Estamos abertos aos filhos da diáspora e à colaboração com as próprias universidades. Esse é um aspeto extremamente importante”, destacou a este jornal, António Mendes Sousa, professor catedrático e diretor do Departamento de Engenharia Mecânica (DEM).
Fundada em 1973, a Universidade de Aveiro (UA) é um dos estabelecimentos de ensino superior de referência em Portugal. Em 2011 foi considerada uma das melhores universidades da Europa e a melhor de Portugal, segundo o ranking da revista britânica Times Higher Education (THE). Para essa classificação teve grande importância a alta qualidade da investigação que é desenvolvida naquela universidade, para além do seu corpo docente e das suas infraestruturas.

http://www.mundoportugues.org/content/1/10759/laboratorio-permanente-inovacao-universidade-aveiro/


Tempo para admirarmos o verdadeiro Museu de Mecanismos, de montar em casa, que é o Site do Rob Ives, está cada vez melhor, e vejam estes três exemplos,  3 variações do mesmo tema, atenção, os Links apontam para estas imagens, mas ANIMADAS!!!

1 O Mecanismo chamado Scotch Yoke serve para transformar o movimento circular em movimento de vai-vem. 

http://www.robives.com/blog/scotch_yoke_mechaniism


2 Pois uma modificação, permite transformar esse movimento coninuo de vai-vem, num movimento pausado;


  http://www.robives.com/blog/scotch_yoke_dwell_more_animations

3, E juntando os dois, tem-se um mecanismo que pode mover um braço em vai-vem contínuo, e uma segunda parte, pausadamente!


sábado, 17 de dezembro de 2011

Desenhar os vossos próprios Circuitos Electrónicos

Querem desenvolver um Projecto em Electrónica?
Agora, é muito mais fácil, graças a esta iniciativa, descoberta pela Ponoko:


Upverter: online hardware design tool

‘Github for electronics’

Upverter is a new cloud-based electronics engineering design platform. It aims to make it easier for open hardware designers to collaborate and share their projects. It includes an HTML5-based schematic editor and crowd-sourced parts library. Integration with Github takes care of versioning, and their open-source schematic conversion tool hopes to standardise interoperability between all common file formats.


E do nosso amigo Maurício Martins, a newsletter do Open Hardware:


The Open Hardware Weekly


Some members from the 2011 dream team with Ayah & Alicia

After two amazing and inspiring iterations (2011 and 2010), we are excited to announce we are passing the Open Hardware Summit torch!

We had an amazing two years: we collectively created the first OSHW definition (which has been adopted by CERN), communally created a logo for our movement, grew into a community that supports each other on forums, mailing lists and sponsorships, launched the first Open Hardware Scholarship, turned a conference goodie bag into something you would wrestle over, and created a geek red carpet that would have the Oscar’s drooling!


http://paper.li/ledsandchips/1317816319

quinta-feira, 4 de novembro de 2010

Protótipos mais baratos, é bom!

Querem fazer um Protótipo decente?


Matt Martinez has recently created Phenom Engineering, a side venture to his day job as an engineer to a large defense contractor in Tucson, Arizona, USA.
What led you to Ponoko, Sparkfun?
I was doing a search for electric components for a work project I was working on. I happened on Sparkfun during that search. I saw the immense design opportunity with all the gadgets Sparkfun offered, so I bookmarked the site and became a frequent visitor. During one of those visits, they had posted a link to Ponoko which I also visited and promptly bookmarked. Exploring the Ponoko site and seeing the services offered really set the creative/design gears in motion. It opened a whole new dimension as to what kinds of things I could prototype, design and eventually produce.
Vejam tudo, aqui:

http://www.facebook.com/notes/ponoko/ponoko-sparkfun-happiness/450549192546

Mais uma maneira de mandarem fazer 3D:

http://i.materialise.com/Model/Details/bookend-hip

E a Ponoko não pára de nos dar boas notícias, eis um livro a ser publicado em breve, as vossas criações via Google 3D:


http://www.amazon.com/o/ASIN/1430233613/amazonbook021-20/ref=nosim?newgoodzT=2010105&utm

E mapas em 3D para os Cegos?
Vejam tudo, aqui:

http://www.facebook.com/notes/ponoko/making-a-splash-with-3d-printing/450549187546

...E se precisam duma razão para assinarem a Gizmag, eis o sonho de qualquer Portuga, a Bicileta-Tenda de campismo!

http://www.gizmag.com/bikamper-bicycle-touring-tent/16815/?utm_source=Gizmag+Subscribers&utm_campaign=b4c841f8e5-UA-2235360-4&utm_medium=email