Blog Posts

Mostrar mensagens com a etiqueta gingery. Mostrar todas as mensagens

quinta-feira, 12 de julho de 2018

Nexen, CNC melhor? E uma Pinball de Lego, projectos, Vídeos Gingery, e 3D para a Quinta!

Nexen!
Em vez dos Parafusos, lentos, ou das correias, relaxadas, o melhor de 2 Mundos, um movimento linear de precisão, mas que aguenta muito...
Bacana!


Nexen Enhances Roller Pinion System With Increased Torque Capacity
Editor Design World

Nexen Group, Inc. has improved its revolutionary Roller Pinion System (RPS) by significantly increasing its torque capacity. With up to 60 to 140 percent more torque capacity*, the RPS offers industry-leading power density for precision linear motion control applications.
“In the past, the market has used the phrase ‘power density’ to differentiate similar motion control solutions,” said Tony Kliber, Lead Project Engineer Precision Automation Components, Nexen Group, Inc. “The new torque capacity ratings eliminate this factor, allowing our customers to reduce the size, cost and weight of their machines without sacrificing superior linear positioning performance.”
Nexen’s RPS offers linear positioning with zero backlash for high-precision motion control applications. With more than 99 percent efficiency and a long operational life of up to 60 million pinion revolutions, the RPS yields up to 36 million meters of travel. Differing from a traditional rack and pinion system, the RPS features a roller pinion/toothed rack combination. The pinion is comprised of bearing supported rollers that engage a unique tooth profile. Each tooth profile is measured to ensure high positional accuracy and eliminate cumulative error. Racks are available in standard 1-meter and ½-meter cut lengths or can be custom cut to certain lengths, leaving no limit to travel distances.


Para a brincadeira, para a palhaçada, ou para a Filharada, eis uma Máquina de Pinball, toda ela, com peças de Lego!


Working Mini Lego Pinball Machine
Lego Man Productions

Learn how to make this working pinball machine completely from Lego.


Dos nossos amigos da 3D Printing, vem esta Dica, uma série de Livos Antigos, que ainda hoje são úteis, dos quais, The Boy Electrician, e The Boy Mechanic:



Public Domain Technical Books
This is a scanned version of The Boy Electrician, 1913 version. This book is in the public domain. Currently it is in scanned form, but the eventual goal is to use OCR software to convert it to real text plus images. If you need the original TIFs (which are huge), send me an email.


Estou sempre a insistir nestes Livros da Série Gingery, mas é assim que eu sou!

O que eu sei, é que estes Livros fazem falta a qualquer Engenhocas, porque não só vos permitem construír Máquinas-Ferramenta, como vops podem inspirar para sabe-se lá que mais outras máquinas, como por exemplo...
Impressoras 3D!


The Best Gingery Lathe Video Series To Date
Gerrit Coetzee

Makercise] has been working on a Gingery Lathe since September last year. His videos on the process are by far the most detailed, clearly shot, and complete series on making a Gingery lathe we’ve come across.
For those who aren’t familiar, the Gingery series of books describe how to build an entire machine shop’s worth of bench top tools using only the hardware store, dumpster dives, charcoal, and simple skills. The series of books start out with the charcoal foundry. [Makercise] has built a nice oil fired foundry already so it’s off to the next book, Gingery 2, is the metal lathe.
The Gingery books and, really, most DIY books from that era are: not well laid out, well written, or even complete. All but the most recent prints of the series still looked like photocopies of typewritten documents with photos glued on. The series provided just enough detail, drawings, and advice to allow the hobbyist to fill in the rest. So it’s really nice to see someone work through the methods described in the book visually. Seeing someone using a scraper made from an old file on aluminum to true the surface is much more useful than Gingery’s paragraph or two dedicated to the subject.


Um Hino à Engenhosidade Humana, 7 histórias de pasmar, como a Agricultura, Mãe de todas as Indústrias, beneficia da ùltima Indústria a aparecer, a Fabricação Local, a partir da Impressão 3D e afins!
E para ajudar quem mais precisa, neste Mundo?
BRAVO!


3D printing for agriculture: Top 7 of the best projects
Lucie Gaget

Additive manufacturing is a great asset for many different industries and can be used for various applications. You may not know it, but agriculture is one of the industries starting to make the most of the cutting-edge technology that is 3D printing. You will see in this blog post what are the benefits of this technology for agriculture and what are the most innovative projects developed in this sector. From urban gardens to 3D printed tools, we will see how additive manufacturing is helping the development of agriculture. Follow the guide.


sexta-feira, 17 de novembro de 2017

Fritzing! E mais um Torno Gingery, Wi-Fi à medida, um Rocket Stove, e um Carregador Portátil

Montar circuitos electrónicos como se fosse um Jogo de Computador!

E ainda tem 3 esquemas de visualização, um, como se montassem um circuito numa Breadboard, outro com a tradicional visão esquemática, e outro inda, que permite levarem esse esquema para imprimir um Circuito numa Placa feita à medida para isso!
 
Querem mais?
Vem com vários circuitos já feitos, tanto a nível de iniciado, com o mais avançado...
Impecável.


Fritzing
Fritzing is an open-source hardware initiative that makes electronics accessible as a creative material for anyone. We offer a software tool, a community website and services in the spirit of Processing and Arduino, fostering a creative ecosystem that allows users to document their prototypes, share them with others, teach electronics in a classroom, and layout and manufacture professional pcbs.

http://fritzing.org/home/


Perdoem a insistência, mas um Torno quase de graça, e feito como um Hobby, é muito importante para um Engenhocas, tanto para obter um Torno...
Como para aprenderem como fazer uma Máquina, e qualquer outra, a partir daí!
Aprendam:


Build Your Own (metalworking) Lathe - Part I
corradini

You can make an entire machine shop worth of power machine tools, using basic hardware store/home center supplies and scrap metal. Melt aluminum in a metal-pail furnace, using sand, charcoal, and a clay flowerpot! Cast sophisticated metal tool parts using supplies from a gardening shop and modified kitty litter! End up with a full machine-shop lathe ("the only tool capable of making any OTHER machine-shop tool, including itself!") for just the cost of your time, some scrap steel and aluminum, and a motor!

https://www.instructables.com/id/Build-Your-Own-metalworking-Lathe---Part-I/


Mais numa coisa bastante útil para fazerem com as vossas Impressoras 3D!
Com isto, vão ter Wi-Fi por toda a casa, e o que é melhor, como vocês queiram, nos quartos que queiram:


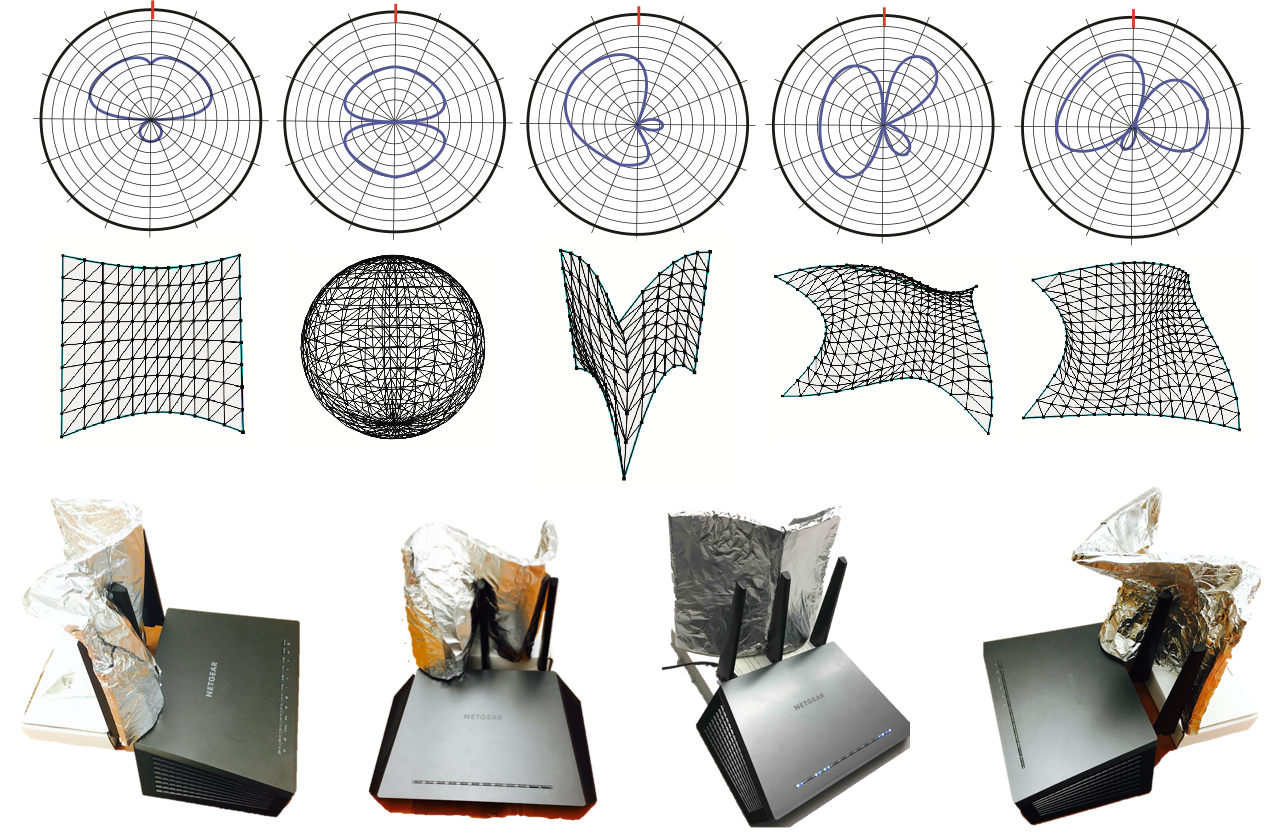
Customizing Indoor Wireless Coverage via 3D-Fabricated Reflectors
Abstract

Judicious control of indoor wireless coverage is crucial in built environments. It enhances signal reception, reduces harmful interference, and raises the barrier for malicious attackers. Existing methods are either costly, vulnerable to attacks, or hard to configure. We present a low-cost, secure, and easy-to-configure approach that uses an easily-accessible, 3D-fabricated reflector to customize wireless coverage. With input on coarse-grained environment setting and preferred coverage (e.g., areas with signals to be strengthened or weakened), the system computes an optimized reflector shape tailored to the given environment. The user simply 3D prints the reflector and places it around a Wi-Fi access point to realize the target coverage. We conduct experiments to examine the efficacy and limits of optimized reflectors in different indoor settings. Results show that optimized reflectors coexist with a variety of Wi-Fi APs and correctly weaken or enhance signals in target areas by up to 10 or 6 dB, resulting to throughput changes by up to -63.3% or 55.1%.

http://dartnets.cs.dartmouth.edu/wiprint


Dizem que este Inverno via ser o mais frio dos ùltimos 100 anos!
BRRRRR!
Por isso, é melhor terem este catrapázio no Quintal ou num canto na casa, porque um Rocket Stove;

-Funciona com galhos, cartão, e etc;
-Gasta muito mpouco combustível porque o aproveita até às cinzas;
- Como queima até o fumo, e o monóxido de carbono, é muito mais seguro, mesmo para dentor de casa!
Muito importante.
Atenção, a Introducção é mínima, mas as Instrucções, são muito completas:


Building a Rocket Stove for the Cabin
foodplotsurvival

FPS combines my passion for hunting and wildlife conservation with the overall need for self sufficiency.

https://www.instructables.com/id/The-16-Brick-Rocket-Stove-Quick-30-Second-Build-Ea/


Há Carregadores Portáteis que resultam mais baratos que construír o vosso próprio Carregador, mas se como eu, coleccionam Sucata...
É de graça!
LOL
Por isso, mãos à obra:


Build Your Own Inexpensive Powerbank with 3D Printing
Matthew Mensley

Instructables user Nematic! details how to make your own portable powerbank from laptop cells, 3D printing and a little electronics savvy.
We’ve all experienced that unique feeling of helplessness and anguish that only a dead cellphone battery can bring. Cut off from the internet and contact with others it becomes impossible to navigate, and what the heck are you supposed to do while sitting around waiting for the bus/train/plane. It sucks.
Fortunately there’s no shortage of inexpensive power banks knocking around to keep you topped up with juice on your travels. But for the thrifty with time to kill and a handful of old laptop batteries lying around (a common scenario, we know) there’s an alternative.
In a short-and-sweet post over on Instructables, user Nematic! shows us how with nothing more than a few tools (3D printer, soldering iron and glue gun), a cheap powerbank module and some 18650 cells, you can make your own smartphone powerbank lickety-split.

https://all3dp.com/3d-printed-powerbank-how-to/ 


sexta-feira, 2 de junho de 2017

Cimento 3D! E Cortar por Waterjet por tostões, Protótipos feitos à medida, Q.bo.One Um Robot para todos, e um Torno de Metal DIY(!)

Que tal, o vosso Laboratório, ou Oficina...
Impressos em 3D?
Foi o que foi feito em Dubai, pela Empresa Holandesa CyBe, isto é um Mundo fantástico:


Dubai’s New Drone Laboratory is 3D Printed from Concrete

Matthew Mensley 
And the award for the most “the future is now” headline goes to this story, and the news that concrete 3D printing company CyBe has completed its first project in Dubai.
The Dutch firm has been working on the city’s new R&Drone Laboratory, one of a number of progressively technology-focused projects commissioned by Dubai’s numerous authorities.
Located in the desert at the city’s Solar Park, it will be home to exciting research facility. Exciting indeed, since 3D printing will be one of the areas of focus, alongside the building’s titular drones.
The Dubai Electrical and Water Authority, architects Wanders Wagner, engineering consultants Witteveen + Bos and construction firm CONVRGNT all have a stake in the project. But it is CyBe that planned and physically constructed the structure.
To achieve this the company used its array of proprietary, concrete-based products. This includes software, material and the CyBe RC 3Dp mobile printer.


Abram os olhos, Engenhocas! 
Cortar por jacto-de-àgua, a 150 Dólares!
Podem ver no vídeo como é, corta Alumínio, uma maravilha à espera de ser transformada em Máquina de Corte CNC, nalgum Fablab...


Waterjet cutter built with a cheap pressure washer
Applied Science
Building an abrasive waterjet cutter with a $150 pressure washer.


Há quem tenha muito Tempo e pouco Dinheiro...
Mas há quem tenha Dinheiro que chegue, mas pouco Tempo!

Para esses, e para quem tem de apresentar um Protótipo já num  nível muito mais avançado, já para a pré-producção, eis esta empresa, que vos resolve o problema:


EPD is a high-tech, full service product development firm. 
We are devoted to providing uncompromised quality and service at a competitve cost. We have the skill and expertise to develop your product to its fullest potential. We believe that products are only complete when styling, function, ergonomics, economics, ecology and manufacturing are fully balanced.
From concept to manufacturing, we can make your product a reality. We use state-of-the-art computer aided design and engineering to develop your product, and the latest in material and process technologies to prototype and manufacture your product.
We've worked in many different industries that span from architectural components, automated equipment, automotive parts and products, bicycles and components, consumer appliances and electronics, furniture, luggage, marine products, medical products, snowboards and other sport-related products, toys and vending machines, just to name a few.


Eis um simpático Robot Open Source, o Q.bo One, e é mesmo para todos, Programadores, Educadores, Hobistas, ou mesmo os mais novos!

Porque pode ser programando com um Interface de programação intuitivo, o Scratch, ou para Engenhocas mais sabidos, em  C++, Java, PHP ou Python, vai ser uma ferramenta bacana:


The Perfect Platform for Kids, Educators and Developers
Qbo Robot 
Q.bo One is built to be easy. It is easy to adopt because it is relatively inexpensive, it is easy to understand because it is interfaced with very simple parts and it is easy to build applications on because its hardware and software are open source.
Programming language such as C++, Java, PHP or Python can be used to program Q.bo One. Notwithstanding, those with little or no programming language experience can always start with Scratch. Scratch is easy to learn, so much so that even kids can pick it up. Essentially, Scratch is supported by comprehensive and interesting tutorials together with references and discussion forums to get the learner up to speed. It is designed to be graphical so that users can just pick and drop various modules to write a program. It similar to building a jigsaw puzzle, only that this time, instead of putting an image together, the user writes a program. 


Quantas vezes já não vos falei do Torno Gingery!
Pois para vos inspirar a fazerem um, cá vai esta história de sucesso, para verem que sim, pode ser feito:


Re: Home made tools!
ndr1968 
Here’s my ultimate home made tool. My lathe! It swings 10.5” over the bed. Turns 24” between centers. Threads the full compliment of SAE threads. Has steady and follow rests as well as a Southbend inspired taper attachment. Yep, I cut all the change gears, made most of the tooling (except chucks) including a sector type dividing head with hole plates. This little lathe still turns with +/- .001” (or better) accuracy and I still use it on occasion. I completed it back in the late 90’s and as I recall it took me about two years of pretty much devoting every spare moment I had to it. 
I was inspired by the David Gingery book Metal Lathe. The book outlines detailed plans and instructions for building a small lathe from aluminum castings. I used no castings for mine but the shop lore and techniques in this little book were all I needed to understand the processes and basic machining skills needed to complete the project. Even if you have no intention of building such a thing the book is well worth looking at. Gingery is a genius of what I like to call “bootstrap engineering”. He takes scratch building to a whole new level. He has several other project books out including how to build a drill press, a shaper, a horizontal mill, sheet metal brake, dividing head, etc. 


segunda-feira, 11 de maio de 2015

Soldar, sem solda? E um Computador a 9 Dólares(!), uma Injectora de Plástico para Fabbers, e Alívio para a Dor, mais uma Câmara de Infravermelhos

Eis como fazerem algo em Electrónica sem as chatices do Fumo e da Solda...
E ainda ficam com uma ligação à prova de àgua!
É bom!


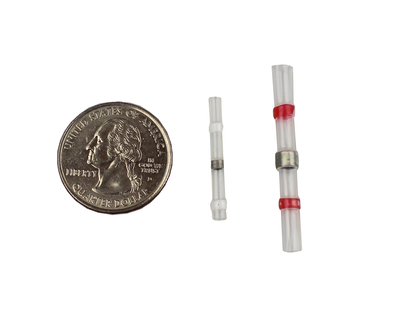
Solder Sleeves
Solder, heat shrink and waterproof your splices in one operation.

This is the easiest way to make soldered splice in your wiring. It is our favorite way to extend the wires on stepper motors.
This part combines a low temperature solder ring inside a piece of clear heat shrink tubing. It also has rings of hot melt glue at each end. You strip each wire, insert one from each end and cross the stripped ends inside the solder ring. You then heat the tubing with a heat gun. The solder and glue melts and the tubing shrinks. You get a reliable, insulated, waterproof and soldered connection in one operation.
It is also great when you need to fan out one wire to several wires. This often happens when you have one ground terminal, but four wires coming to it. Place the four wires in one end and one in the other end.


Um Computador por 9 Dólares? 
Com ligação Wifi, e gestão de Bateria?
Sim, se só precisarem de computadorizar uma Engenhoca, ou terem um Smartphone ou Tablet feito à vossa medida, porque este liga-se a um Televisor, ou Écran de Smartphone, com Monitor é mais caro.


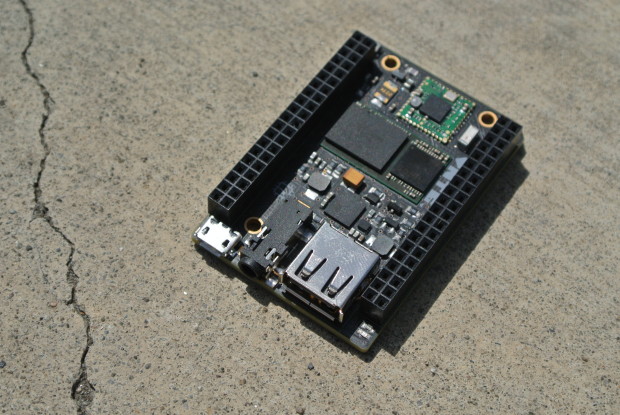
Next Thing Co. Releases “World’s First” $9 Computer
David Scheltema

Snuggly situated in an industrial section of Oakland, CA is Next Thing Co. a team of nine artists and engineers who are pursuing the dream of a lower cost single board computer. Today they’ve unveiled their progress on Kickstarter, offering a $9 development board called Chip.
The board is Open Hardware, runs a flavor of Debian Linux, and boasts a 1Ghz R8 ARM processor, 512MB of RAM, and 4GB of eMMC storage. It is more powerful than a Raspberry Pi B+ and equal to the BeagleBone Black in clock speed, RAM, and storage. Differentiating Chip from Beagle is its built-in WiFi, Bluetooth, and the ease in which it can be made portable, thanks to circuitry that handles battery operation.


Ter a vossa própria Fabriqueta na Garagem, passará certamente, mais cedo ou mais tarde, por terem uma Máquina de Injecção de Plástico, para os vossos Projectos.
Pois aqui vai uma que podem fazer em casa, baseado no Ilustre trabalho da casa Gingery:


Make Your Own Injection Molding Machine
John Hannon

Tried, true, and totally doable. Start cranking out solid thermoplastic parts.

Sometimes there’s a tool you want to buy, but you can’t justify the cost. In that case, why not make it? For me, a plastic injection molding machine fell into that category — and it turns out they’re not hard to make.
I wanted to make solid plastic parts for some of my amateur science experiments. There are a number of ways to make things out of plastic, each with its advantages and disadvantages. Often just cutting raw material to the desired shape works best. Some plastics can be cast by pouring a liquid resin with hardener into a mold (see “DIY Rotocaster,” Make: Volume 41). Vacuum forming works well for making things out of thin sheets of plastic (see “Kitchen Floor Vacuum Former,” Make: Volume 11). I considered making a 3D printer, but for the few plastic parts I envisioned needing, it wasn’t worth the time and money.
Plastic injection molding has been around since thermoplastics were invented. It’s a great way to make many copies of a part quickly, and what I like best is that it’s easy to reuse old plastic objects to make new ones.
So I built an injection molder based on the plans in Vincent R. Gingery’s book Secrets of Building a Plastic Injection Molding Machine. David Gingery could be considered a forerunner of the Maker Movement — he and his son Vincent have written a whole series of books on building tools for the machine shop.


E aqui vai mais uma Engenhoca para os que sofrem com as Dores, uma máquina que vos alivia o Sofrimento...


LumiWave: A Breakthrough for Injury & Pain Relief

Campaign Highlights
If you want to feel better every day; move better every moment and compete at the highest level, support this crowdfunding campaign. We need your help. 
Your contributions will jump start our new manufacturing process to reduce our costs –costs which we will pass on to you as lower pricing. For a limited time, pre-orders are offered at $199. That’s 60% off our current price.
Your Pain may be after skiing, running, competitions or workouts. 100 million of you experience chronic pain – all day, every day.  Your pain may be an ankle, knee or shoulder. Some of you may have back and neck pain. Your pain may be caused by athletics, auto or work related injuries. Or it could be the result of Arthritis, Osteoarthritis, Multiple sclerosis, Shingles or Nerve damage (neuropathy).


Eis a FLIR C2, uma Câmara de Infravermelhos de Bolso, para a Construcção Civil, mas é claro que os Ẽngenhocas a irão usar para uma Miríade de outros fins...


FLIR C2 Thermal Imaging Camera, Temperature Measurement Range: -10 → +150 °C

The FLIR C2 is the world’s first full-featured, pocket-sized thermal camera designed for building industry experts and contractors. C2 features FLIR's unique MSX® that adds key details from the onboard visible light camera to the entire infrared image in real time.

IR Sensor: 80 ´ 60 (4,800 measurement pixels)
Field of View: 41° x 31°
3" Display (Color) 320 x 240 pixels
Auto Orientation
Touch Screen
Object temperature range: -10°C to +150°C (14 to 302°F)
Storage Media: Internal memory stores at least 500 sets of images
Image file format: Standard JPEG, 14-bit measurement data included
Digital Camera: 640 x 480 pixels
Size (L x W x H): 125 x 80 x 24 mm (4.9 x 3.1 x 0.94 in.)
Weight: 0.13 kg
Supplied with

Infrared camera, battery (inside camera), lanyard, power supply/charger with EU, UK, US, CN and Australian plugs, printed getting started guide, USB memory stick with documentation, USB cable.

    Application    Building
    Best Temperature Measurement Accuracy    ±2 °C
    Detector Resolution    80 x 60pixel
    Dimensions    125 x 80 x 24mm
    Display Resolution    320 x 240pixel
    Display Size    3in
    Field of View    41 x 31°
    Focus Type    Fixed
    Height    24mm
    Horizontal Detector Resolution    80pixel
    Horizontal Display Resolution    320pixel
    Horizontal Field of View    41°
    Length    125mm
    Maximum Temperature Measurement    +150 °C
    Minimum Focus    0.15 (Thermal) m, 1 (MSX) m
    Model Number p    FLIR C2
    Refresh Rate    9Hz
    Storage Media    Internal Storage
    Temperature Measurement Range    -10 → +150 °C
    Thermal Sensitivity    <0 .1="" br="">    Vertical Detector Resolution    60pixel
    Vertical Display Resolution    240pixel
    Vertical Field of View    31°
    Visual Camera    Yes
    Weight    0.13kg
    Width    80mm


sábado, 15 de dezembro de 2012

Geek chique, e um vídeo a ver sem pressas...

Tinha alguém de pensar nisto,  Geek Chique!


The Geek Chic Shop 
Nerd-tastic Gadgets And Goodies 

We got our revenge. Nerdy is now cool. (Take that, Miss Prom Queen!) So get ur geek on with ZipZip’s memory brick sticks, 1980s Star Trek drinking glasses, MechaniCards’ steampunk sculptures, Singularity&Co.’s obscure sci-fi subscriptions, Mr. Beer’s home-brewing kits and MOLECULE-R Gastronomy’s chemistry cooking kits.

http://mailer.fab.com/view/4ee0753a015761c9c23e73bcrlfu.vd73/1aaf7a5e


Eis um Vídeo para ver com calma, da autoria de Morgan Demers, uma descrição bem detalhada de como se fazem as peças, uma a uma, para esse Torno Faça-você-mesmo, o Torno Gingery!

Categoria!


Making the Gingery Lathe Tailstock

For more information on this project see the accompanying Blog Post here:
http://morgandemers.com/?p=357

This video shows the building of a Setover Tailstock for my Gingery Lathe. The video covers the whole process, from pattern making, to casting, and finally machining of the tailstock.

I'm using my Gingery Lathe to build the tailstock, and thus this video will include some methods of building a tailstock with a less than equipped lathe.

For more information on the lathe build, or my other projects, checkout my projects blog:
http://morgandemers.com


domingo, 6 de setembro de 2009

Uma prensa Hidráulica!


Moldar chapa em larga escala, ora aqui está um sonho de vários Engenhocas...
Carros experimentais, Aviões e Helicópteros Ultra-Leves, Lanchas, sei lá mais o quê!

Vejam com fazer isto, aqui:

http://www.lindsaybks.com/bks11/airc3/index.html

quinta-feira, 13 de agosto de 2009

Dois em um

Duncan's Metal, um dois em um:

Projectos impecáveis, dele, uns já acabados, outros não, todos porreiros, como este Engenho, tornado numa máquina CNC:

A sua mini Fundição,

Este cabeçote divisor, para rodas dentadas,

E até um afidador de ferramentas de corte:


http://metal.duncanamps.com/index.php


MAS, há a parte 2, uma lista de fornecedores, E AINDA, uma data de Links para outros projectos!

http://metal.duncanamps.com/info/links_projects.php