Blog Posts

terça-feira, 2 de junho de 2015

3D para Moldes, acabamento em Sugru, Lego para imprimir, e uma gravadora Lego NXT!

Fui o primeiro a constatar o óbvio que mais ninguém via, sou bom nisso, a Impressão 3D serve é para se fazer um Molde, do qual se farão N objectos, muito mais rápida e económicamente...
Pois cá vai Instructable a demonstrar isso mesmo! 

 ...E está cheio destas ilustrações bacanas!


3D Printed Molds Casting Tutorial: Complex Shapeshertzgamma 
Here is a very easy technique to cast complex shapes in 3D printed molds.
By complex shapes I mean shapes that are hollow, have channels or thin walls etc. Standard techniques usually involve making a negative shape of your object in sand or other material and then pouring the casting resin inside. This method is not something easy to do in a lab and it does not provide the possibility to easily cast shapes hollow from the inside. It also lacks repeatability and consistency in the final object.
It all starts with an idea - you want to make that minion figure from Despicable Me or a copy of someone's toe (why not haha).. Follow the instructable for a simple method to produce soft silicone casts out of 3D printed molds.
The process in 3 steps:
First we create the cast
Then, we mix two silicone compounds (usually or whatever you have) and pour them into the cast - gravity takes over and replaces the air in the mold with silicone
When the silicone cures we extract it from the cast and it's done!
Issues arise when we want to cast a complex object that has many surfaces or cavities. 
http://www.instructables.com/id/3D-Printed-Molds-Casting-Tutorial-Complex-Shapes/  


Interessantíssimo, eis uma técnica de acabamento dos vossos Objectos...
Em Subru!
Ou Oogoo, é claro. 
È também um pequeno Curso, de tão detalhada e organizada a Informação, 25 Passos, organizados em Capítulos.
É que é mesmo difícil não gostar deste Artigo: 


Skill Builder: Styrofoam Sculpting, Surfacing, and “Sugru Skinning”Jude Pullen 
The modeling technique I used in my Ergo Mouse project (MAKE Volume 38) has 3 main steps: sculpting, surfacing, and Sugru skinning. But you can apply it to any creative process requiring models to explore interactions and aesthetics, quickly and at low cost.

http://makezine.com/projects/make-38-cameras-and-av/foam-sculpting-surfacing-skinning/ 


Os nosso amigos da MyMiniFactory ofereçem-vos estas peças de Lego para imprimirem nas vossas Impressoras!
Ora aí está algo para agradar a Pequenos e Grandes Geeks, é só descarregar... 


Printable Lego Brick Starter Pack,brick 
This is the Printable Lego Brick starter pack! It in includes 11 different brix types that allow you to print, build and create your imagination.
Each brick prints support free and takes less than 15 minute per brick.
Create your master pieces and upload your pictures to the page! We can't wait to see what you have up your creative sleeves!
It is fully compatible with standard Lego bricks and can be used to enhance and create your old Lego sets!
 
https://myminifactory.com/object/myminifactory-brix-starter-pack-7356 


Falando de Lego, eis como podem fazer uma Gravadora Laser, com Lego NXT, e sem Solvdagem.
Ora isto é porreiro, porque aprendem a fazer uma Máquina CNC, e se, um dia, arranjarem um laser mais forte, do que este, tirado dum DVD...
Podem cortar Acrílico!
E suspeito que podem já cortar Cartão, assim... 


Lego NXT Laser Engraver
Baybren
 
After seeing a few laser engravers on Instructables and their intricate results I decided it would be worth building my own machine to make some wooden signs and artwork. I also decided I wanted it to be easy to build but still relatively effective at engraving images and that other people would be able to build as well. Thus my goal was to make it cost-effective and simple enough that anyone with some basic electronics knowledge and materials could build it without much difficulty. Initially I was going to use Arduino and almost all 3D-printed parts, but after having some printer issues I figured Legos would make things much simpler and easier to work with, and it's turned out fairly well. It's not industrial-grade and it has some issues of its own, but it's a great way to get started with using and building custom CNC tools, and doesn't require any knowledge of Arduino or soldering. 


segunda-feira, 1 de junho de 2015

...Mas, FAÇAM QUALQUER COISA, PÁ!

Não, não há mais desculpa para não fazerem o que vos der na cabeça, não quando é tão fácil quanto ISTO, 2 Molduras, material de Escritório, o forno e o Aspirador lá de casa...
E quererem fazer ALGO! 
Quanto aos Moldes, só precisam de um por ideia, e podem bem ir fazê-los à FabLab mais à mão... 


Make a good, cheap, upgradeable sheet plastic vacuum formerdrcrash Tired of buying cheap plastic crap? Now you can make your own!
Or you can make nice and surprisingly sturdy plastic stuff in amazing shapes, amaze your friends with your technical prowess, and be the life of the party.Vacuum forming is a technique for shaping sheet plastics into 3D shapes, which you can do at home, easily and cheaply. And it's fun. It's the easiest way to make an infinite variety of shapes in plastic, or to make molds for casting shapes in other materials, such as concrete.The basic technique is to0. clamp a sheet of plastic to a frame (such as a windowscreen-type aluminum frame)1. heat it in an oven (such as your kitchen oven) until it's soft and rubbery2. stretch it over a convex mold of an interesting shape (such as a life cast of your sweetie's face), and 3. suck the plastic inward onto that mold with a vacuum system (such as your household vacuum cleaner)Once the plastic cools, you pull it off the mold and trim off the excess plastic, leaving a copy of whatever shape you sucked the plastic onto.  http://www.instructables.com/id/Make-a-good%2c-cheap%2c-upgradeable-sheet-plastic-vacu/


Ou querem fazer uma Impressora 3D, super-barata, com Sucata? Pois cá está como é, passo-a-passo, com CDs e DVDs que encontrem por aí, e pouco mais:


Complete newbie step by step, 3D printer with all parts listsdintid  
Intro, prelude, or just: who is this meant for?I wanted the title to include cheap, but lets face it: it is not cheap to build a 3D printer unless you have some/most of the components on hand or if you find just shy of £100 as cheap to make a tiny, not very good quality printer. This tutorial is all about starting from zero, figuring out and understanding all parts of a 3D printer and keeping costs down for this our very first build.
The upside is that all the items can be reused for a larger better printer at a later stage. I did that, and it Works wonderfully - better than an Ultimaker original in fact (proud).
It should be obvious which one is made from old CD/DVD drives, and which one I reused my parts in later :) I opted for a small printer, but you can just ordre longer metal rods and get a larger cabinet, and you have a larger printer at the same cost.
I have not kept strict tabs on costs, but the final printer, which is awesome, amounted to a total of just over £200 or so.
In short, I'm going to build a 3D printer made from parts from old CD/DVD drives and some aluminium pieces. I am going to provide complete detailed description on every single part needed. There will be no requirments on having advanced or expensive tools nor expert knowledge on anything.

http://www.instructables.com/id/Complete-newbie-step-by-step-3D-printer-with-all-p/  


...E se não, esta Fresa CNC resolve-vos o problema, lá está, mais um Projecto que só não faz, quem não quizer:


How to Make a Three Axis CNC Machine (Cheaply and Easily)oomlout 
The idea behind this Instructable was to fulfill my desire for a desktop sized CNC machine. While it would have been nice to purchase an off the shelf unit the issue of price as well as size proved prohibitive. With this in mind I endeavored to design and build a three axis CNC machine with the following factors in mind:
-Use Simple tools (needs only a drill press, band saw, and hand tools)
-Low Cost (this kind of got away from me however with everything bought off the shelf the cost for all parts is under $600 (significant savings could be made by skillfully sourcing some pieces))
-Small footprint (30" x 25" footprint)
-Usable working envelope (10" X-axis, 14" Y-Axis, 4" Z-Axis)
-Relativly fast cut rate (60" per minute)
-Small part count (fewer than 30 unique parts)
-Easy to source parts (all parts available from 4 sources (Home Depot + 3 online sources)
-Ability to cut ply-wood (Succesful)

http://www.instructables.com/id/How-to-Make-a-Three-Axis-CNC-Machine-Cheaply-and-/ 


quinta-feira, 28 de maio de 2015

As minhas Engenhocas

Estão à venda, são planos para as vossas Laser CNC, e apoiem o Inventor Português, construíndo estes Puzzles que funcionam, e são a alegria da Criançada de todas as Idades!
Da esquerda para a direita,  uma Pistola de Elásticos, uma Espingarda que dispara Nerfs, e uma Pistola de Ficção Científica, que é realmente um Ponteiro Laser!
Os três Planos, com Instrucções passo-a-passo, é claro. 


Edgar the Inventor
 
Edgar is a Portuguese inventor who won the Gold Medal in Geneva (2002) for his Triosk (Kiosk on wheels for the disabled) as well as several other awards and medals across Europe for his ideas. He has worked with computers since the Spectrum 48Ks and been on the net since the 80s. He is the author of the book "Prototypes: To build a prototype without giving up" and the popuar site, "Build your stuff", in English, https://sites.google.com/site/buildyourstuff/ , and a Prototype building Blog, Faz você mesmo, in Portuguese, http://faz-voce-mesmo.blogspot.com.


quarta-feira, 27 de maio de 2015

Sobrevivência Urbana, mais vale prevenir que remediar!

Às vezes, uns minutos de Preparação vale para salvar vidas...
A começar pelas nossas! 

Já vos apresentei o Site Sobrevivência Urbana, do Dr. Abrahão, pois vai ter aqui um espaço para Posts, que são ao mesmo tempo Engenhosos e Engenhocas:

Somos uma empresa focada em segurança privada, consultoria e capacitação profissional.
http://www.sobrevivenciaurbana.com.br/


Eis uma notícia dessas, por exemplo:

Dentro em pouco, até nos vossos Cubículos de Escritório poderão ter um importante acréscimo de Segurança, nomeadamente, à prova de explosão!
Para já é proposto para as Forças Armadas, mas já se sabe, vai ser inevitávelmente transferido para uso civil...


Ballistic wallpaper to help protect soldiers seeking temporary shelter
David Szondy

It sounds like an old Goon Show joke, but soldiers may one day protect themselves from blasts by wallpapering temporary shelters. It may not be very decorative, but the new ballistic wallpaper under development by the US Army Corps of Engineers uses a special fiber inlay to help prevent walls from collapsing under blast effects.
If you wander the back alleys of British towns, you can still spot obscure windows dating back to the Second World War showing traces of sticky tape that the owners never bothered to strip off. During the German Blitz, Britons would crisscross their windows with ordinary tape to keep the glass from turning into flying daggers during bomber attacks. It was a simple fix that saved many thousands of lives and the principle is being revived to reinforce not windows, but whole walls.
 www.gizmag.com/us-army-ballistic-wallpaper/37658/ 


E já agora, apresento-vos o Livro sobre como sobreviver na selva que se torna este Mundo, e deixo os Publicadores falar por ele:


Não seja mais uma vítima
Autores: José Roberto Romeiro Abrahão e Ricardo Nakayama. Editora: Bueno Editora.Sinopse: 
A obra “Não seja mais uma vítima”, produzida pela Bueno Editora e escrita por Ricardo Nakayama e José Roberto Romeiro Abrahão, explica quais são os perigos da cultura do medo e como o cidadão pode enfrentar a violência urbana, a partir do método de defesa pessoal SOTAI. O sistema, criado pelos autores, ensina como os grupos minoritários (mulheres, crianças, idosos, deficientes e homossexuais), podem reverter uma situação de risco. A publicação além de abordar a parte teórica, traz também vários estudos de casos, leis e ilustrações. Com uma linguagem objetiva, isto é, de fácil entendimento, explora os dilemas da questão, entre eles, a banalização da violência. “Não seja mais uma vítima” tem a colaboração de diversas personalidades, como o jurista Ives Gandra, que prefaciou a obra, e os instrutores de defesa pessoal Robson Maciel, Marco César Scavone e Alexandre Chiavone de Araújo Cruz. Sobre os autores: José Romeiro Abrahão é advogado criminalista, jornalista, poliglota, instrutor de tiro, artista marcial, escritor de destaque no Brasil e exterior, e um dos defensores dos direitos das minorias, tendo se especializado em desenvolver ferramentas e técnicas voltadas à segurança, defesa e sobrevivência dessas pessoas. Já Ricardo Nakayama é matemático, artista marcial, graduado em diversas modalidades, instrutor de defesa pessoal. 

http://www.sobrevivenciaurbana.com.br/#!livros/c1z9q


segunda-feira, 25 de maio de 2015

Um carro eléctrico numa Hora! E Moldagem de Resina, como actualizar máquinas CNC, re-carregar o Smartphone, de uma Pilha, e a Handibot ao Torno!

Para poupar na Gasolina, não há como montarem o vosso próprio Automóvel Eléctrico em uma Hora ou menos!
É bom!
OSVehicle’s Tabby EVO: Build This Open-Source EV in an Hour
Mike Senese
 The OSVehicle team wants to revolutionize the way the world makes its transportation, and today introduces a new platform that will help bring auto building to the community and individual level.
Named Tabby EVO, the vehicle can be built in just an hour in a moderately equipped workshop. It features an 80v/15 kW electric drivetrain with a range of 87 miles and a top speed of 80 mph. It has a 93-inch wheelbase and can be configured for 2-4 passengers. Its upgraded frame and suspension help qualify it for L6e, L7e, and M1 licensing for street-legal use in Europe and the US, as well as allow it to be used for off-road purposes. 


Já reparei que os Instructables sobre Moldagem e/ou Fundição em vários Materiais, são muito populares... 
Pois aqui está este Instructable, sobre Moldagem de Resina, que vos permite produzir objectos translúcidos em Resina, e de um tamanho considerável:


Resin Casting Tutorial - Moldmaking
seeblack
When I started to make my Umi costume, it soon became apparent that I would have to make my own custom molds. You can usually buy or find something to cast common gem shapes, but sometimes the size you need won't be commercially available. In the above pictures, all the front tabard gems, headband gems, and waist cincher gems were made from custom molds using silicone rubber from Smooth-On. (The small ovals and small circle gems were made from a Michael's resin casting tray and a generic $1 paint tray respectively.

http://www.instructables.com/id/Resin-Casting-Tutorial-Moldmaking/ 


Caso ja'se tenham arrependido de ter comprado uma Máquina CNC, de que veio logo a seguir um Modelo melhor, podem aprender, neste Tutorial em várias partes, como actualizar a Máquina, e assim, estarem mais felizes com o Fabbing: 


Upgrading a CNC milling machine Part 1

stuartChilds

Compact CNC machines have been around for a long time and there are affordable and often well built units available to buy from surplus suppliers and via auction. Provided a machine is of good quality and has not been abused the hardware will likely work for many years to come.
Though the mechanical side may be serviceable it can be a different story when it comes to the software; the machines may not come with their original control computers, if they do this may not boot or may be missing the security 'dongle' for the control software. In addition there have been numerous improvements in motor drive technology in recent years.
We have a Denford Novamill 3-axis mill that came with a rusty old computer that did not boot up. From initial inspection the mill itself looked promising, leaving us with the challenge of connecting a new computer with new software to run the machine.
In this first post we will determine how our machine is wired and bring it up to date with new stepper motor drive electronics, and with a brand new embedded control computer.


Não há mais simples, simpático e ùtil que este Porta-Chaves que recarrega os vossos Smartphones, Celulares, Telemóveis, I-Pads, etc. 
Até dá para, se quizerem, ganharem uns cobres, penso eu, com quase nada, Sugru, ou o muito mais barato Oogoo, e uma Pilha quadrada de  9Volts... 


Keyring Phone ChargerShakeTheFuture
In this Instructable, I made a simple keyring charger.
It can charge your phone's battery with a standard 9v battery.
If you ever travel and find that your battery is dying, just get a 9v battery and use your keyring to charge your phone.
For this project you'll need:

Car's USB charger
Micro USB to USB adapter
2x 9v batteries or battery connectors
Sugru

http://www.instructables.com/id/Keyring-Phone-Charger 


Isto é um espectáculo, a Fresa CNC portátil Handibot, a fazer peças de Xadrez, ao torno!
Sim, com um Acessório lá deles, podem tornear peças com essa máquiia excepcional...
Categoria!


Watch Handibot Cut 3D Chess Pieces
Nathan Hurst
The portable Shopbot CNC tool, Handibot, fits on a rotary indexer, churning out extra-large chess pieces from acrylic in the middle of Maker Faire. The environment is loud, and the shop vacs are running almost constantly, but engineer Ryan Sturmer says it’s the perfect environment to demo the tool.
“We have taken the internal electronic and software framework of our tool, and replaced it with something that is web capable, that you can access from your mobile device,” he says. “Your CNC tool will actually have an app.”
It’s targeted at Makers. Shopbot now has open-source FabMo software, a digital fabrication platform for PC, Mac, Linux, and mobile, and Sturmer hopes to see developers building apps for it.

http://makezine.com/2015/05/17/watch-handibot-cut-3d-chess-pieces/


quarta-feira, 13 de maio de 2015

Um Braço robótico para Fabbers! E a Samsung com Arduino, Ímanes de desligar, Espessura em 3D, e um actuador simples

Makerarm é um Braço Robótico, para Makers, o que dizer nós, Engenhocas! 
Esta gibajoga promete, pois pode ser a base para Impressão 3D, Corte Laser, Fresa CNC, Plotting, Montagem, e mais...
Vocês mudeam a cabeça do Bicho, de Impressão 3D para Corte Laser, por exemplo, e já está!


Meet

Makerarm is a complete personal fabrication system packed into a single, beautifully designed robotic arm that mounts on your desktop. Makerarmfeatures interchangeable heads for countless applications such as 3D printing, plotting, milling, laser engraving, electronics assembly and more. That way you can make more, for less.


 http://makerarm.com/


A Samsung, deu-lhe para se meter no mundo do Arduino, para colaborar com a Internet de coisas, essa história de ter os aparelhos lá de casa todos ligados à Net...


Samsung Announces Their Entry into the Arduino Family
Matt Stultz
 
When you think about Samsung, the first products that come to mind are probably phones or televisions, not Maker-focused electronics. Today, with their announcement at Internet of Things World, Samsung has entered the Maker world with their ARTIK platform, an Arduino compatible family of devices targeted towards Internet of Things applications.
Currently there are three ARTIK devices: The ARTIK 1, ARTIK 5, and ARTIK 10. All are multi-core ARM processors with built in Bluetooth Low Energy. The ARTIK 5 and 10 also include Wi-Fi, BT, Zigbee, and Thread wireless connections.


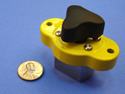
Se sempre quizeram saber como funcionam aqueles Braços de Laboratório e Oficina, com os Ímanes na base, de ligar e desligar, está tudo aqui:


Magnets with an OFF Switch

Can neodymium magnets be turned on and off?
Generally, no. The neodymium magnets we provide are also called, “permanent magnets.”  The word “permanent” means they stay magnetized for a long time.  They are always on.
This is the opposite of an electromagnet, where you have to run an electric current through a wire whenever you want it to act like a magnet.  No flow of electricity, no magnet.
It's also opposite of a "temporary" magnet, like when you stick a (permanent) magnet to a steel paperclip, and that steel acts like a magnet as long as the (permanent) magnet is stuck to it.  Remove the magnet, and the paperclip stops acting so magnet-like.
When people ask us for magnets that can be turned off, we say it’s not possible.  Neodymium magnets, large and small, tend to stay ON.  That's part of what makes them so useful.


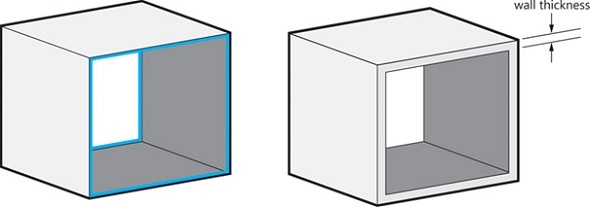
Eis como fazerem bem as paredes duma caixa ou outro Objecto ou Peça que queiram imprimir, explicado por quem sabe, dica da Imaterialize:


How to Choose the Perfect Wall Thickness When Turning Your 3D Model into a 3D Print
Fabian

Since each printing material and 3D model is different, choosing the right wall thickness can be confusing. Yet, keeping these simple tips in mind will ensure that you won’t receive an unpleasant surprise and the walls of your object will have just the thickness they need.
First things first: it’s very important that every surface in your 3D model has been assigned a wall thickness. When using your 3D modeling software it is possible to design a surface without a wall thickness. However, our printers need the information about how thick you intend the wall of your object to be. Thus, when turning a 3D model into a real 3D print, wall thickness is needed.


Eis como fazerem um Braço actuador linear com muito pouco...
Usando Sucata, uma Seringa de cola e uns poucos outros componentes:


Build This Inexpensive Linear Actuator from a Glue Stick
Andrew Terranova

A linear actuator is a mechanism that pulls or pushes a load along a straight line. Pneumatic and hydraulic pistons are examples. So are the threaded rods on 3D printers.
Commercially available linear actuators can be quite expensive, but now you can build your own with just a few dollars worth of parts. Gareth from Let’s Make Robots explains the idea in this post.
The main mechanism is salvaged from a used glue stick. By using a modified hobby servo to drive it, this actuator even comes with positional feedback. It is both surprisingly accurate and surprisingly strong. Check the video to see the finished actuator lifting a 6 lb weight!


segunda-feira, 11 de maio de 2015

Soldar, sem solda? E um Computador a 9 Dólares(!), uma Injectora de Plástico para Fabbers, e Alívio para a Dor, mais uma Câmara de Infravermelhos

Eis como fazerem algo em Electrónica sem as chatices do Fumo e da Solda...
E ainda ficam com uma ligação à prova de àgua!
É bom!


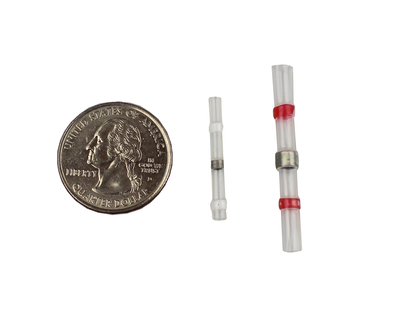
Solder Sleeves
Solder, heat shrink and waterproof your splices in one operation.

This is the easiest way to make soldered splice in your wiring. It is our favorite way to extend the wires on stepper motors.
This part combines a low temperature solder ring inside a piece of clear heat shrink tubing. It also has rings of hot melt glue at each end. You strip each wire, insert one from each end and cross the stripped ends inside the solder ring. You then heat the tubing with a heat gun. The solder and glue melts and the tubing shrinks. You get a reliable, insulated, waterproof and soldered connection in one operation.
It is also great when you need to fan out one wire to several wires. This often happens when you have one ground terminal, but four wires coming to it. Place the four wires in one end and one in the other end.


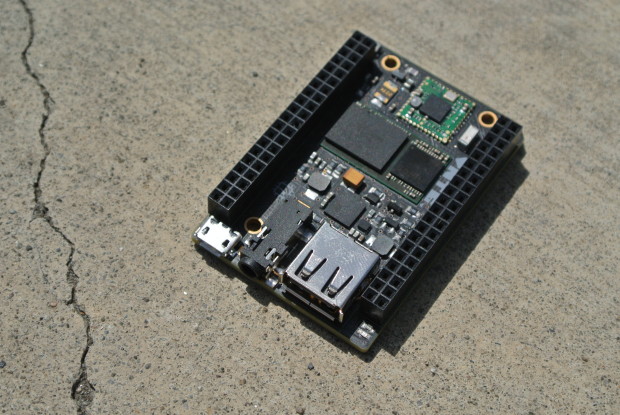
Um Computador por 9 Dólares? 
Com ligação Wifi, e gestão de Bateria?
Sim, se só precisarem de computadorizar uma Engenhoca, ou terem um Smartphone ou Tablet feito à vossa medida, porque este liga-se a um Televisor, ou Écran de Smartphone, com Monitor é mais caro.


Next Thing Co. Releases “World’s First” $9 Computer
David Scheltema

Snuggly situated in an industrial section of Oakland, CA is Next Thing Co. a team of nine artists and engineers who are pursuing the dream of a lower cost single board computer. Today they’ve unveiled their progress on Kickstarter, offering a $9 development board called Chip.
The board is Open Hardware, runs a flavor of Debian Linux, and boasts a 1Ghz R8 ARM processor, 512MB of RAM, and 4GB of eMMC storage. It is more powerful than a Raspberry Pi B+ and equal to the BeagleBone Black in clock speed, RAM, and storage. Differentiating Chip from Beagle is its built-in WiFi, Bluetooth, and the ease in which it can be made portable, thanks to circuitry that handles battery operation.


Ter a vossa própria Fabriqueta na Garagem, passará certamente, mais cedo ou mais tarde, por terem uma Máquina de Injecção de Plástico, para os vossos Projectos.
Pois aqui vai uma que podem fazer em casa, baseado no Ilustre trabalho da casa Gingery:


Make Your Own Injection Molding Machine
John Hannon

Tried, true, and totally doable. Start cranking out solid thermoplastic parts.

Sometimes there’s a tool you want to buy, but you can’t justify the cost. In that case, why not make it? For me, a plastic injection molding machine fell into that category — and it turns out they’re not hard to make.
I wanted to make solid plastic parts for some of my amateur science experiments. There are a number of ways to make things out of plastic, each with its advantages and disadvantages. Often just cutting raw material to the desired shape works best. Some plastics can be cast by pouring a liquid resin with hardener into a mold (see “DIY Rotocaster,” Make: Volume 41). Vacuum forming works well for making things out of thin sheets of plastic (see “Kitchen Floor Vacuum Former,” Make: Volume 11). I considered making a 3D printer, but for the few plastic parts I envisioned needing, it wasn’t worth the time and money.
Plastic injection molding has been around since thermoplastics were invented. It’s a great way to make many copies of a part quickly, and what I like best is that it’s easy to reuse old plastic objects to make new ones.
So I built an injection molder based on the plans in Vincent R. Gingery’s book Secrets of Building a Plastic Injection Molding Machine. David Gingery could be considered a forerunner of the Maker Movement — he and his son Vincent have written a whole series of books on building tools for the machine shop.


E aqui vai mais uma Engenhoca para os que sofrem com as Dores, uma máquina que vos alivia o Sofrimento...


LumiWave: A Breakthrough for Injury & Pain Relief

Campaign Highlights
If you want to feel better every day; move better every moment and compete at the highest level, support this crowdfunding campaign. We need your help. 
Your contributions will jump start our new manufacturing process to reduce our costs –costs which we will pass on to you as lower pricing. For a limited time, pre-orders are offered at $199. That’s 60% off our current price.
Your Pain may be after skiing, running, competitions or workouts. 100 million of you experience chronic pain – all day, every day.  Your pain may be an ankle, knee or shoulder. Some of you may have back and neck pain. Your pain may be caused by athletics, auto or work related injuries. Or it could be the result of Arthritis, Osteoarthritis, Multiple sclerosis, Shingles or Nerve damage (neuropathy).


Eis a FLIR C2, uma Câmara de Infravermelhos de Bolso, para a Construcção Civil, mas é claro que os Ẽngenhocas a irão usar para uma Miríade de outros fins...


FLIR C2 Thermal Imaging Camera, Temperature Measurement Range: -10 → +150 °C

The FLIR C2 is the world’s first full-featured, pocket-sized thermal camera designed for building industry experts and contractors. C2 features FLIR's unique MSX® that adds key details from the onboard visible light camera to the entire infrared image in real time.

IR Sensor: 80 ´ 60 (4,800 measurement pixels)
Field of View: 41° x 31°
3" Display (Color) 320 x 240 pixels
Auto Orientation
Touch Screen
Object temperature range: -10°C to +150°C (14 to 302°F)
Storage Media: Internal memory stores at least 500 sets of images
Image file format: Standard JPEG, 14-bit measurement data included
Digital Camera: 640 x 480 pixels
Size (L x W x H): 125 x 80 x 24 mm (4.9 x 3.1 x 0.94 in.)
Weight: 0.13 kg
Supplied with

Infrared camera, battery (inside camera), lanyard, power supply/charger with EU, UK, US, CN and Australian plugs, printed getting started guide, USB memory stick with documentation, USB cable.

    Application    Building
    Best Temperature Measurement Accuracy    ±2 °C
    Detector Resolution    80 x 60pixel
    Dimensions    125 x 80 x 24mm
    Display Resolution    320 x 240pixel
    Display Size    3in
    Field of View    41 x 31°
    Focus Type    Fixed
    Height    24mm
    Horizontal Detector Resolution    80pixel
    Horizontal Display Resolution    320pixel
    Horizontal Field of View    41°
    Length    125mm
    Maximum Temperature Measurement    +150 °C
    Minimum Focus    0.15 (Thermal) m, 1 (MSX) m
    Model Number p    FLIR C2
    Refresh Rate    9Hz
    Storage Media    Internal Storage
    Temperature Measurement Range    -10 → +150 °C
    Thermal Sensitivity    <0 .1="" br="">    Vertical Detector Resolution    60pixel
    Vertical Display Resolution    240pixel
    Vertical Field of View    31°
    Visual Camera    Yes
    Weight    0.13kg
    Width    80mm