Blog Posts

Mostrar mensagens com a etiqueta infra-vermelhos. Mostrar todas as mensagens

quarta-feira, 17 de maio de 2017

Aulas de Design 3D, free Class! E publicar 3D paramétrico, uma Câmara de Infravermelhos de Bancada, um Torno feito por Impressão 3D(!), E UM MOTOR BRUSHLESS!

Aulas à borla, é bom!
Estes nossos amigões da Autodesk, oferecem-nos uma série de Aulas bacanas para aprenderem a desenhar 3D, no programa Fusion 360, como deve de ser.
Impecável.
Vão-se lá inscrever:


3D DESIGN CLASS
Autodesk Design Academy 
Learn 3D modeling in Fusion 360 in under an hour! Whether you are new to CAD or already using parametric CAD software, this short video-only class includes everything you need. We'll introduce you to valuable tools for learning and teaching Autodesk Fusion 360 essentials, and give you great tips and tricks from industry professionals. Through a scaffolded learning experience, you'll develop your 3D modeling skills by applying them to a real world design challenge inspired by the Louis Kalff "Krähenfuss" table lamp.
The class includes step-by-step video instruction, a printable PDF guide, and a quiz.
Let's get started! 


Desenho 3D paramétrico, é outra coisa.
Porquê?
Porque é infinitamente adaptável!
Só para dar o exemplo mais óbvio, um Desenho paramétrico dum par de sapatos pode ser configurado para todos os tamanhos, cada número de Calçado é uma derivação dum desenho-base.
Por isso, este novo serviço, Profissional, permite-vos publicar um Modelo, e esse pode ser configurado N vezes, para os vossos clientes, por todo o Mundo.


Welcome! 
ShapeDiver is a web service for publishing parametric 3D data. It is run by ShapeDiver GmbH, a limited liability company registered in Vienna, Austria. Alexander Schiftner, Mathias Höbinger and Mathieu Huard founded it in 2015.
Our motivation is to bring parametric modelling to the web, and to make it a smooth, convenient and exciting experience for both designers and viewers. We want to offer the flexibility of mass customization to every company, big or small, in a simple web browser. Read more about our mission.
Our responsibility is to do it in a way that respects every designer's needs and concerns, be it regarding intellectual property rights, data security, privacy or any other issue that concerns you when you think about the idea of uploading your precious work to the cloud.
Read more about how we protect your IP.
There is nothing like seeing your product through our technology for the first time. Request a demo and let us show you how parametric design can enable new possibilities for your company.

https://shapediver.com/business-3d-configurators


NewFLIR ETS320 Thermal Imaging Camera, Temperature Measurement Range: -4 → +482 °F 320 x 240pixel
FLIR ETS320 Test Bench Thermal Camera 
FLIR ETS320 is a professional, affordable solution designed for hands-free laboratory testing. Ideal for reducing test times and improving product design for electronic board and device evaluation. The ETS320 detects design flaws that materialise as heat. Which is an important indicator of how a system is functioning. The ETS320 helps engineers and test technicians collect accurate, reliable data in seconds and analyse it quickly.


Quando se é Engenhocas, é outra coisa...
Este bacano, como nas Aulas tinha de esperar à vez, para tornear os seus Objectos, vai mas é de fazer, ele mesmo, o seu próprio Torno!
Brutal! Bravo.


3D Printed Lathe
iccycold3000  
First off, I am a sophomore high school student who actively participates in FTC Robotics representing Shark Beta Team #10088 and FatherBoards Team #10087. The goal of our robotics team is to learn as much as possible before graduating and going off to college. One crucial skill everybody on our teams had the desire to learn was how to manually lathe parts our self instead of sending the files for somebody else to machine them for us. This was where the idea of building my own lathe came in. As our school did not want to purchase a full-size lathe or for that matter allow students to operate a full-size lathe; the only other option was to build a miniature one myself. The major challenge of this project was that because all of our funds go straight into our robotics program and purchasing parts, the lathe had to be constructed out of existing parts in our lab, or the parts needed to be made personally (this is where the idea of 3D printing the lathe itself came into play. Another major challenge of this project was that the lathe needed to be relatively precise and accurate so that the final parts could actually be used on our robots. Those were the main challences I was faced with and I believe I did a relatively good job at solving these. If you do decide to build this you will find how percise and accurite it is despite it being 3D printed. So lets get to building! 


MARAVILHA!!!
600 Watts! 
MUÁHÁHÁHÁHÁ!

Eis um Motor Brushless, que vocês podem construír em casa, se tiverem uma Impressora 3D à mão, ou puderem imprimir estas peças nalgum lado, nalguma FabLab...
Usa o Arrenjo Halbach, de que já falei algumas vezes, e é fácil de montar:


600 Watt, 3d-printed, Halbach Array, Brushless DC Electric Motor
TheGoofy 
This is a very powerful, 3d-printed brushless DC electric motor. It has 600 Watts, and performs with more than 80% efficiency. The main components like rotor and stator can be printed with a common FDM-printer. Magnets, copper wire, and ball-bearings are ordinary components. The magnets of the rotor are arranged as Halbach Array. The motor runs with a standard ESC widely used in different RC-applications (plane, drone, car). 


terça-feira, 24 de maio de 2016

Brixo, Lego e electrónica! E Tinta que muda de côr(!), Câmara de Infracvermelhos, Massa sem Borax, e a máquina de aproveitar garrafas.

Para facilitar ainda mais a vida aos Engenhocas, aparece agora Brixo, que faz da electrónica um sinples Jogo de Montar!
Com Motores, Sensores, e Bluetooth, e compatível com o Lego, esta nova ideia ajuda-vos a ter ideias, e a pô-las em prática.


What is Brixo? 
BRIXO's electric bricks are normal sized building blocks that are anything but normal. It's like Lego® on steroids, if steroids also gave you superpowers and taught you new languages. 
Basically, they're bricks that safely conduct electricity and connect to your phone to enable you to do all sorts of cool things with your designs.  And no, you don't need to buy a whole new set, because they're used interchangeably with your favourite building blocks to add an element of interactive awesomeness. 
BRIXO bricks include LED lights, motor blocks and even sound, light and proximity sensors. They’re powered by a low voltage Bluetooth controlled built-in battery brick and coated in chrome, a non-toxic metal, to ensure your safety. 


Um Projecto bem Didáctico e divertido, eis como podem aprender a...
Fazer a vossa própria Tinta que muda de cr!
Neste caso, a Tinta muda de côr conforme a Temperatura!
A gama de usos possíveis é infinita. 


How to Make Colour Changing Paint
SFXC 
In this tutorial I am going to teach you how to make a colour changing paint. On this occasion, I have chosen to create a paint that changes colour with temperature (thermochromic).
There are so many applications in which thermochromic coatings can be used. Some of these include, colour changing t-shirts, colour changing posters, colour changing birthday cards, promotional items and educational products. 


Não faltam Telemóveis, ou Celulares, por casa, com Câmara, mas sem mais uso, nestes dias, então, porque não, transformá-los em Câmaras de Infravermelhos?
É escandalosamente SIMPLES, e é o que vão aprender, neste Instructable: 


Make Basic Infrared Thermal Imaging Camera For Cheap ! Convert Any Camera Into Infrared Thermal Camera
Kedar Nimbalkar
  
How To Convert Any Camera Into Infrared Thermal Camera Very Cheap But Useful Hack . Every Camera Sensor Has Ability To See Infrared i.e. Thermal Part of The Light But The Infrared Blocking Filter Inside Digital Camera's Protects The CCD Sensor From Burning With High Energy Infrared Light Such as Sunlight .
Now , If We Remove The Blocking Infrared Filter The Camera Can Also Able To See Infrared Part of The Spectrum of Light ! Which Is Pretty Cool Because After This Hack You Can See Hot Objects With Your Camera Glowing More As They Emit More Infrared Energy & Many Other Things You Can Do Like See Through Some Clothes , Black Objects Which Takes Teardown To a Next Level !  


Mais Diversão, para Engenhocas novos e velhos,  eis como fazer Flubber, em casa, mas sem utilizar Bórax, que não há à disposição em todos os Países:


No Borax Or Starch Flubber/slime/putty
Igioteno 
I've been looking for a no starch or borax flubber for a long time
Some recipes had tide, cornstarch, lotion, clear glue and other ridiculous ingredients
Today, I found a recipe on YouTube on flubber and sounded very believable
I tried it out and a total fail
I then viewed the videos comments and one said just use glue, eye drops and baking soda
I tried it out with using the same ingredients in the video and the same ingredients the comment suggested it turned out great
But it smelled horribly like bleach and it was very wet
It was also very airy and not that stretchy 
So I just used the recipe the comment suggested 


E vamos dar as Boas-Vindas a este nosso amigo Romanurshuak, que conheci através dos seus Vídeos no Youtube, e em boa hora lhe sugeri que fizesse também Instructables, pois cá está este, para aproveitarem Garrafas de Plástico, com esta magnífica Engenhoca que as desfia, em rolos que podem aproveitar para vários fins:


How to Make a Plastic Bottle Cutter / Tutorial
romanursuhack
 
How to make a rope out of a plastic bottle?
We often need a strong wire or rope at rest or at the cottage. For example, you need a linen rope, and there's nothing suitable at hands. Don't worry! It is possible to make a long and strong rope out of an empty plastic bottle. 


segunda-feira, 11 de maio de 2015

Soldar, sem solda? E um Computador a 9 Dólares(!), uma Injectora de Plástico para Fabbers, e Alívio para a Dor, mais uma Câmara de Infravermelhos

Eis como fazerem algo em Electrónica sem as chatices do Fumo e da Solda...
E ainda ficam com uma ligação à prova de àgua!
É bom!


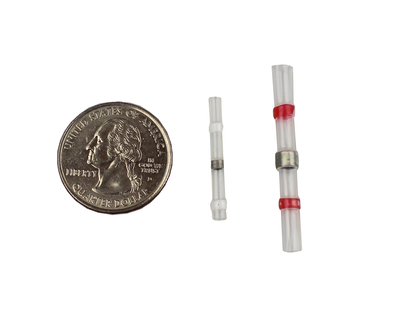
Solder Sleeves
Solder, heat shrink and waterproof your splices in one operation.

This is the easiest way to make soldered splice in your wiring. It is our favorite way to extend the wires on stepper motors.
This part combines a low temperature solder ring inside a piece of clear heat shrink tubing. It also has rings of hot melt glue at each end. You strip each wire, insert one from each end and cross the stripped ends inside the solder ring. You then heat the tubing with a heat gun. The solder and glue melts and the tubing shrinks. You get a reliable, insulated, waterproof and soldered connection in one operation.
It is also great when you need to fan out one wire to several wires. This often happens when you have one ground terminal, but four wires coming to it. Place the four wires in one end and one in the other end.


Um Computador por 9 Dólares? 
Com ligação Wifi, e gestão de Bateria?
Sim, se só precisarem de computadorizar uma Engenhoca, ou terem um Smartphone ou Tablet feito à vossa medida, porque este liga-se a um Televisor, ou Écran de Smartphone, com Monitor é mais caro.


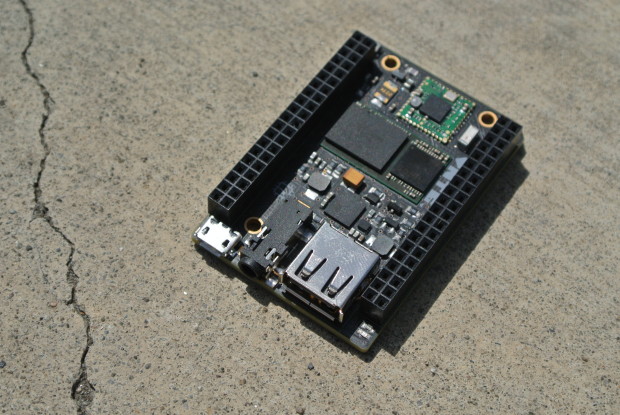
Next Thing Co. Releases “World’s First” $9 Computer
David Scheltema

Snuggly situated in an industrial section of Oakland, CA is Next Thing Co. a team of nine artists and engineers who are pursuing the dream of a lower cost single board computer. Today they’ve unveiled their progress on Kickstarter, offering a $9 development board called Chip.
The board is Open Hardware, runs a flavor of Debian Linux, and boasts a 1Ghz R8 ARM processor, 512MB of RAM, and 4GB of eMMC storage. It is more powerful than a Raspberry Pi B+ and equal to the BeagleBone Black in clock speed, RAM, and storage. Differentiating Chip from Beagle is its built-in WiFi, Bluetooth, and the ease in which it can be made portable, thanks to circuitry that handles battery operation.


Ter a vossa própria Fabriqueta na Garagem, passará certamente, mais cedo ou mais tarde, por terem uma Máquina de Injecção de Plástico, para os vossos Projectos.
Pois aqui vai uma que podem fazer em casa, baseado no Ilustre trabalho da casa Gingery:


Make Your Own Injection Molding Machine
John Hannon

Tried, true, and totally doable. Start cranking out solid thermoplastic parts.

Sometimes there’s a tool you want to buy, but you can’t justify the cost. In that case, why not make it? For me, a plastic injection molding machine fell into that category — and it turns out they’re not hard to make.
I wanted to make solid plastic parts for some of my amateur science experiments. There are a number of ways to make things out of plastic, each with its advantages and disadvantages. Often just cutting raw material to the desired shape works best. Some plastics can be cast by pouring a liquid resin with hardener into a mold (see “DIY Rotocaster,” Make: Volume 41). Vacuum forming works well for making things out of thin sheets of plastic (see “Kitchen Floor Vacuum Former,” Make: Volume 11). I considered making a 3D printer, but for the few plastic parts I envisioned needing, it wasn’t worth the time and money.
Plastic injection molding has been around since thermoplastics were invented. It’s a great way to make many copies of a part quickly, and what I like best is that it’s easy to reuse old plastic objects to make new ones.
So I built an injection molder based on the plans in Vincent R. Gingery’s book Secrets of Building a Plastic Injection Molding Machine. David Gingery could be considered a forerunner of the Maker Movement — he and his son Vincent have written a whole series of books on building tools for the machine shop.


E aqui vai mais uma Engenhoca para os que sofrem com as Dores, uma máquina que vos alivia o Sofrimento...


LumiWave: A Breakthrough for Injury & Pain Relief

Campaign Highlights
If you want to feel better every day; move better every moment and compete at the highest level, support this crowdfunding campaign. We need your help. 
Your contributions will jump start our new manufacturing process to reduce our costs –costs which we will pass on to you as lower pricing. For a limited time, pre-orders are offered at $199. That’s 60% off our current price.
Your Pain may be after skiing, running, competitions or workouts. 100 million of you experience chronic pain – all day, every day.  Your pain may be an ankle, knee or shoulder. Some of you may have back and neck pain. Your pain may be caused by athletics, auto or work related injuries. Or it could be the result of Arthritis, Osteoarthritis, Multiple sclerosis, Shingles or Nerve damage (neuropathy).


Eis a FLIR C2, uma Câmara de Infravermelhos de Bolso, para a Construcção Civil, mas é claro que os Ẽngenhocas a irão usar para uma Miríade de outros fins...


FLIR C2 Thermal Imaging Camera, Temperature Measurement Range: -10 → +150 °C

The FLIR C2 is the world’s first full-featured, pocket-sized thermal camera designed for building industry experts and contractors. C2 features FLIR's unique MSX® that adds key details from the onboard visible light camera to the entire infrared image in real time.

IR Sensor: 80 ´ 60 (4,800 measurement pixels)
Field of View: 41° x 31°
3" Display (Color) 320 x 240 pixels
Auto Orientation
Touch Screen
Object temperature range: -10°C to +150°C (14 to 302°F)
Storage Media: Internal memory stores at least 500 sets of images
Image file format: Standard JPEG, 14-bit measurement data included
Digital Camera: 640 x 480 pixels
Size (L x W x H): 125 x 80 x 24 mm (4.9 x 3.1 x 0.94 in.)
Weight: 0.13 kg
Supplied with

Infrared camera, battery (inside camera), lanyard, power supply/charger with EU, UK, US, CN and Australian plugs, printed getting started guide, USB memory stick with documentation, USB cable.

    Application    Building
    Best Temperature Measurement Accuracy    ±2 °C
    Detector Resolution    80 x 60pixel
    Dimensions    125 x 80 x 24mm
    Display Resolution    320 x 240pixel
    Display Size    3in
    Field of View    41 x 31°
    Focus Type    Fixed
    Height    24mm
    Horizontal Detector Resolution    80pixel
    Horizontal Display Resolution    320pixel
    Horizontal Field of View    41°
    Length    125mm
    Maximum Temperature Measurement    +150 °C
    Minimum Focus    0.15 (Thermal) m, 1 (MSX) m
    Model Number p    FLIR C2
    Refresh Rate    9Hz
    Storage Media    Internal Storage
    Temperature Measurement Range    -10 → +150 °C
    Thermal Sensitivity    <0 .1="" br="">    Vertical Detector Resolution    60pixel
    Vertical Display Resolution    240pixel
    Vertical Field of View    31°
    Visual Camera    Yes
    Weight    0.13kg
    Width    80mm