
Blog Posts

Mostrar mensagens com a etiqueta temperar metal. Mostrar todas as mensagens

segunda-feira, 22 de julho de 2019

Automatismo para qualquer um! E acabamentos na Impressão 3D, com uma PISTOLA DE COLA(!), Concrete Molds, Derreter VIDRO no Micro-ondas, e temperar PLA

Qualquer um pode controlar agora a sua Màquina, sem saber programação!
Brutal! 
E podem controlar, vigiar etc.


Machine Control at Your FingertipsMichael Di Staulo 
We’re proud to present our new MachineMotion Pendant: a plug-and-play touchscreen interface for automated equipment powered by the MachineMotion controller. Now you can program, control, and monitor your machine through an intuitive code-free user interface.
The pendant features a 10.1-inch touchscreen, impact-resistant enclosure, rear mounting tabs compatible with UR’s eSeries Pendant Mount, and a comfortable hand strap. It also makes your system safer by ensuring an emergency stop button is always within the user’s reach. 
https://www.vention.io/blogs/machine-control-at-your-fingertips-184


Note: Besides the cool uses that you see on the neat idea below, think also it can be used to COLORIZE details on monocrome Prints!


Isto é uma  ideia que toda a gente gostaria de ter tido!
Paa o quê?
Para acabar, soldar ou reforçar, etc. umas peças com a vossa simples Pistola de Cola, o que vos poupa muito tempo e chatiçes!
Porreiro.
Até... 
Pode servir para COLORIR detalhes duma impressão Monocromo, já pensaram nisso? 
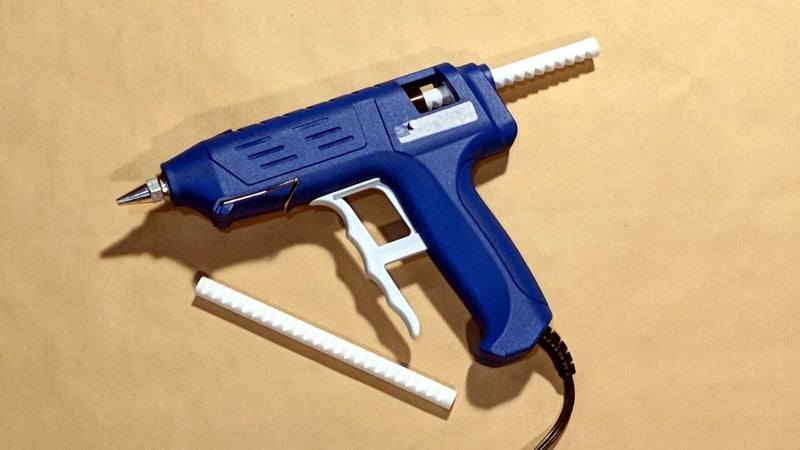


[Project] 3D Printing Sticks for PLA Hot Glue GunTyler Koslow
Who needs a 3D printer when you have a hot glue gun? This Hackaday project from Donald Papp shows us how to use molten PLA filament to glue 3D printed objects together.
When 3D printing ambitiously sized projects, hot glue guns come in handy as a tool to join two separate things together. But what if you could bind these objects with the very same PLA filament that you used to 3D print in the first place?

https://all3dp.com/weekend-project-3d-printing-sticks-for-pla-hot-glue-gun/


Cimento neles!
Já viram que bacansa de Impressoras 3D se faziam, com partes em CIMENTO, para tornar a máquina muito mais sólida?
Até TORNOS se podem fazer com Moldes, seguindo este método.


Useful both for 3D printers a lot more solid, AND even for Lathes, using this Cement Mold idea!


Create Concrete Products With 3D Printed MoldsFurther Fabrication  
In this Instructable I wanted to show you my process, for making 3d printed moulds, to create cost effective prototype products, with cast concrete.
https://www.instructables.com/id/Create-Concrete-Products-With-3D-Printed-Molds/


Note, although Metal on the Microwave is a big NO-NO, removing the Kiln, at a certain temperature, and quckly pouring it onto a Mold...
That's feasable.


Derreter VIDRO no Micro-ondas!
E sabe-se lá que outros Materiais não-metálicos.
Porque Metal, no Micro-ondas...
NÃO!

Mas... Isso não impede de se poder retirar o Cadinho, com uma boa temperatura...
E, rápidamente, inserir um pouco de Metal, e logo, se verter para um Molde! 
MEWAHAHAHAHA!


DIY Microwave Kiln | Fuse Glass in Your MicrowaveShakeTheFuture 
In this Instructable, we'll look into way to make a microwave kiln.
For those who don't know what is a microwave kiln, here is a quick introduction.
Microwave kiln is a kiln that you can put in your regular microwave oven.
It does not use a wire heating element or gas to heat up. Microwave kiln is covered with silicon carbide.
Silicon carbide absorbs microwaves and turns them into heat.
Microwave kilns are usually used to fuse glass.
You can turn broken glass into amazing jewelry. 
https://www.instructables.com/id/DIY-Microwave-Kiln-Fuse-Glass-in-Your-Microwave/


Tempera-se Metal...
Porque não, PLA?
É o que este nosso amigo nos ensina a fazer:


Annealing PLA Prints for Strength – 2 Easy WaysMiroslav Sarcevic 
Background Information
Annealing, when referring to metals, is when you heat up a material to make it less brittle and more pliant. In order for this physical change to occur, you have to heat the material to a sweet spot that’s cooler than its melting point but hotter than the temperature it recrystallizes at. You have to maintain this temperature for a while and then let it naturally cool down.
...
Annealing Plastic
Though this definition refers mostly to metals, a similar process can also be used with plastic. The technology behind plastic annealing is not new. It has been used for decades in the production of injection-molded plastic objects. Annealing is used to reduce internal stress in molded parts and make those parts stronger and less prone to warping.

https://all3dp.com/2/annealing-pla-prints-for-strength-easy-ways/


quinta-feira, 16 de fevereiro de 2017

Um Forno de temperar metal! E fotos da passarada, uma Serra de Fita portátil, o vosso póprio Aduino Nano, e uma Mega-Lanterna LED

Se quizerem temperar Metal duma forma científicamente controlada, podem agora fazê-lo, a preceito, com um baratíssimo forno de Toradas, e uns truques!
É bom!
Muito importante para obterem peças em Aço com a dureza e flexibilidade que quizerem, molas ferramentas de corte, etc. 


PID Temperature Controlled Oven

kai.h  
With this instructable, we will take a cheap toaster oven and turn it into an accurate, temperature controlled tempering oven that will be able to achieve a stable and accurate temperature controlled by a microprocessor.
We will combine some common and off-the-shelf components to easily and safely achieve this goal.
Why do we want to do this? After heat treating steel, it's in a very hard and brittle state. So we can use it with less risk of it snapping, we want to temper it. Tempering will slightly soften steel, but more importantly will restore flexibility to it. Most steel manufacturers specify particular temperatures to temper steel at so you can achieve a given hardness rating.


Para fotos da passarada do vosso Quintal, enquanto não lá estão, que é quando eles estão à-vontade, contem com esta Engenhoca, que detecta os vossos amigos de asas, e os fotografa, enquanto vão às compras:


Simple PIR DSLR Camera Trap

stinkyabb

The biggest problem I have capturing images of wildlife is not getting close enough to the subject. I never have enough time to sit and wait for them to come to me or they are easily spooked, and fly away at the first sign of movement. Using an simple, widely-available PIR motion sensor, I can leave my DSLR in the yard to capture images while I run errands, cut the grass, or even leave it out overnight.


Uma Serra de Fita que podem levar às Exposições, Trabalho de Campo, Campos de Aero-modelismo, e o mais que queiram, já existe, mas o que fazem com esta adaptação, é terem uma base fixa que vos permite tabalhar duma forma precisa, como nos modelos maiores:


Portable Bandsaw Metal Stand

seamster 
I recently got a portable band saw for cutting metal.
In order to get the full potential out of it, I built a metal stand so I can use it like a traditional vertical bandsaw.
My stand is essentially a metal version of this wooden one made by Honus, coincidentally made to use with the same model of saw (DeWalt DWM120 Portable Band Saw).
If you're looking to make a metal stand for your portable bandsaw, hopefully this will help you out. It's a great project to practice some welding as well as a bit of precision metalwork. Thanks for checking this out. 
http://www.instructables.com/id/Portable-Bandsaw-Metal-Stand/


O Arduino Nano é um Chip bacano, e podem agora fazer um em vossas casas!
Por isso, se têem amor ao Hobby da Soldadura, mãos à obra:


Make your own Arduino Nano (DIY - Arduino Nano)

Pratik Makwana  
In this instructable, I will show you how to make your very own Arduino Nano. I'm using laminator for the toner transfer method.
What things you will need:
Copper - clad board (Dual Layer)
Ferric Chloride (FeCl3)
Acetone (Nail polish remover)
Glossy Paper
LASER Printer
Marker Pen
Scissors
Plastic container
Sand paper
Safety gloves
Latex gloves
Saw - For copper board cutting
Laminator or iron
Let's Do it...


Esta Lanterna, é um Farol!
Podem ter assim uma Fonte de Luz LED que mete respeito, para as vossas Experiências, e tudo o que envolva uma actividade nocturna sem outas condições.
Ou uma Garagem ou Cave onde têem de trabalhar, mas sem Luz de Jeito!


Mega Torch - the ultimate guide
sjowett 
Mega Torch Build!
Welcome! This instructable has been 'written' mainly as a set of detailed videos (10 in total including the 'fake' advert above). As such, you will find the text is sparse but, this is more than made up for during the in depth descriptions in the vlogs.
I hope you enjoy this build and hope you can find the time to subscribe to my YouTube channel.
In this series, each video is between 5 and 15 minutes long and so its time to get a nice cuppa, sit down and lets get started!
Happy making!