Blog Posts

quinta-feira, 10 de maio de 2012

Uma CANETA!

Isto é divertidíssimo, e Didáctico:


Giant Clicker Pen! 

We built this enormous retractable pen as part of our Kinematics class at BYU.

The goal was to build a mechanism big enough to teach and be handled by fourth-graders.
http://www.instructables.com/id/Giant-Clicker-Pen/


Neste caso, têem só o Vídeo, mas podem ver que é fácil de construir este amplificador de Sinal para as vossas antenas Wi-Fi, chapa de circuito Integrado, e cabos de Cobre!


HIGH POWER WIFI ANTENNA, Free Internet, Highly Portable, 16dB Gain, Almost a Dish!!

Uploaded by on Mar 15, 2010
This thing is the closest you can get to having a massive parabolic dish without having a massive parabolic dish.

Here is the detailed construction of a 16dB gain QUAD BIQUAD antenna. This is sort of a rare breed, something you don't see too often, but it's killer. It's a bit more difficult to make than a standard one-element biquad, but it's worth it. This thing is almost as directional as my 18" parabolic dish. Remember...the power (your signal) doubles every 3dB...this one's nearly 16dB ; )

With this I can get Linksys, Netgear, or D-link Access Points from over 2 MILES away.


Lembram-se do Pepakura?
Podem fazer ISTO, com esse Programa, uma série de Brinquedos Interactivos, para saberem quando vos enviam emails, por exemplo:


ReaDIYmate: Internet-connected toys made from paper

By Simon Crisp

Remember paper? It's that thin thing you used to scribble your shopping list on before everything was stored in zeros and ones. Well, it looks like paper is making a comeback … and thanks to the rise of the Internet of Things, it's now Wi-Fi enabled. ReaDIYmate is a recent Kickstarter-funded project, which enables users to create paper-based internet companions that respond to things happening in their digital life.


quarta-feira, 9 de maio de 2012

Pepakura, 3D em papel

Pepakura, é bom...
E está cada vez melhor!


What's new in Pepakura Designer 3.1.0a:

January 24th, 2012

· A menu to export the unfolded pattern separately into multiple DXF files was added as [File]-[Export]-[Vector Format]-[Multi-Files DXF].
· The part which is selected on the 2D Window is highlighted on the 3D Window.
· A menu to check the overlapping parts was added as [2D Menu]-[Check Overlapping Parts].
· Double-clicking an edge on the 3D Window before unfolding selects multiple edges on the edge-ring at a time.
· An edit mode on which measures the distance between two points was added as [2D Menu]-[Edit Mode]-[Measure Distance between Two Points].


...E lá vou eu, fazer a experiência!

Faço os Sólidos em Wings3D, exporto para 3ds,


Um detalhe importantíssimo, quando exportarem os vossos Sólidos para 3ds, seleccionem as faces que importam, lembrem-se que vão fazer uma caixa em papel, e escolham "export selected", sim, guardem só as faces seleccionadas!


Importo para o Pepakura, estão a ver, importam uma caixa oca,


O Programa desdobra o Sólido,

Imprimo,


E Zás! Corta, cola, já existe no Mundo real!


Maravilha! Agora, já posso começar a minha nova Engenhoca, tão novinha, e já funciona!


Para compensar a minha ausência, problemas de Computador, grrr, eis mais 2 boas notícias, a Traceparts está com cada vez mais parts, e certificada para o programa Inventor:


http://www.traceparts.com/news/newsletters/newsletter.asp?idfile=newsletter-actu-201205-EN


E eis uma maravilha a juntar às outras, um Site chamado... Let's make Robots!
Com toda a espécie de peças para isso, fazer Robots!

Hi :)

This website is a free and volunteer based initiative, originally started by Fritsl in 2008, now 100% produced and maintained by members of the community. Thanks to everyone.
Who is in charge?
There is an inner core that tries to run the hard core issues of the show. There are hangarounds as well, but the most vital posts are currently held by TheCowGod (Hosting), Hugo_nl (CMS development) rik (finance), ignoblegnome (PR/other communities), Fritsl (all over)
http://letsmakerobots.com/shops


domingo, 6 de maio de 2012

Agora, tudo pode mesmo funcionar no Papel!

Meditando sobre as Maquinetas fabulosas do Rob Ives...

Se este Autómato não é o Simbolo dos Inventores, sempre tentando o Impossível, não sei qual seja...

Die Fledermaus; the flying mouse. Turn the handle and the fiendish blend of crank slider and cam make the maus flap his arms frantically in a vain attempt to fly. He's batty even to try!
As the handle is turned, the mouse makes one pass for each turn of the handle while the arms flap four times! Print this model onto thin photocopier card then all you need to made the model are scissors, ruler, PVA glue and a sharp knife.
http://www.robives.com/blog/die_fledermaus_flying_mouse
 
E ocorreu-me agora que, realmente, TUDO pode funcionar no Papel, não no sentido antigo, de que, em teoria, tudo funciona, mas no sentido que muita máquina pode ser produzida num "esboço" simplificado, em Papel, ou Cartolina!


Ainda se torna mais útil, com o tradicional Bloco-Notas, que deve sempre acompanhar um Engenhoca: 

Juntem-lhe uma pequena tesoura, Cola, e um Cordador estilo X-acto, daqueles de Porta-Chaves, e poderão tanto testar uma ideia nova, como demonstrar as que já têem, em directo, e ao vivo, a potenciais Investidores!

É bom!

sexta-feira, 4 de maio de 2012

Instructables, e um Telelé especial de corrida!

Como dobrar tubo de PVC, eis algo que pode servir para um sem-número de fins, desde mobiliário faça-você-mesmo, até Cenários, passando por toda a espécie de Protótipos:

Bending PVC pipe - Just because you can

Have you ever found yourself putting in that new sprinkler system for your garden and right in the middle of the project discovered that you are out of 45 degree fittings? With this simple technique, you can heat bend custom fittings in any kind of PVC pipe. The secret to the process is using a controlled heat source and spreading it out. In a word keep: it moving, keep it rotating. (OK, that was more than "a" word) 


Algo para os Fotógrafos, um Espelho escuro, óptimo para esbater o fundo de Fotografias:


Make your own Claude Glass or Black Mirror


Claude glass (or black mirror) is a small mirror, slightly convex in shape, with its surface tinted a dark colour. Bound up like a pocket-book or in a carrying case, black mirrors were used by artists, travellers and connoisseurs of landscape and landscape painting. Black Mirrors have the effect of abstracting the subject reflected in it from its surroundings, reducing and simplifying the colour and tonal range of scenes and scenery to give them a painterly quality.

http://www.instructables.com/id/Make-your-own-Claude-Glass-or-Black-Mirror/


Uma Multi-Ferramenta para Campistas e Engenhocas, lembrem-se, esta Ferramenta pode ter as peças que vocês quizerem:


Tactical Multitool
When camping, I often wish I had brought a tool along; a hammer, a hatchet, a shovel, etc. Especially on backpacking trips, however, the weight and hassle of carrying 3 or 4 tools is over the top and not worth it in the long run. The Tactical Multitool is the perfect solution. It combines the versatility of a tool shop with the simplicity of any other camping gadget. It especially stands out in its ability to mismatch a number of "heads" in many combinations. The ability to detach, reattach, and swap "heads" makes this a truly unique tool. Whether you're camping in the wilderness or fixing something around the house, there's always the right tool for the job. So, while you read the process I took to make this Tactical Multitool, let your creativity run free and help me think of more ideas to add to this "one-tool toolbox". The possibilities are endless!

http://www.instructables.com/id/Tactical-Multitool/


E porque não, um Cortador Laser, num Isqueiro Zippo?


Laser cutter hidden in a flip top lighter

There may be times when a fuse needs to be lit or something cut at a distance, a laser is a good way to do it but it needs to be disguised as something more everyday....like a flip top petrol lighter..... it would be more covert without the engraving but as I am not spying at the moment I don't think it will matter too much :) A word of warning! Lasers are not toys and need to be used with care, lasers should always be used with safety goggles designed for the wavelength being used. Always be aware of others around you when using a laser, eyes are not replaceable! The laser diode used here was the best available when 007 was a boy, much more powerful ones are available now so do your own research to find what you need..... This setup will light stuff easily enough but is weak by modern standards.
http://www.instructables.com/id/Laser-cutter-hidden-in-a-flip-top-lighter/


E que tal, para acabar, por hoje...
Um Telemóvel Faça-você-mesmo?
ESTE, será mesmo feito como vocês queiram...

Olha, aqui está uma nova Profissão, Telelés feitos à medida!


DIY mobile phone made from $150 worth of parts

By James Holloway

MIT PhD student David Mellis has designed and built a fully operational mobile phone, named the DIY Cellphone, using about US$150-worth of parts.
What's more, he's published source code, circuit designs and case designs on GitHub so that others can do the same. The phone features a quad-band GSM module and 1.8-inch 160x128-pixel TFT display, but its most eye-catching feature is plainly the laser-cut plywood and veneer body.
Mellis describes the project as an experiment into the individual, customized construction of the what is usually the most ubiquitous of mass-produced gadgets: the mobile phone.

quinta-feira, 3 de maio de 2012

Bodes Lógicos, Arduino, e Sculpteo em Grande Formato

BODES LÓGICOS!
Não, ainda não dei em Doido Varrido, (penso eu), eis um jogo-de-palavras típicamente Britânico, de Logic Gates (portas lógicas) para...
Logic Goats, Bodes lógicos!
E o Génio, e Talento, deste Britânico é evidente:

xor goat

Finally! The xor-goat! Just what you needed to complete your Logic Goat set.
Just like the rest of our Logic Goats, the xor-goat is to silicon logic gates what the and-goat is to the and-gate. Download, print out and make this paper model then, when you press one button OR the other button the goat nods. But not if you press both. Hence the 'x', which stands for Exclusive.
As usual, the download comes with all the parts you need ready to print out, you'll just need add some glue, a few coins (to act as weights) and some basic tools.
http://www.robives.com/category/product_tags/logic_goats


Vejam só o Vídeo, Fantástico! 


O Raspbery Pi já faz das suas, eis um bacano que o pôs a comunicar com uma Placa Arduino:

Raspberry Pi and Arduino

The Raspberry Pi is creating quite a storm of interest. I have just got mine and one of the first things that I wanted to try was to get it talking to an Arduino over USB using Python.

.. and you know what? It proved to be a lot easier than I expected. This is mainly because, after all, despite its diminutive price tag, the Pi is just a Linux box. I got communication working both ways, with the Arduino sending 'Hello Pi' to the Pi and at the same time, testing for a digit coming in. When it receives a digit, it flashes the number of times indicated by the digit.
 http://www.doctormonk.com/2012/04/raspberry-pi-and-arduino.html


A Sculpteo dá-vos agora a oportunidade de Fabricar EM GRANDE!

Sculpteo Now 3D Prints in King Size!

You can now 3D print very large objects in polyamide on Sculpteo.com! Time has come to think BIG.
The new maximal dimensions for white plastic 3D printing are: 677mm x 368 mm x 565 mm (26.6 inch x 14.4 inch x 22.2 inch). Perfect for end products, big mechanical parts, figurines, real-size prototypes or models!
Our white plastic is a strong white polyamide material which has a grainy texture and is slightly porous. It allows any kind of finishing: painting, sanding to make it look exactly as you desire it.
You can create complex parts and mechanical gears with it. It is also a pretty flexible material when your parts are thin.
The minimum layer thickness of our white material is very thin: 0.1mm (0.003 inch). Resolution is very good with details appearing at 0.3mm (0.01 inch)


Para o final, este Sintetizador outra possibildade que a Ponoko vos oferece, lembrem-se Electrónica mais placas cortadas a Laser, mais Crowsorcing = Engenhocas Felizes!

NTH Synth: a DIY electronics + open-source hardware + crowd-funding + Ponoko fairytale

Meet the makers of the NTH Synth, following their successful Kickstarter campaign
 
This mouth-wateringly good looking machine is the NTH Synth, a product that was recently crowd-funded on Kickstarter. I interviewed the guys behind NTH Synth about DIY electronics, designing for Ponoko, and how to get your crowd-funding campaign to stand out from the crowd.
 http://blog.ponoko.com/2012/04/27/nth-synth-a-diy-electronics-open-source-hardware-crowd-funding-ponoko-fairytale/


quarta-feira, 2 de maio de 2012

Endurecer esferovite (isopor)

Ora aí está uma combinação que permite fazer de tudo um pouco: 
-Trabalham fácilmente, com ferramentas baratas, Lâminas de corte, Cola própria, e Lixa;
-E depois de acabarem, aplicam-lhe Verniz de Madeira, ou um Líquido próprio, e lavável, e zás! 
Têem um Material resistente, para as vossas Engenhocas!

Neste Site de Miniaturas, falam do simples Verniz de Poliuretano para Madeira, para endurecer a Esferovite, parece que penetra nos interstícios da Esferovite, e aumenta a rigidez das peças:

A while back someone posted a foam hardening method while discussing making terrain boards using the normal expanded styrofoam. They stated that after they shaped the foam, they painted a polyeurethane type wood varnish onto the foam which soaked into the spaces between the foam "balls" and hardened creating a honeycomb of varnish. The foam was as hard as a rock afterwards. You might be able to use the varnish, then apply any texture you need on top and shape as needed.
http://theminiaturespage.com/boards/msg.mv?id=164060

Mas também há esta intrigante gama de produtos específicos para endurecer:


#026 - Exterior Foam Coat (3 lbs)

Brand New! Rock hard finish for all of your outdoor (and indoor) foam projects. This stuff is super tough. It is not sandable. Has a rough stone feel when dry. It can be troweled smooth, or brushed to make a super rough finish.
-Adheres to polystyrene foams.
-Forms a weather resistant surface.
-Easy to mix. Just add water.
-Covers Up to 300 square feet.
-Use above or below grade
-Apply with paintbrush or trowel.
-Paintable
-Fireproof
-Many decorative surface textures can be created.
-Soap and water clean-up.
-Try adding Boost fortifier. (will not work with Bounce)
  
http://hotwirefoamfactory.com/-026-Exterior-Foam-Coat.html 
Vejam os dois Links acima com vagar, são uma fonte desta e de muitas mais dicas...

Aqui está um vídeo ilustrando a aplicação destes produtos na Esferovite:


...E como se tudo isto não fosse o suficiente para vos pôr a cabeça à roda com múltiplas ideias, aqui vai a ùltima dica, a Ponoko agora corta...
Styrene!
Por enquanto só em 0,5 mm de espessura, atenção, podem agora fazer milhares de coisas com a precisão do Laser!


Styrene – May Material of the Month

The white knight of model making

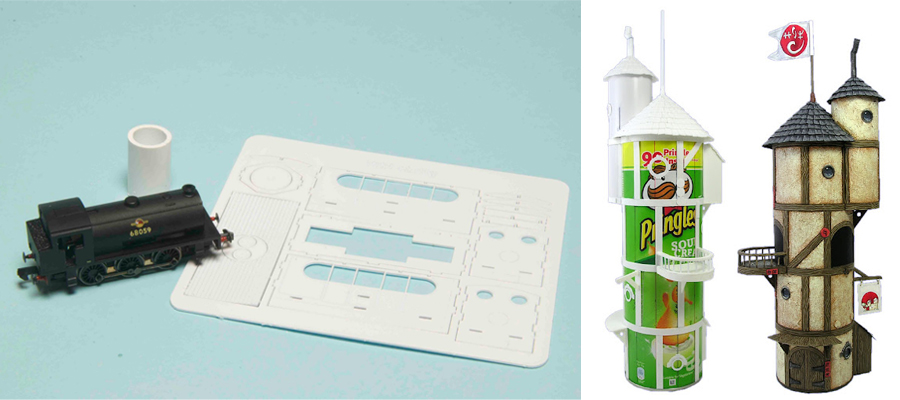
Styrene, or as sometimes it likes to be formally addressed – High Impact Polystyrene Sheet (HIPS) is one of the most ubiquitous plastics around, even though it’s too humble for most of us to pay any notice to.  Like PETG, it’s commonly used in food packaging, where it’s thermoformed for specific applications. When it comes to laser cutting, fabricating components for model making is where this material truly shines.  Prefab laser cut model kits are already available for the likes of railways, trucks, aeroplanes and buildings.  Styrene’s properties make it an excellent material choice for these applications.  While it doesn’t cut as precisely as acrylic, it is easily sanded or scored with a craft knife, which is perfect for leaving sprues (little “bridges” of material) to hold parts in place.  Partially laser cut parts can be easily snapped off the kit sheet and sanded back for a clean edge.