
Blog Posts

Mostrar mensagens com a etiqueta fibra de vidro. Mostrar todas as mensagens

segunda-feira, 22 de maio de 2017

Modelos e Ideias! Um Holograma em cada Smartphone(!), vasos 3D-impressos, Material 3D de Carbono, um sintetizador de Papel, e Ar Condicionado com Hidroónica!

Isto é impressionante...
Um Holograma em cada Smartphone, sim, os vossos Smartphones vão poder mostrar Imagens em 3D! 
Dica de Tyler Koslow, do belo Site All3DP, a coisa vai funcionar assim:
Uma película especial será criada, para se sobrepôr ao ècran do vosso telemóvel, e isto permite projectar imagens em 3D, FORA do Smartphone.

Impressionante.


Researchers Develop 3D Hologram Display for Smartphone Use

Tyler Koslow 
Just a few years ago, the idea of having access to holograms seemed like a fantastical notion. What once was a communication tool in the sci-fi classic Star Wars is starting to become an imminent reality.   
A team of researchers from the Melbourne, Australia-based RMIT University and the Beijing Institute of Technology are developing what they call the “world’s thinnest hologram.”

Creating 3D Holograms On Your Smartphone

The team is designing a nano-hologram that you can see without 3D goggles and is also 1,000 times thinner than a human hair. Using topological insulators, the researchers are creating a holographic film screen that is only 60 nanometers thick.  
This material have unique properties, acting like a conductor at the surface but an insulator throughout most of the interiors.
According to Zengji Yue, a research fellow at RMIT University and co-author of the research paper, the combination of the metallic surface and insulated interior acts as an intrinsic optical cavity. This generates multiple reflections of light within the thin film.   


E agora...
Arte 3D!
Uma série de 5 Vasos, impressos em 3D, pelo Designer Olivier van Herpt, por encomenda da Marca de Moda COS, por via duma Impressora que imprime em Barro.
Isto é só o princípio, quem sabe quantos mais novos de Expressão Artística o Fabbing permitirá?


Olivier van Herpt Partners with Fashion brand COS to 3D Print Clay Vases

Hanna Watkin 
Fashion brand COS has commissioned dutch designer Olivier van Herpt to create a series of five vases using a custom-designed 3D printer.
Olivier van Herpt is an industrial design graduate of the Design Academy Eindhoven. He has specialized on beautiful 3D printed objects made from clay. Fashion brand COS regularly works with artists and van Herpt was chosen due to his innovative twist on 3D printing.
Now van Herot has developed a series of five printed vases which are inspired by the company’s Spring/Summer collection. The designs take into account the colors, textures, and shapes of the collection’s pieces.
As a result, each of the vases has a different shape, from curved to angular. The final designs are now on display in COS stores around the world.
These stores include Stockholm’s Biblioteksgatan, Berlin’s Neue Schönhauser Strasse, London’s Regent Street, in Rotterdam’s Dreamhouse, Spain’s Bilbao and on New York’s Fifth Avenue.
If you live nearby any of these stores, check out the images of van Herpt working on the vases in the windows. You’ll be able to spot the designer’s custom-designed 3D printer which drips clay. By using a 3D printer, he was able to print larger designs. 


Aeromodelistas e afins, eis uma boa notícia da Sculpteo este novo Material, CarbonMide, é plástico reforçado com Fibra de Vidro, e, já adivinharam, é muito mais leve que o Poliamido, com a mesma resistência...
E imprime com muito boa resolução!
É bom.
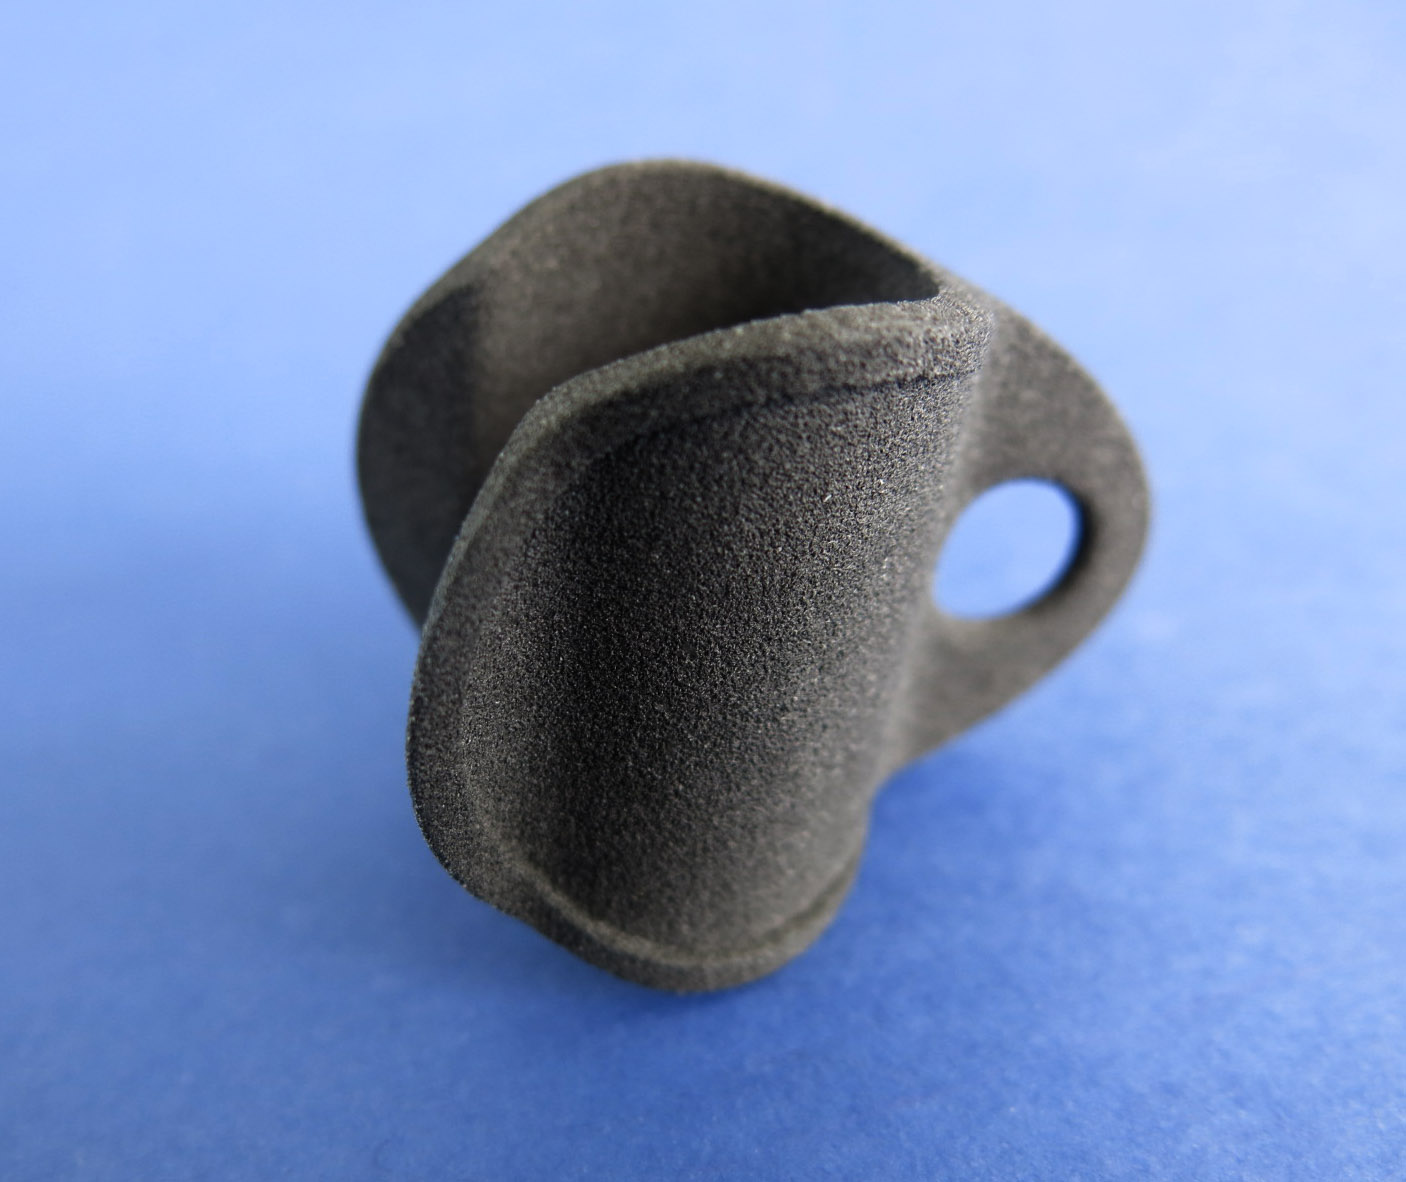


3D Printing Material: CarbonMideSculpteo 
Our CarbonMide Material
The CarbonMide objects printed at Sculpteo are created from a fine black plastic polyamide powder (PA12) reinforced with carbon-fibers. The material is characterized by an excellent stiffness and a maximized weight-strength-ratio. It nearly has the same mechanical properties than the solid black plastic Polyamide but is much more lightweight. The material is great for experienced professionals and people in need of a strong and lightweight material, and a very high 3D printing precision.
Due to the process related orientation of the fibers, the mechanical properties vary in the three axis directions. The Z axis is is the less resistant compared to X and Y. To learn more about it, refer to the design guidelines.
To learn more, refer to our paragraph about finishes and colors for polyamide models.
Processing Times and Pricing
The printing price of your design is calculated automatically the moment it is placed online. As you modify your object (changing size, using batch control or hollowing feature, etc.) you will note that the price changes automatically. The pricing is based on a series of factors, including: total volume, object size, and bounding box - to name a few.
Your CarbonMide object is estimated to arrive in maximum 16 business days. Polishing options and particularly large objects can extend the processing time by 1-2 days on average. The estimated shipping time is also calculated automatically as the object is uploaded.
Delivery time should be added to processing time and depends on the delivery option you choose. 
https://www.sculpteo.com/en/materials/carbonmide-material/


E agora, um pouco de saudável Loucura Criativa, façam um Sintetizador de 8 Bits, com PAPEL, fita de folha de Cobre, e mais uns pózinhos...


PaperSynth: an 8-bit Synthesizer Made Out of Paper and Copper Foil
Bryan Cera

PaperSynth v2 is an "8-bit synth" circuit for creating musical square wave tones - made with paper, copper foil tape, an ATTINY85 microcontroller and some simple electrical components.

https://www.instructables.com/id/PaperSynth-an-8-bit-Synthesizer-Made-Out-of-Paper-/


E esta, não lembrava a ninguém...
Mas aconteceu!
Uma estufa Hidropónica, que arrefece o ar, para o vosso Ar condicionado, em Climas quentes e secos.
E este, como tem a Estufa, serve também para os meses menos quentes.


Swamp Cooler, Hydroponic, Rooftop GreenhouseAviKado in backyard 
For those not in the know, a swamp cooler (also known as an evaporative cooler) is a popular way of cooling homes in hot, dry climates like Tucson, Arizona. It is a very simple machine, just a box with a fan in it and wet pads as walls. The fan pulls dry air through the wet pads, thus evaporating water, and pushes the now moist air into the home. The simple act of evaporation causes the pads to get very cool, and thus will cool the air as it flows past. The humidification of air is a side effect, but is usually welcomed when it is very dry outside. This is the same basic principle of how sweat works. However, swamp coolers can only drop the temperature of air by a limited amount, and will only work when it is dry, which is why you only see them in certain regions and even then, many people prefer AC units (or both). But enough about swamp coolers, lets turn ours into something else! 
It is an enclosed space with water and electricity, and is usually located on the roof of a building where it will get a lot of sun. The orientation of the swamp cooler does matter. The side with the duct should face north, but may also work if it face east or west. If it faces south it will block to much sun to make this useful. The roof of a swamp cooler is solid, but with the low winter sun it wasn't much of a problem.

https://www.instructables.com/id/Swamp-Cooler-Hydroponic-Rooftop-Greenhouse/


sexta-feira, 9 de dezembro de 2016

InventRight! E calcularem o que precisam, uma Micro-Máquina de Jogos, imprimir peças resistentes em 3D, e Imprimir sem Impressora!

Inventar, não é difícil para os Inventores...
VENDER, ou licenciar as nossas Ideias, ISSO é que é difícil!
Podem aproveitar a experiência destes Inventores de Sucesso, e aprender com eles, como abordar Companhias, proteger as vossas ideis, e não serem explorados, nem exigirem quantias exorbitantes.
Uma quantidade de vídeos à vossa disposição, é só irem aprendendo conforme quizerem e precisarem, e podem fazer perguntas, telefonando ou através de email.
É bom!


Description 
Award winning inventor Stephen Key and Andrew Krauss, longtime leader of Inventors’ Alliance in the Bay Area, cofounded their one-on-one coaching program, inventRight, in 2001.Since then, they've been teaching creative people how to license their ideas, aka sell them to powerful companies with extensive resources, in exchange for royalties. Learn how to reduce risk and increase your chances of licensing your idea. Visit www.inventright.com for more details about inventRight.   
Want to set up a phone call with Andrew or another member of our team to discuss your inventing questions? 
Call 1-800-701-7993 or fill out this short form to book: http://www.inventright.com/request-more-information.  Please note: inventright, LLC. is not a law firm and does not provide legal or patent, trademark or copyright advice. Please use caution when evaluating any information, including but not limited to: business opportunities; links to news stories; links to services, products or other web sites.
https://www.youtube.com/user/InventRightTV


Uma muito boa Dica, do nosso amigo Vijay Ahire, não precisam de ser Engehneiros, para calcularem algumas peças e partes importantes, basta-vos visitarem este Site, com Apps para de tudo um pouco, e é só escolherem...
Vejam só a imagem deste Calculador de Molas,que marvilha!


INFO 
Mechanical Engineer calculator is one of the powerful free tool available in the INTERNET which can be used for calculation and design of various mechanical components like gear, lead screw, spring, beams, bearings, sprocket etc. This basic design calculator can save great deal of time taken by hand calculation for these mechanical components.
The calculator has simple graphic user interface for each mechanical component on different web pages which contains input and output display box. The user has to first select the component from menu bar located on top of this page and give correct values with appropriate unit in input display box to automatically calculate result in output display box.     
Mechanical Engineer calculator has wide range of application for mechanical, automobile, structural and automation engineering. 


Querem encantar a Namorada? 
Não há melhor que esta encantadora Máquina de Jogos Miniatura, que é um espanto de Engenhoca.
O Natal aproxima-se...


World’s Smallest MAME Arcade Cabinet is adorable!

Luke 
Have you ever thought to yourself, “You know what, I’d love to play pac-man on a 0.96 inch OLED display with a tiny joystick and tiny buttons”? No? Us neither! That however hasn’t stopped Adafruit coming up with the ridiculously tiny MAME arcade machine. Built using a Raspberry Pi Zero, a 0.96″ RGB OLED display, an audio amplifier and assortment of buttons, they hacked the arcade machine together over a weekend. 


Empresas, Escolas, Fablabs, e Associações de Inventores, para além de Engenhocas abonados, poderão construír Engenhocas mesmo fantásticas, com a Impressão em 3D de peças com a resistência do Alumínio.
Esta Impressora, faz peças em Plástico, MAS que são impregnadas com Fibra de Vidro, Carbono, ou Kevlar!
Isso significa que muitas mais Ideias poderão ver a luz do dia, como Produtos no Mundo Real, directamente das vossas Oficinas.
Maravilha. 


THE MARK TWO 
The Mark Two combines Markforged's unique continuous carbon fiber reinforcement with workhorse reliability for the strongest, most versatile parts in our portfolio. It is the only printer in the industry that enables you to go from CAD to beautiful, end-use strong parts in hours. 
With your choice of reinforcement and plastics, remove the time, hassle and design iterations and put your parts to use right off the printer engineered with the right material for any job.


Mas como imprimir em 3D sem màquinas, nem Programas CAD?
Ou, têem uma Impressora 3D em casa, a ganhar pó, ou a fazer macacadas, e querem fazer dinheiro com elas, mas não sabem como?
A Treatstock, com uma rede de Impressoras 3D espalhadas por todo o lado, resolve esses 2 problemas, agora, com esta Empresa Associada, que vos permite desenhar pela Internet, e imprimir onde haja uma Impressora mais perto...
É só facilidades.


Fantastic 3D Prints and Where to Make Them 
Leopoly is a user-friendly product design and customization software platform where absolute beginners can customize existing 3D models or start from scratch and create something totally brand new. We are happy to announce that they have now teamed up with Treatstock to offer the option to print 3D models using our global 3D printing network. In this article, we will run you through just how easy it is to create designs on Leopoly and 3D print them on Treatstock. If you would like a more detailed description, you can find our instructables page here.
First of all, create or customize a model using Leopoly. Visit http://leopoly.com/, sign up and decide what it is that you would like to make. You will have various tools at your disposal for customizing and creating your model, and they have made it very easy to use so have fun and let your imagination run wild.
As Leopoly states on their website: “We are the creators of the interface that makes 3D object creation as natural as taking a picture, editing with Instagram or Microsoft Office”. After using their platform, we couldn't agree more! 
https://www.treatstock.com/blog/Collaboration-Treatstock-Leopoly


segunda-feira, 7 de julho de 2014

Caixas à medida! E mais um Controlador Programavel, conheçam as vossas Fresas, pCLinuxOS, e molas em Fibra de Vidro!

Podem mandar fazer as vossas Caixas, à medida, uma ou muitas, e isso é uma boa notícia para Inventores, Fabbers, e Engenhocas de toda a espécie...
Dica da Designspark:


NEW! Custom Cases from RS Components
Connector Geek

DesignSpark is proud to be able to offer a truly ground-breaking initiative to it's members - Custom Cases. Customers can specify a plastic case entirely to their own requirements and order as many or as few as they need. Let's have a closer look at this new product.
One of the big moments of any new project is turning the design that exists on paper (or on your computer screen) into reality. Some parts of the process are easy - prototyoing PCBs has never been easier, for example - but other parts can be really expensive. Let's take a look at enclosures. How can you best create a working prototype, with its case, without breaking the bank?

http://www.rs-online.com/designspark/electronics/eng/knowledge-item/new-custom-cases-from-rs-components


Da Mindsets vem este Controlador programável, bem pequeno, que vos poderá ajudar a fazer de tudo um pouco, e consome bem pouco.
Pode ser usado tanto por Geeks, como inciados, o que é sempre bom:


THE NEW CRUMBLE CONTROLLER

 This truly game-changing device opens up countless possibilities for ‘embedded intelligence’ as required by the new national curriculum.
What makes it unique is the much lower cost than comparable devices and the ease of use.

Non-electronics experts can use it right away BUT also offers great potential for advanced users. 


As Fresas CNC só são úteis... 
Se conhecerem as Ferramentas de Corte delas.
Da Inventables, vem este Artigo para vos esclarecer, que vos permite escolher a Ferramenta certa para cada caso.
É bom!


Milling 101: Understanding Milling Bits
jeremy
 
Choosing the right milling bit for the job at hand can be an extremely important factor in whether a milling project comes out amazingly, alright, or not at all. Combine that with having more choices of bits than materials, and choosing the right bit can be quite a difficult task. However, by answering a simple set of questions, you can greatly simplify your choice of bit. Here are the things you need to ask:

  • What material am I cutting?
  • What is my machine capable of?
  • What shape am I cutting?

Let’s quickly go through each of these and what they mean.

http://blog.inventables.com/2014/07/milling-101-understanding-milling-bits.html


Se já se fartaram daquela ideia funesta da Ubuntu, de quererem macaquear os Apple, e sobretudo, de fazerem de computadores pessoais a sério, I-pads idiotas, podem mudar para o PCLinuxOS, que é de onde vos mando estas linhas.
É mais rápido do que o Ubuntu;
Mais simples;
Instala TUDO à primeira;
E não se pôe com esquisitices, como querer fazer de PCs de trabalho, I-Pads idiotas, como o malfadado Unity, do Ubuntu!


About PCLinuxOS

What is PCLinuxOS?


PCLinuxOS is a free easy to use Linux-based Operating System for x86 desktops or laptops.
PCLinuxOS is distributed as a LiveCD, and can also be installed to your computer. The LiveCD mode lets you try PCLInuxOS without making any changes to your computer. If you like it, you can install the operating system to your hard drive. Locally installed versions of PCLinuxOS utilize the Advanced Packaging Tool (or APT), a package management system (originally from the Debian distribution), together with Synaptic, a GUI frontend to APT for easy software installation. PCLinuxOS has over 12,000 rpm software packages available from our software repository.


E isto interessa aos Fabbers e Inventores, porque já se sabe que, se hoje é só a Audi a fazer disto, vai aparecer um Inventable, dentro em pouco, para nós mesmos fazermos as nossas molas...
EM FIBRA DE VIDRO!
Pensem bem:
Mais baratas e fáceis de fazer, mais leves, resistem à Corrosão, e com as propriedades que quizerem que elas tenham?
Geeks, mãos à obra!


Audi set to cut vehicle weight with introduction of fiberglass springs

Scott Collie

The quest for ever-greater fuel efficiency is driving auto manufacturers to extreme lengths to reduce the weight of their vehicles. Aluminum, carbon fiber and fiberglass are all being used to help meet stringent emissions standards. In its search for "enlightenment," Audi has announced it will introduce glass fiber-reinforced polymer (GFRP) springs in its vehicles before the end of the year.
The core of the spring is made up of fiberglass strands, impregnated with epoxy resin and twisted together. Audi then uses a machine to wrap additional strands of fiberglass around the core and cures the unit in an oven. The strands are wrapped across each other at a 45-degree angle, to allow the load to be equally distributed across the whole spring.


quinta-feira, 26 de dezembro de 2013

Varetas, Turismo, Mesas de Tubos, e 3D de Super-Cola!

Para todo o Engenhocas e/ou Fabber Sucateiro, (e haverá outros?) eis uma fonte grátis de Varetas em Fibra de Vidro, os Chapéus de Chuva, vítimas de mau uso, por gente que desdenha segurar bem no chapéu...


13 Varetas grandes e outras tantas pequenas, em Fibra de Vidro, preço... ZERO!
É bom!


Eis a Inovação no Turismo Português, pela mão do incansável Jack Soifer, sempre batalhando por mais e melhor Turismo:

SWEDUTECH 12/13 by Jack Soifer


Eis como adicionar uma Mesa resistente ao vosso Escritório, Oficina, ou Garagem, por um preço bem módico...
Usando uma estrutura em Tubo de PVC


The $74 PVC Mega Awesome Super PVC Table


Wow.  It’s been a long time since I’ve posted an Ible! I ended up using PVC again for an office project and thought I would share how and what I built with it, since I get so many questions in my inbox about PVC.

As the title states, this Instructable will show you how to build an VERY large table out of a hollow core door and PVC pipe and fittings. They can be used for anything, such as craft tables, train tables, light desks or for garage sales or even family dinners as a ‘kids table’.  It is entirely up to you.  We needed ten of them and we use them as desks.  This was our first one we built.


E eis o que pode ser o arranque para Impressão 3D por Deposição de pó em camadas, Open Source, com uma Simples Makerbot de 2 Cabeças!
Esta Técnica envolve Bicarbonato de Sódio, mas poderia também ser Maizena, e a Super-Cola de Acrilato.
Uma camada de pó, duma cabeça, mais uma borrifadela de Acrilato, da outra, repete-se até se obter um Objecto em Acrílico, ora eis um Material que aguenta muita mais que os Plásticos comuns à Impressão 3D por máquinas Open Source...
E não precisamos de Materiais de Suporte, podem-se fazer Objectos mais complexos, é só vantagens.
FABBERS, MÃOS À OBRA!


An introduction to P-R-P. 'Poor man's Rapid Prototyping'. Let's build an IRobot keyring
This is a tribute.
A Thank you.
Dedicated to all people who selflessly experimented, tried, failed and succeeded. They who created instructables so other people may learn and gain by it.
And a thank you for creating a place to make all this possible; Instructables.com
This instructable therefore is for instructors and modders, builders and fixers.

You will find it helpful in many situations I trust.

I have used this methods and materials, described inhere for many years to fix, build, mod and stick things. Many-a-time getting me out of troublesome situations.
When you break something that has to be right. Now.

http://www.instructables.com/id/Poor-mans-Rapid-Prototiping-Lets-build-a-IRobot-ke/


quinta-feira, 24 de janeiro de 2013

Reparar Fibra-de-Vidro, Rasperry Pi e Lego, Hidrogénio à descrição... E a Ray-Gun!!!

Como a vida está dura para quase todos, eis algo que faz sempre muito jeito, como reparar rachas e buracos, em Fibra-de-Vidro, da nossa amiga audreyobscura:


Repairing Fiberglass

audreyobscura

This Instructable comes from a recent project I have been working on that involves fixing up an old fiberglass travel trailer. In the remodeling of this trailer, I was left with many small holes from antiquated peripherals on the sides of the trailer (like a phone jack). There was also a six inch crack in the front from a rock hitting it on the road.

I actively searched for the best way to patch small holes in fiberglass on the web, and couldn't quite find concise answers - this lead to a more dedicated search. I ended up talking to surfers, sailors, and prop-masters about how they make repairs to structual fiberglass and came up with the following methodology.

Hope this is helpful, and I would love to hear back from the community on this.


Como o Raspberry Pi não vem com caixa, eis mais uma sugestão... Lego! 
Isso, e mais um Bootloader, e uma série de dicas, vão ver:


Adventures in Raspberry Pi-land: Bootloaders and LEGO sets

James Holloway

After several shameful weeks of having it sit on a bookshelf, Gizmag recently decided it was time to embark upon not one but two very ambitious projects for its Raspberry Pi: turning it on, and building a LEGO case for it. Needless to say, in both cases we turned to the worldwide web for fast, easy answers.
I say "turning it on," but considering that's as simple as connecting a power adapter (not included), we thought we'd go one better and get the thing properly up and running. This is all fairly straightforward if you follow the Raspberry Pi Foundation's quick start guide.


Gerar Hidrogénio, com nano-partículas, basta juntar Àgua!
Isto é importante, não precisa de luz, calor ou electricidade, e o único subproduto é um àcido não-tóxico:


Silicon nanoparticles could lead to on-demand hydrogen generation

Darren Quick

Researchers at the University of Buffalo have created spherical silicon nanoparticles they claim could lead to hydrogen generation on demand becoming a “just add water” affair. When the particles are combined with water, they rapidly form hydrogen and silicic acid, a nontoxic byproduct, in a reaction that requires no light, heat or electricity. In experiments, the hydrogen produced was shown to be relatively pure by successfully being used to power a small fan via a small fuel cell.


Mais um dia, mais uma dezena de peças, a Ray-Gun continua a ser feita, e até agora, tudo vai encaixando...
É bom!
Sim, faltam peças... Amanhã!


sds

terça-feira, 16 de outubro de 2012

100 Experiências prá Malta Jovem! E o David, agora a cores, Raspi com o dobro da memória, etc.

Para as Escolas, nada menos que 100 Projectos, para os Alunos...
É bom!

100 Awesome Engineering Projects for Kids

By Kristie Lewis
Engineering and fun aren't always two things that kids naturally associate with one another, but there are hundreds of ways to make engineering, physics and design fun and challenging for kids. Here are 100 great experiments that will let kids construct, play, learn and grow, all while they study the fundamentals of engineering.
Basics
These projects focus on the basics
of motion, force and other essentials of physics.

http://constructionmanagementdegree.org/blog/2010/100-awesome-engineering-projects-for-kids/


O Scanner 3D David não pára, e vem agora, numa nova Versão, com texturas coloridas...
New DAVID Version 3.5
Dear DAVID Friends,
We proudly present DAVID 3.5 - the best DAVID ever! ;-)
In the last months we have been busy implementing some great improvements:
  • Color texturing for SL scanners even with monochrome cameras, like the SLS-1. Real color, no tricks! It also performs white balancing, so you will get realistic colors on your 3D models.
    These have been captured with a monochrome camera (SLS-1):

http://www.david-laserscanner.com/?section=Downloads


O Raspberry Pi duplicou a Capacidade de Memória, o que vem aumentar ainda mais o seu interesse como Plataforma de Ensino de programação, e tudo mais o que se lembrarem:


Raspberry Pi Model B RAM doubled

James Holloway

Apparently in response to Raspberry Pi enthusiasts calling for a more capable addition to the lineup, the Raspberry Pi Foundation has today gone one better and doubled the RAM available in the existing Model B unit to 512 MB, without increasing the asking price of US$35.
In a blog post published today the Foundation implies that the RAM increase transforms the Model B into a viable general purpose computer capable of running "multiple large applications" at once.
There's good news for consumers who have ordered but are still awaiting their Model B Raspberry Pi delivery: they will receive the 512-MB variant without having to take action. A firmware upgrade enabling users to access the additional RAM should be released in the next few days.

http://www.gizmag.com/raspberry-pi-ram-increase/24560/


A Autodesk dá-vos Programas de Borla, sim, Grátis, tomem nota desta Página, Innovation Edge...
 
 
 Eis os ùltimos 3:


DesignScript for AutoCAD Build and analyze complex designs in AutoCAD® 2013 software with a powerful exploratory scripting language.   


Project Basejump for AutoCAD Map 3D and AutoCAD Civil 3D Access Microsoft® Bing® web mapping services including aerial imagery, road, traffic, and other information within the AutoCAD® Map 3D® or AutoCAD® Civil 3D® software environment. 


Project Hydra for Simulation Mechanical or Multiphysics Try improvements to the Parametric Design Studies (PDS) feature, importing temperatures from Autodesk CFD (formerly known as CFdesign®), new fast Subspace with AMG solution of dynamics analyses, inquiry of results by part, improvements to the Drop Test Wizard (DTW) feature, and rerelease of the GPU-enabled AMG Solver (AMG-MF) in Autodesk® Simulation® Multiphysics 2013 and Autodesk® Simulation® Mechanical 2013 software.

http://labs.blogs.com/october2012/innovation_edge.htm


E como gramo à brava ver a Malta Surfista ir praticar Desporto, só lhes faz é bem, embora eu nunca pratiquei,  cá vai uma para elas e eles, como tirar Marcas de Alcatrão da Fibra de Vidro!


Removing Tar from Fiberglass
audreyobscuraI have just begun the restoration process of my tiny fiberglass trailer. When I pulled the windows off of the hull, there was this tar-based weather stripping sealing the window from the elements. I knew that if I was to replace the windows at any point, I would have to replace the weather stripping too, and the new weather stripping wouldn't stick to anything besides a pristine-clean surface.

I removed what I could with a razor blade and a putty knife, but there was still a thick layer of black, sticky residue remaining. I went to the hardware store and found a product called GooGone. WEARING GLOVES, I put some the solvent on a paper towel and rubbed an ample amount on to the surface of the hull. I allowed the solvent to set for a few minutes before wiping it off with another paper towel.

(Note: I am using very heavy duty shop paper toweling)

The GooGone took off, or kind of melted, most of the tar. The small amount of tar remaining cleaned up with lacquer thinner.

In summary:

1)Scrape!
2)GooGone
3)Scrape/Wipe
4)Lacquer Thinner
5)Wipe

http://www.instructables.com/id/Removing-Tar-from-Fiberglass/