Blog Posts

Mostrar mensagens com a etiqueta mindsets. Mostrar todas as mensagens

terça-feira, 25 de julho de 2017

Injecção de Plástico em casa! E Mindsets em saldos, uma Fonte de Alimentação regulável, partilhem com AddToAny, e desenhem Engrenagens

Eis uma maneira de terem uma Fábrica de Injecção de plásticos na Oficina, para terem pequenas séries de objectos realmente realistas...
Usando uma Impressora 3D!
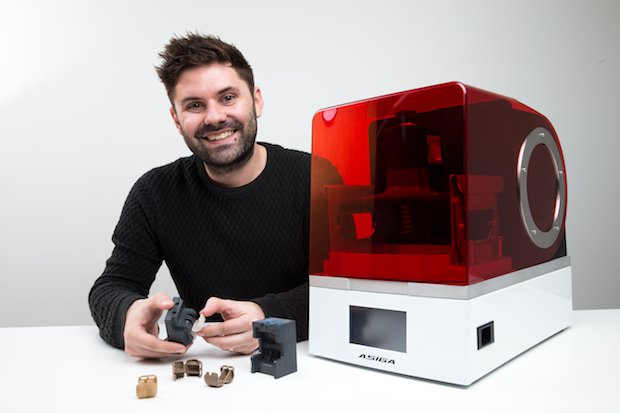
O "truque", é, para além de muita cabecinha ao desenhar os Moldes, uma Impressora Asiga, e a sua Resina especial, a Asiga FusionGRAY.
Leiam com toda a atenção, todo o atrigo, indo ao Link: 


Low-cost desktop injection moulding
Janie Barrett

Low-cost desktop injection moulding - here, Mitchell Brown from VERT Design, explains how they did it using Asiga's desktop 3D printing solution ...
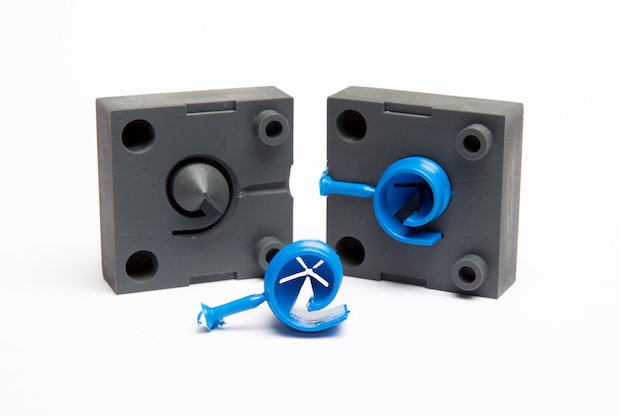
Our product design company was engaged to develop a variation of a hose clip that is used on a high speed production line. The product works through the use of an integral hinge and flexible clipping geometry.
Traditionally we would test the design through the used of SLS 3D printed models, however, the results achieved were not accurate. We required the geometry to be proven in the actual production materials, which in this case was injection moulded polypropylene
Through the design phase, we developed multiple iterations. Eventually this was short-listed to two possible concepts. Producing a prototype tool in steel or aluminium would have cost many thousands of dollars and taken a minimum of 6 weeks. We turned to 3D printed tooling as it was faster and cheaper.


Só a página, é um espectáculo, mas estes artigos estão em Saldo, por isso, aproveitem, que esta quantidade de coisas boas, para Engenhocas, vai-se esgotar, e depois, é tarde demais:


CLEARANCE. NOT TO BE MISSED!...

See our range of Clearance items. Available whilst stocks last.
When they're gone, they're gone.
Making way for new and exciting ranges.


E eis mais uma Fonte de Alimentação que podem fazer em casa, cortesia deste engenhoso Engenhocas no Site Instructables.
Esta, tem como trunfos der de regulação contínua, tanto de Voltagem, como de Amperagem!
É bom.


How to Make a Bench Power Supply
deba168

A bench power supply is an extremely handy bit of kit to have around for electronics hobbyists, but they can be expensive when purchased from the market. In this Instructable, I will show you, how to make a variable lab bench power supply with a limited budget.It is a great DIY project for beginners as well as any one interested in Electronics.

https://www.instructables.com/id/DIY-Bench-Power-Supply/


Isto é porreiro, uma ferramenta para partilharem o que quiserem por toda a Net, e o que é melhor, é grátis.
Vejam todas as vantagens disto, no Site:


Share Anywhere

Share to any service, or add a custom service to share to. AddToAny gets people to the right destination to share or save your content, whether it's in a native app or on the web.
https://www.addtoany.com/


Isto é maravilhoso, não só porque é um bom Instructables para desenhar Engrenagens...
Mas também, com este Intructable, podem aprender como imprimir em 3D todas as peças mecânicas que quizerem!
Através deste catálogo de peças acessível ao programa Fusion 360:


The Easy Way to Design Gears in Fusion 360
Desktop Makes

One of the first things I ever made from a 3D printer was a gear. But it wasn't just any old gear. The beauty behind this gear was that it was a replacement part for the very printer that was making it. This still blows my mind to this day. I love printing gears and still get excited about this new world that 3D printers have opened up. The problem is that designing gears have always been a bit of a challenge for me. That is until I learned what I'm about to teach you.
In the last step I also include a video demonstrating the entire process.


terça-feira, 3 de maio de 2016

Aprender sobre trilhos! E o Arduino sem Mestre, nem Solda, façam o vosso Filamento, uma Impressora para fazerem com Impressoras, e Kerf!

Brinquedos Didácticos assim, é outra coisa...
Uma aceleração brutal, nestes Modelos  de Monorail, e é certo que se mantém a atenção da Pequenada, na componente de Ensino do projecto. 
Apesar de ser um pouco caro, para indivíduos, não o será tanto, para Associações e Escolas.
E há sempre a possibilidade dalgum Engenhocas fazer isto, com Sucata e pouco mais! 


High Speed Rail Racer
De veloped in association with Stephen Hill, Head of D&T at Turnford School in Hertfordshire.
This amazing system has been designed to put the WOW into a range of STEM activities. Using a simple friction drive principle, small electric vehicles running on an electrified rail can achieve astonishing acceleration and speed from a standing start. The rail concept has parallels with both large-scale linear rail transport systems and small-scale goods transfer lines used in manufacturing - and offers pupils or students unlimited opportunities to learn through a highly motivating and enjoyable technical challenge.


E para aprenderem a dominar o Arduino, nada melhor que este Kit, que vos ensina a criar as vossas Engenhocas, sem sequer se meterem a soldar componentes, nem mesmo, precisam um Breadboard!
Mais fácil, não há! 


ARDUINO CODING KIT
The Arduino Coding Kit is an intro to programming, allowing anyone to create and code inventions without breadboarding, soldering, or wiring. Learn the basics of coding as you create and program 8 inventions, or upload code from the site using codebender.  


Se acham que o Filamento para as Impressoras 3D está muito caro, já podem é recorrer à vossa própria Fábrica de Filamento, e fabricar o que precisam, e fazendo essa Fábrica caseira com pouco dinherio:


Build your own 3d printer filament factory (Filament Extruder
ianmcmill

Too long, didn't read:
Make your own 3D printer filament !
Cheap and high quality at a decent speed of 150-190 IPM ! (4-5 meters per minute)
UPDATE: Now with wiring diagram !

Long read:
3D printers are cool and they finally start to drop in price. Kickstarter campaigns like the one from QB-UP or M3D are popping up and they are finally "affordable". And with affordable I mean affordable like 200 $ and not "affordable" like 2.199$ affordable. However, once you are a proud owner of a 3D printer you will soon realize that your wallet is far from being let alone. No ! You need plastic filament of course to print those super awesome coat hooks and wheel chocks. Since the price for these filaments tend to top the actual material costs, printing before mentioned life savers is kind of expensive and could become a problem to the development of the ever growing 3D printer community
BUT FEAR NO MORE !! Some clever gents came along - Hugh Lyman with his Lyman Extruder may be mentioned here or the guys over at Filastruder.com - and saved the day ! YAY. And there was much rejoicing ! They have built plastic extruders everyone can build or buy at a decent price. However if you are a fellow Instructable.com user the first thing that should come to your mind is "I can build this by myself...and cheaper...". Building at lower costs is the nature of DIY after all.
And much more fun than putting together a premade kit, of course.

http://www.instructables.com/id/Build-your-own-3d-printing-filament-factory-Filame/


Para continuar neste tema, se já têem uma Impressora 3D, mas precisam de outra, pois podem fazer mais uma, com peças que fizerem na primeira.
E com duas, pode acabar com 4, etc...


The D-Bot, my self made reprap.
AndreasDesmedt

After I bought my first printer and began printing for friends, I felt I could use a 2nd printer. Instead of just buying a 2nd one, I came up with the idea to build a reprap. I had a printer, so I could print the parts. You could buy the other parts everywhere on the internet, so that wasn't a problem either. I began creating a design that was easy to built, compact, cheap and still accurate. Continue reading to see if I succeeded!


Já aqui falei antes de Kerfing, a técnica que nos permite obter Madeira curva, sem Câmaras de Vapor, pois tal pode também ser feito sem Laser CNC, mas com este acessório, nas vossas Serras eléctricas:


An Easier Kerfmaker

Phil B
Someone showed a group of us a simple kerfmaker he built from scrap. I was reminded of a nice aluminum kerfmaker Instructable posted by Steliart and I thought about building it. This Instructable describes an easier kerfmaker I built from some hardwood. It is not a disposable kerfmaker fitted for only one tool. The precision sliding parts are so easy to make well that it is almost foolproof.
A kerfmaker is initially set by you for the thickness of your cutting tool (saw blade, router bit, bandsaw blade). From that point, it allows you to set the kerfmaker for the thickness of a piece of work so you can make a precise dado for that piece without further measuring. 


sábado, 12 de dezembro de 2015

Um Fab-Inventor Peruano, Mindests, um Transformer, e uma Multi-Máquina

Arquitecto, Designer, Fabber, e Inventor, eis um Peruano em Roma, mas que orgulha a sua Nação, com estas Invenções que permitem fazer-se muito, com pouco:


PERUANOS DESTACADOS: 

Entrevista a nuestro connacional inventor Eder Laureano León


A Mindsets oferece-vos, entre outros Brinquedos, um AirZooka, por isso, vão lá ver, que é bom!   


Laser Air Zooka 
The Laser Airzooka is the same bucket shaped, high-tech, soft combat, high velocity air cannon that you've come to know and love, but this time it's been equipped with a "laser".
"Paint" your target with the laser, pull back the quick release, sprung firing mechanism and let loose on your unsuspecting victim. They'll be hit by an incredibly focused ball of air sending hair and paperwork flying all over the office.
If you thought the Airzooka was a blast just imagine how much fun you could have with a Laser Airzooka.
A bucket shaped, high tech, soft combat, high velocity air cannon with laser targeting system. The targeting sight is a Class I laser - do not under any circumstances shine in anyone's eyes.
Suitable for ages 16 years +.
Requires 2 x AAA batteries (not included). 


..Eis algo com tudo o que nos encanta, é feito por Impressão 3D, usa um Arduino, Android, e é uma grande Engenhoca!
E como podem fazer tudo isto em casa, é de aproveitar. 


3D Printed "Transformers" Robot - Spiderbot

Smudger_WTH

The Spiderbot is an imitation of the "Transformers". It is a RC quadruped robot and has two modes of operation: spider and vehicle, just like the robots in "Transformers". It is Arduino-based and controlled by Android phone using Bluetooth. It does not have any kinematic calculation inside. The robot cannot be played on rough round as it needs to slip slightly. You should check out the Youtube video demonstration first!

Hope you like it!  


...E se precisavam duma desculpa para começarem a mexer com o Sistema Makerblock, eis aqui uma Multi-Máquina, feita com esse autêntico Meccano do Século 21!
Vem quase tudo da Makerblock, estrutura, motor, etc: 


How to Make a Five-in-One Mini Wood Working Machine

Makerworks 

Recently,I found myself so into wood making. Therefore, on the 18th Maker Marathon of Makeblock holding on Nov. 28th, I decided to DIY a mini wood-working machine which covers the functionalities of the lathe, drill machine, a milling machine, grinder, and sawing machine.
Most parts are from: http://www.makeblock.cc/ 


terça-feira, 3 de novembro de 2015

Maker's Marks! E Ímanes na Educação, um Planador espectacular, e o Crumblebot

Isto é mais um sonho tornado realidade...
Dica do nosso amigo Eddy Ridder: 
Moldem o que quizerem, ponham-lhe umas Etiquetas auto-colantes, ondue querem os componentes, e o scanner e o programa fazem o resto...
Um Objecto 3D, com a caixa já feita e a caixa já com tudo preparado para os Componentes!
Depois, é só imprimir em 3D, e montar!
Muito bom!


Makers' Marks: Physical Markup for Designing and Fabricating Functional Objects
Berkeley Institute of Design


To fabricate functional objects, designers create assemblies combining existing parts (e.g., mechanical hinges, electronic components) with custom-designed geometry (e.g., enclosures). Modeling complex assemblies is outside the reach of the growing number of novice “makers” with access to digital fabrication tools. We aim to allow makers to design and 3D print functional mechanical and electronic assemblies. Based on a formative exploration, we created Makers’ Marks, a system based on physically authoring assemblies with sculpting materials and annotation stickers. Makers physically sculpt the shape of an object and attach stickers to place existing parts or high-level features (such as parting lines). Our tool extracts the 3D pose of these annotations from a scan of the design, then synthesizes the geometry needed to support integrating desired parts using a library of clearance and mount- ing constraints. The resulting designs can then be easily 3D printed and assembled.

https://www.youtube.com/watch?v=EM7bgipWy6g


Aqui está uma boa maneira de usarem os ímanes de neodimio, em Aulas divertidas sobre o Tema do Magnetismo, para a criançada:


Magnets in Education
A few of us here at K&J Magnetics recently had the opportunity to present magnetic topics in the classroom.  One has a daughter in elementary school working on her first exposure to magnetism and electronic circuits in science class.  Another had an invitation from a friend who's a teacher.  It was a huge amount of fun playing show-and-tell with magnets to excited kids!
We've known that magnets are fun for years.  If there's one thing we learned in our recent school visits, it's that magnets in a classroom setting can be seriously engaging.  Adding interactive and hands-on stuff to science class really gets students involved and excited.
This article provides a brief description for the many magnetic demonstrations we presented.  Regular readers of the K&J blog might recognize a number of demos from earlier articles.  We thought listing them all together here might help answer some common questions we receive:
What kind of science experiments can I do with magnets?
My kid wants to use magnets in their science fair / project. What should they use?
What magnets are good for the classroom?
For some of these ideas, we use some fairly powerful magnets for good effect.  Please use magnets carefully and responsibly.  Some of these experiments are best conducted with adult supervision. 


Para quem se queira deliciar com a Maravilha que é o Voo, só é de aplaudir este magnífico esforço de Alexander Shevchenko, ao combinar, de forma genial, a Economia do voo de Asa Delta, com a Rigidez de Planadores mais seguros, usando a bem económica Esferovite, ou Isopor, mas Laminada, de forma a garantir muito mais segurança a um preço que é mesmo para qualquer um.
E também se poupa na Manutenção! 
Parabéns! 


This Glider Design by Alexander Shevchenko Costs Less to RepairJen Chae Ukrainian designer Alexander Shevchenko’s Delta glider design keeps the frugal in mind. Mostly made of laminated foam, this sailplane costs significantly less to fix or replace compared to others in the market. The design is composed of thoroughly researched materials keeping the theme of efficiency in mind. The resulting effect delivers similar quality while promising less repair costs. 
http://www.trendhunter.com/trends/glider-design


A Mindsets oferece-nos este Kit Didáctico, facílimo de programar, montar e operar, Cheio de Sensores e botões, ainda por cima, é acessível a 24 Libras:


CrumbleBot Robot for Crumble Controller 
The CrumbleBot is an ideal way to introduce young (and old) children to robotics using the fantastic Crumble controller.
All programming with the Crumble is extremely easy: drag, drop and click is all that is required to accomplish hundreds of simple and more complex tasks With this robot kit you can do experiments for: Basic movements (forward, reverse, left spin, right spin)
More complex turns (by moving one motor slower than the other)
Line following using the built-in line sensors with indicators
Light seeking or light avoiding using the built-in light sensors
Using the built-in Sparkles to give indications of what is happening
Use the built-in push-button switch to start the program, change mode or anything else you want 
http://www.mindsetsonline.co.uk/Catalogue/ProductDetail/crumblebot-robot-for-crumble-controller?productID=a2106972-5e21-4901-821b-719848cd1bf8&catalogueLevelItemID=28235202-fe9d-481e-9fe8-e5fec53b7a8a


quinta-feira, 29 de janeiro de 2015

Caixas, Écrâs, e Câmaras para a Raspi! E novas Ferramentas 3D, e Sismógrafos!

A RS-online vende também Caixas para as vossas Raspberry Pi, e Écrâs TFT, e com, ainda, módulos de Câmera vídeo, para as Raspis, ou o que queiram dotar destas capacidades...
É bom!


Cases
Protect your Raspberry Pi with our range of cases. Available in black, white & clear ABS.


Displays 
Make the most of your Pi with one of our TFT touchscreen displays. Available in 2.8in or 4.3in and complete with adapter for Raspberry Pi GPIO header, 2GB microSD card, programming adapter and all of the cabling required to interface between a Raspberry Pi.


A Shapeways não quer que vocês mandem imprimir Objectos que não são viáveis, por isso, têem à vossa disposição 3 novas Ferramentas Online, para avaliarem o porquê da rejeição e emendarem, e uma Ferremedelas é uma Ferramennta bacana, que envolve várias peças diferentes, que são envolvidas num "casulo" que é depois retirado:


Learn New 3D Printing Skills in 2015 
Lauren 

It’s a new year and we’ve jumped on the annual bandwagon and resolved to improve ourselves. What better way to do that than to improve how our talented designers use Shapeways? Earlier today we told you about the new Shapeways 3D Tools - our new suite of tools that will enable you to check your designs using the same guidelines our 3D Printing Engineers do. Here’s a quick video tour of the automatic checking tools.


A Mindsets tornou-se um autêntico manancial de Engenhocas para fazerem de tudo um pouco e desta vez, é uma gama de Sismógrafos e detectores de vibração, do qual apenas mostro este, vão lá ver os outros:


Slinky Seismometer 

Designed in association with the British Geological Survey. Provides an elegant, low-cost solution to earthquake detection. Electromagnetic induction to detect ground motion. Eddy current damping for improved sensing. Requires a suitable digitiser such as our USB seismometer interface (shown below) and software (such as the popular jAmaSeis).


terça-feira, 27 de janeiro de 2015

Aveiro! E um bom Microscópio, mais uma Forja, e uma escada de Jacob

AVEIRO BRILHA!
A Universidade de Aveiro, e estes génios do Departamento de Electrónica, Telecomunicações e Informática da dita Universidade, estão de parabéns, por inventarem esta Bengala que avisa o Cego da existência de Obstáculos como buracos e declives, pela frente!
Primeiro lido no Jornal Destak de hoje, e esta notícia vem da Revista Sábado, eis como se avança a sério, com a Tecnologia:


Universidade de Aveiro cria bengala electrónica para cegos

Uma bengala que utiliza ultrassons para detectar buracos e declives com o objectivo de ajudar pessoas com deficiência visual está a ser desenvolvida na Universidade de Aveiro (UA). A bengala, já em fase de protótipo, produz vibrações no punho avisando com isso o utilizador que se aproxima, por exemplo, de uma escadaria ou de um buraco no pavimento.

O projecto nasceu no Departamento de Electrónica, Telecomunicações e Informática como resposta a um desafio lançado pela Associação Promotora do Ensino dos Cegos (APEC) que quer acabar com as centenas de acidentes sofridos anualmente pela população invisual portuguesa, muitos dos quais com consequências graves, causados por obstáculos indetectáveis com uma bengala normal.


A Mindsets vende, por cerca de metade do Preço anterior, este magnífico Microscópio 3 em 1, que é tanto um Microscópio normal, como tem capacidades Digitais, com uma respeitável Resoução de 1280*1024 Pixeis... 
E ainda pode ser removido da sua base, para uso em Trabalho de Campo!
É de aproveitar!


3 in 1 Digital Microscope 

'Digiscope' can be used either as an ordinary or digital microscope.
Detatchable head for handheld use.
USB 2 connection.
Resolution SXGA - 1280 x 1024.
Includes:
Software CD (compatible with: Windows 7, Vista, XP, 2000 SP4, Mac OSX 10.4.8 - 10.6.2),
1 sample slide and 3 blank slides,
dropper and forceps.
3 magnifications:
50x - 100x
100x - 200x
200 - 400x


Mais uma Forja, desta vez, feita com o Tambor dum Travão, para verem que se pode fazer de tudo...
Com Sucata!
Muáháháhá!


Brake Drum Forge
Straklin 

My brother (Bigdaddycole) and I have been talking about building a forge for some time. We finally found some time over the last few weekends and put this together. We used a lot of stuff we had in house, so it was a cheap build. Please comment if you have suggestions or improvements. We have also entered this in the "On a Budget" contest, so if you like it please vote. We hope you like this build!
DISCLAIMER: When using an angle grinder, make sure you use eye protection and gloves. Also make sure you are working in an area free from combustible material. It throws off a lot of sparks and hot metal. Know how to use your tools safely! Be safe, and have fun!


E para algo de hipnóticamente Geek-espectacular, eis como construír uma Escada de Jacob...
Helicoidal!
Um regalo para os olhos!


Helical Jacob's Ladder
imarhino 

Helical Jacob's Ladder Project:

  • experience level: beginner
  • parts needed include: transformer, power cord, bare wire, wire nuts, wood block, wood screws, wooded dowel and a nail
  • tools needed: screwdriver, wire stripper, wire cutter, and drill
  • Safety notice: Always unplug or isolate a device from its power source when servicing!
  • Perform these tasks under the direct supervision of a parent or a trained adult!