Blog Posts

sábado, 8 de dezembro de 2018

Raspberry Pi 3, A+! E alojar as Impressoras, Mini-satélites(!), Lixar sem Stress, e o PVC sem Mestre

A placa Raspi não pára!
Agora um autêntico Computador, Quad-Coore de 64 bits, e o que mais,  a 1,4 GHz, vão ver à página deste Link as Especificações desta bela máquina!


Raspberry Pi 3 Model A+ Unboxing
e14phil

Introducing the Raspberry Pi 3 Model A+, the latest product in the Raspberry Pi 3 range.
Like the Raspberry Pi 3 Model B+, it boasts a 64-bit quad core processor running at 1.4 GHz, dual-band 2.4 GHz and 5 GHz wireless LAN, and Bluetooth 4.2/BLE.
The dual-band wireless LAN comes with modular compliance certification, allowing the board to be designed into end products with significantly reduced wireless LAN compliance testing, improving both cost and time to market.


...Algumas dicas que não são óbvias, e são mesmo essas as que nos tramam, quando não as sabemos...
Saibam então como fazer uma caixa para as vossas Impressoras 3D, que permita uma temperatura estável, sem abafar a máquina, e mais!
Dicas porreiras.


5 Tips for Building a 3D Printer Enclosure
3D Printing Nerd

While at Printed Solid, I spoke to David Randolph about 3d printer enclosures. They sell a number of enclosures, and even white label their enclosures for other resellers. Knowing I tried to build one myself with Bill Doran, I asked Dave to give me his five best tips for building one!


MINI-SATÉLITES!!!
Muháháhá!
Malta Estudante, e Super-Geeks, aprendam como construír estes bichinos, mas para durarem, que lançá-los, não é pela UPS, ou pelos Correios.
Ainda... LOL
Maravilha.


ArduSat-1 and ArduSat-X launched from the ISS Picture credit: NASA
Build a CubeSat Satellite that actually works, Part 1: Make it Resilient
Bill Marshall

It’s such a great idea: students in schools and colleges inspired to become the next generation of Space engineers by building and orbiting their own satellite. But it’s not a new idea. The first amateur satellite, OSCAR 1 was actually launched in 1961 as a secondary payload - only four years after Sputnik 1. Project OSCAR continued with more launches until 1969 when the Radio Amateur Satellite Corporation (AMSAT) was formed to co-ordinate further activity. The OSCARs are primarily amateur radio communication satellites built by students in educational establishments worldwide. Three were constructed at Surrey University in the UK starting with UoSAT-1 (OSCAR 9) in 1981 then UoSAT-2 (OSCAR 11) in 1984 and UoSAT-3 (OSCAR 14) in 1990. The educational purpose behind these satellites was highlighted when a special purpose radio receiver with software for the BBC Microcomputer became available. In the late 1990’s the CubeSat was born when it was realised that thanks to microelectronics it had become possible to squeeze most of the functionality of an OSCAR satellite into a 10cm cube. Since the first one made it into Low-Earth Orbit (LEO) in 2003, many more have followed. But the failure rate has been high for two reasons: the stresses of launch can ‘break’ the CubeSat before it even reaches orbit, and the Space environment is very hazardous for delicate electronics once orbit is achieved. What can be done to increase the likelihood of success?


Para não ficarem piores da Vista, nem dos Pulmões, não se lixem, ao lixar à máquina, e usem mas é esta Caixa protectora, que a saúde é essencial.
E também é essencial à paz de espírito, uma Garagem limpa, para terem de ouvir a querida Esposa a ralhar à brava...
LOL


Garage Dust/Sanding Enclosure
corbor4shore

INTRODUCTION:
I have a very small shop in my two car garage. Unfortunately I have to share that space with two cars. When I am sanding, routing or drilling, dust seems to coat every surface in my garage, including my wife car. I was tired of washing my wife’s car so I needed to find a solution to all the dust I was creating. I did some research and found some sanding downdraft tables, but I couldn’t imagine those working without an incredibly powerful vacuum (which I do not have), plus they do not contain the dust jettisoned out. I then started looking at bead blasting cabinets and found that I liked the containment aspect of the cabinet but I needed the downdraft capabilities of the sanding tables, so I decided to create a hybrid.

https://www.instructables.com/id/Garage-DustSanding-Enclosure/


Aprendam 5 lições duma assentada, sobre como usar o humilde, mas tão útil, Tubo de PVC para uma data de coisas boas, cortesia da nodda amiga, audreyobscura, que não pára de nos surpreender com a sua creatividade:


PVC CLASS
audreyobscura

Plastic PVC is most commonly used by plumbers and very clever DIY enthusiasts. This material and pipe were designed to transport water, as it cannot wear out over time like rusting metal can. PVC is also structurally very strong. When parts are constructed properly, it can support structures that are hundreds of pounds!
This class aims to go over the material properties of PVC as well as the most common ways it is worked, machined, joined, and finished. You'll be inspired to create furniture, agriculture projects, and more after learning these simple techniques to work with PVC.


quarta-feira, 28 de novembro de 2018

Impressão 3D melhor e mais barata! E uma Fresa CNC impecável, um aviso sério, 3 dicas e uma bitola, e calibrar a Imprssora!

Aqui vai uma Dica das boas, deste nosso amigo para tanto imprimirem melhor...
Como mais barato!
Vão a uma Papelaria, e compram folhas auto-colantes deste material para as placas onde se colam Post-its, e são muito mais baratas que o Builtak, e permitem uma impressão com a camada inferior muito mais lisa...
E até vos explica como também comprarem placas de vidro, para essas folhas!
É bom.


Print bed coating you can attach to regular glass beds
Paul Rogalinski

Turns out that dirt cheap black board sticker works great as print bed coating you can attach to regular glass beds. I love the mate finish. Last photo shows a uncoated (to the left) vs. coated (to the right) finish.

PLA adhesion is great and parts do come off without any residue on the build surface after cooling down. Will keep you posted about long term results, a bit worried about expansion of the coating and tearing. Not an issue right now though.


O bacano que fez esta obra-prima de Carpintaria, vai-vos dar uma Fresa CNC, planos grátis, por menos de 900 Dólares!
Vão ao seu Site, também, porque aprender com ele, vale bem a pena.


DIY CNC Router for Under $900 - Free Plans Available
DIY Builds

The CNC has a half sheet of plywood cut capacity with a maximum thickness allowance of 6". The entire unit cost under $900 to make. A free set of plans and cost breakdown analysis (with links to every product used) is available for download on my website DIYBuilds.ca


Para os Iluminados que pensam logo em ARMAS DE FOGO, quando se fala em Impressoras 3D, meditem bem nisto:
Se a pressão dos gases, na câmara duma arma de fogo, essa pressão, COMPRIME COBRE...
O que fará a uma pistola feita em Plástico?


If the pressure on a gun's Chamber compresses a copper slug...
What will it do to Plastic Guns?


Mosin-Nagant Factory Pressure Test Rifle
Forgotten Weapons

How did people determine chamber pressure in the years before computers and fancy electronics? Well, by squishing a calibrated slug of copper. Factories would convert rifles specifically for pressure testing use by adding a pressure ring around the chamber, drilling a hole in it, and then threading in a gage to crush a block of copper. This Mosin Nagant is an excellent example of the system, complete with the all the testing apparatus!


O nosso amigo Angus, da Maker's Muse, brilha, com estas 3 boas Dicas para fazerem Impressões com buracos nelas, mas que não têem depois de acabar com uma broca, e ainda...
Com uma Bitola para verem como vão regular as medicas das vossas Impressões, para fazerem peças que se encaixam na perfeição!
Impecável.


3 Design Tips for Better 3D Printed Holes - CAD For Newbies
Maker's muse

3D Printing isn't a perfect technology, however with clever design we can improve the quality of our parts!


Mais um tipo impecável, é Chris Thorpe, que me ajudou a ter as Impressoras a imprimir cubos de tamanho mesmo igual, e rodas circulares, mesmo, com esta Instructable que me apontou, para resolver o problema, duma vez por todas!


How to Accurately Calibrate Your 3D Printer
mrakuaku

One of the steepest learning curves when starting with 3D printing is learning how to calibrate all the motors accurately. The good news is that once you know how to calibrate one motor of the printer, the rest are pretty well the same. The following instructable shows you how to accurately calibrate your printer using minimal filament (filament is only needed to calibrate the motor that feeds the filament through the hotend).
I'll be using a Printrbot simple and Repetier for this instructable, but you should be able to follow along with any printer and software combination.


terça-feira, 13 de novembro de 2018

6 canudos! E impressão em papel(!) , uma serra motorizada para imprimir, servos, e um avião em cartão!

A pedido de várias Famílias, eis uma Zarabatana-Revólver para aumentar a Diversão inocente das Zarabatanas de Cones de papel, que todos já fizemos...

E agora, fazemos outra vez, prá Filharada, e atiramos com eles, também, "para mostrar como é"! 
LOL
Pois agora, são 6 de cada vez, cortesia deste vosso amigo, para se divertirem com as vossas Impressoras 3D, com um projecto fácil de fazer, só 4 peças, e que se monta num instante:


Six Shot Blowgun
Edgar Castelo

3D model description
A Blowgun with a revolver's cylinder, 6 shots in rapid succession. It uses 20 mm PVC tubing, and it's just 4 pieces and a rubber ban, all easy to print and assemble.

Some 3 and a half hours to print, 98*44*30 mm, the larger part.The rest is the PVC tubing;
One large PVC tube part is the barrel, and 6 smaller tube parts, along with 2 other printed parts, make the cylinder.
The last 2 are a Rubber band, and the cylinder holding piece, that holds the cylinder, but rotates.


Não só respeitador do Ambiente, (embora o PLA seja tão biodegradável, que mais, era comestível...), como, talvez, uma forma de ter um material de suporte, para impressoras de 2 ou mais cabeças, eis algo a seguir de perto...
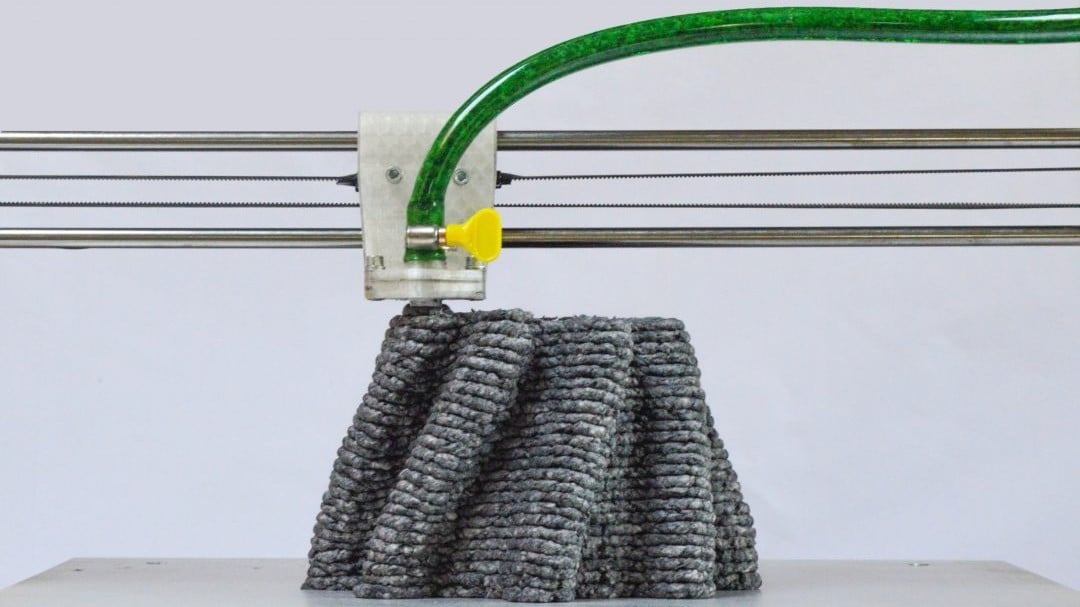
Imprimir 3D em POLPA DE PAPEL!


Designer Develops 3D Printer That Spits Out Wet Paper Pulp
Tyler Koslow

Designer Beer Holthuis has developed the Paper Pulp Printer: a 3D printer that squirts out fascinating objects made from wet paper pulp. The project aims to give artists and designers a way to 3D print more sustainable objects.
3D printing is a marvelous and innovative technology that enables us to create even the most complex designs, but one issue that has concerned environmentally-minded makers is the excessive use of plastic materials. Sustainability is becoming a major focus for many 3D printing companies and enthusiasts, leading to the development of recycled materials and other more earth-friendly processes.
Taking inspiration from the mischevious kids that sat in the back of class shooting spitballs at one another, designer Beer Holthuis has developed the Paper Pulp Printer: a 3D printer that extrudes sopping wet paper. Using a bit of natural binder and wet paper, the designer created a 3D printer that could extrude a thick bead of pulp that could be built up layer-by-layer into a 3D object.


Eis uma muito boa razão para se ter uma Impressora 3D;
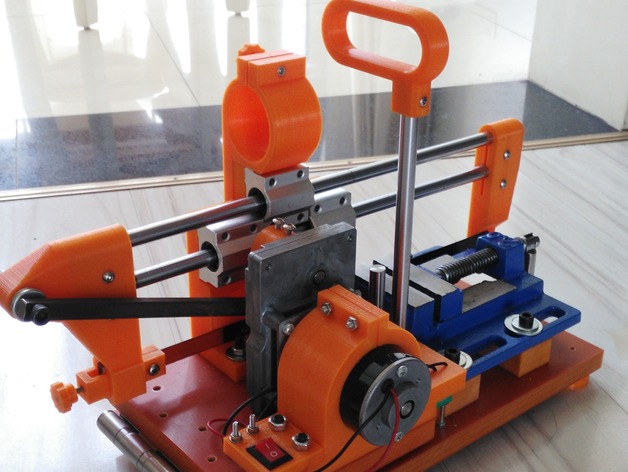
Fazer dela, UMA MÃQUINA QUE FAZ MÁQUINAS!
Isto vai-vos dar muitas ideias, e fazer uma Oficina, a partir de Filamento, é habilitar a Malta a ter outro nível de vida...
Ou, apenas, uns momentos bem passados!


Power Hacksaw by 3D Printer V4.0
Tomlie_Xie May

This time, I use bakelite to make the base. And the base reduced to 30cm. I have made two hacksaws for my friends.
Now, I'm building the v5 hacksaw, its base is 270x135mm and more easy to make. i'll update the STLs after test finished.


Pessoal da Robótica, e Tele-controle, aprendam umas coisas sobre os Drivers, que impelem os Servo-motores a fazer o que lhes mandam:


556 Servo Driver
hombremagnetico

Servos (also RC servos) are small, cheap, mass-produced servomotors used for radio control and small-scale robotics. The are designed to be easily controlled: the position of the internal potentiometer is continually compared to the commanded position from the control device (i.e., the radio control). Any difference gives rise to an error signal in the appropriate direction, which drives the electric motor either forwards or backwards, and moving the shaft to the commanded position. When the servo reaches this position, the error signal reduces and then becomes zero, at which point the servo stops moving.
Radio control servos are connected through a standard three-wire connection: two wires for a DC power supply and one for control, carrying a pulse-width modulation (PWM) signal. The standard voltage is 4.8 V DC, however 6 V and 12 V is also used on a few servos. The control signal is a digital PWM signal with a 50 Hz frame rate. Within each 20 ms timeframe, an active-high digital pulse controls the position. The pulse nominally ranges from 1.0 ms to 2.0 ms with 1.5 ms always being center of range

https://www.instructables.com/id/556-Servo-Driver


Mais fiéis ao original, de certeza, que as Caravelas feitas com Pau-de-Fósforo, e com aplicações em toda a espécie de Espectáculos, Desfiles, e Filmes amadores, vejam como se fazem, no humilde cartão, Modelos convincentes...


Boeing 737-800 Build Out of CARDBOARD
Lalramsiam
 
Hello. Today, I am going to share with you, how I made an airliner (Boeing 737-800) out of CARDBOARD.
This is my first instructable, so please forgive me if i post something incorrectly.


domingo, 4 de novembro de 2018

Parafusos 3D! E construír Circuitos, mais uma Impressora 3D Open-source, e testem a Impressora!

Um Parafuso faz falta... 
A muita gente! 
LOL
Por exemplo, nas vossas Engenhocas, pode ser importante imprimir em 3D uns parafusos, mas uns que funcionem, mesmo, sem falhas, e com dimensões e outras características que não encontrem por ai.
Por isso, sigam este Tutorial:


Step-by-step easy guide: designing and 3D printing threads
Katarzyna Plewa

In this blog post, we will show you how easy it is to 3D model threads, which are used all around us. We have them in our bathrooms, kitchens, gardens. Most of them have universal size and can be easily designed and 3D printed with an online service like Sculpteo. Our 3D printing experts will show you how simple 3D modeling and 3D printing can be. Let’s get started!

What are the benefits of 3D printing threads?
One would ask, why would you 3D print threads if they are already available on the market? But the benefits of 3D printing threads are numerous. Let’s start with the customization. No other technology in the world gives you that much design freedom and a high level of details. With Additive Manufacturing you can design and produce parts perfectly fitting just your needs.

https://www.sculpteo.com/blog/2018/10/31/step-by-step-easy-guide-designing-and-3d-printing-threads


Para perderem o medo a criar os Circuitos Electrónicos, que precisem, aprendam com este Instructable, porque aprendendo, o que custa mais, é dar os primeiros passos:


How to Build Your 1st Circuit
lonesoulsurfer 

Building your own circuits can seem like a daunting task. Circuit diagrams look like hieroglyphics and all those electronic parts make absolutely no sense.
I have put this Instructable together to hopefully help and guide you to ultimately build your own circuits. The 10 tips in this Instructable are ones that I have picked-up over the years through much trial and error. I’m no expert (the great thing is you don’t have to be an expert to learn how to create circuits!) so please don’t expect this Instructable to be a complete guide. Rather, I hope it’s used to help anyone who is interested in learning about electronics and circuits, to pick up a soldering iron and get started.


 ~


Mais outra Impressora 3D Open Source, para não dizerem que vos faltam opções, e este, com práticamente tudo o que é bom, mas ainda assim, com a possibiliade de ficar melhor!


LightBlue 3D
fkirita

Hello.
In the past 4 years I've played with 3D printers.
I have discovered and learned new skills and knowledge. I designed and printed a lot of objects. I fell in love with 3D printers. And I hated them. And again I fell in love.
And now I've decided to make a 3D printer. An open source printer.
In this instructable I will describe how to build your BlueLight 3D printer. It is the first 3D printer we produced and is the basic model. If you want, you can upgrade to DeepBlue 3D or even to DeepBlue 3D Pro.
Highlights: cube like frame, new cross XY rolling system design, servo Z probe for all bed surfaces, four point translation bed design, simple filament run out sensor, active cooling with laminar air curtain and Marlin 2.0 firmware (early stage).
The DeepBlue 3D Pro, the top of the Blue3D range has an active enclosure, wi-fi connection, raspberry pi with octoprint and direct extruder.
 
https://www.instructables.com/id/LightBlue-3D/


Um Diagnóstico completo à qualidade das vossas Impressões, é o que vos oferece este fichheiro que é um Teste de Impressão, bem mais completo do que o simpático Benchy:


Autodesk and Kickstarter Develop a Free, Downloadable Universal Test Print for 3D Printers
Rain Noe

Before buying one, how do you determine if any given FDM (fused deposition modeling) 3D printer will be able to do what you need it to? Shouldn't there be some universal test print, like those printer test pages that you can use to determine if your printer's up to snuff?
Kickstarter thinks so. As the host for over 200 successfully-crowdfunded 3D printers, most famously Formlabs', the company realizes it would be beneficial if all developers of 3D printers could demonstrate their machines' capabilities by all producing the same complicated object. Hence they've partnered with Autodesk to develop the following file:


 ~


 ...E se o vosso malvado Extrusor só vos dá dores-de-cabeça, aprendam mas é a calibrá-lo em 6 passos, para ser sempre a abrir...
É bom!


Extruder Calibration – 6 Easy Steps
Emmett Grames

Extruder calibration is crucial to FDM 3D printing for many reasons. The point of extruder calibration is to ensure your printer is pushing exactly the right amount of filament through the hot end during a print.
Too little filament and a part will have gaps between layers, or the layers themselves will be weak or missing. Adhesion will also not be very good, and prints can be subject to layers delaminating and warping.
Too much filament and your prints will come out with over-extrusion problems, resulting in blobs, stringing, and droopy details. Extreme over-extrusion can also contribute to clogging and filament jamming in the hot end.
To avoid these problems, we suggest following this simple step-by-step guide to calibrate your extruder.

https://all3dp.com/2/extruder-calibration-6-easy-steps-2/


sábado, 27 de outubro de 2018

Hardware city? E façam um Estroboscópio, mobília CNC, dobrar metal, e actualizar o Marlin!

Eis algo para vos ajudar a levar as vossas Engenhocas, no campo do Hardware, Startups, partilhar ideias, e contactar Industiais...
Uma grande ajuda, para concretizar coisas, penso eu!


HARDWARE COMMUNITY
Hardware City closes the gap between hardware startups and contract manufacturers

Hardware Startups
Developing hardware products is Hard! Here you can find a community that can help you during the pipeline of industrialization

Community of Makers
Makers are one of the most creative communities worldwide. We want to engage this community to stimulate the creativity and share of technical skills

Industry
The step from product development to industrialization is the most difficult. We want to bridge the gap between hardware startups and the contract manufacturers


Um Estroboscópio a partir dum LED? 
Algo de útil para Fotógrafos, Engenhocas, Curiosos, e Cientistas, por isso aprendam, que é bom.


Make Your Own LED Stroboscope
GreatScottLab

In this project I will show you how the stroboscopic effect works and how we can use it to determine the RPM of a motor. Also I will be showing you how to create a simple LED stroboscope at home by utilizing an Arduino or a 555 Timer circuit. Let's get started!


Mobília, a partir da ideia, passando ao CAD, e depois ao CNC, passo a passo, ora aqui está algo de porreiro para os Designers!


CNC Furniture: From Sketch To Prototype Using Rhino & Grasshopper!
Ezequiel Lopez
About Carlos and Modifile
Carlos Travaini is the lead designer at Modifile.com. He's an Argentinian that moved to Venice, Italy many years ago and is constantly busy alternating between private projects he gets hired for and his new website.
Intrigued by how he's able to mix all the elements that enable him to create all his fun and very original furniture pieces, I asked him for a favor: I wanted to get to know his creative process. Note that most of the times this is a very private process and many artists simply won't let you into that space, but Carlos was gracious enough to let our cameras in not only during the sketching portion but the entire process, from sketch to prototype production.

https://www.shapediver.com/blog/cnc-furniture-from-sketch-to-prototype-using-rhino-amp-grasshopper


Aprendem aqui como dobrar a eito, Tiras de Metal, usando um pouco de Faça Você Mesmo:


Homemade Mini Bend Brake
Improbable Construct

In this Instructable I will show you how I made a Mini Bend Brake to bend some 1/16" aluminum.
I needed to make clean straight bends in strips of aluminum for my Hidden Bookshelf Light Switch.
I had pretty good luck bending the aluminum in my bench vise, but it was hard to keep the bends square and even.
So, this is what I came up with.

https://www.instructables.com/id/Homemade-Mini-Press-Brake/


O Tempo passa...
Se o vosso Software Marlin precisa de ser actualizado, este nosso amigo explica como se faz.


Easily upgrade the Marlin firmware on your kit 3D printer!
Thomas Sanladerer

Ever wanted to get rid of the buggy or outdated version of the Marlin firmware that shipped with your printer? Just update it to the most current one! I show you how to set up the mainline Marlin firmware on your kit 3D printer using the Arduino software package.

https://www.youtube.com/watch?v=lAKyZd63_ns