
Ora aqui está um meio caminho entre imprimirem, um por um, uma pequena série de objectos, e mandar fazer um Molde para injecção em séries grandes.
Isto vai libertar muito Criador e Engenhocas...
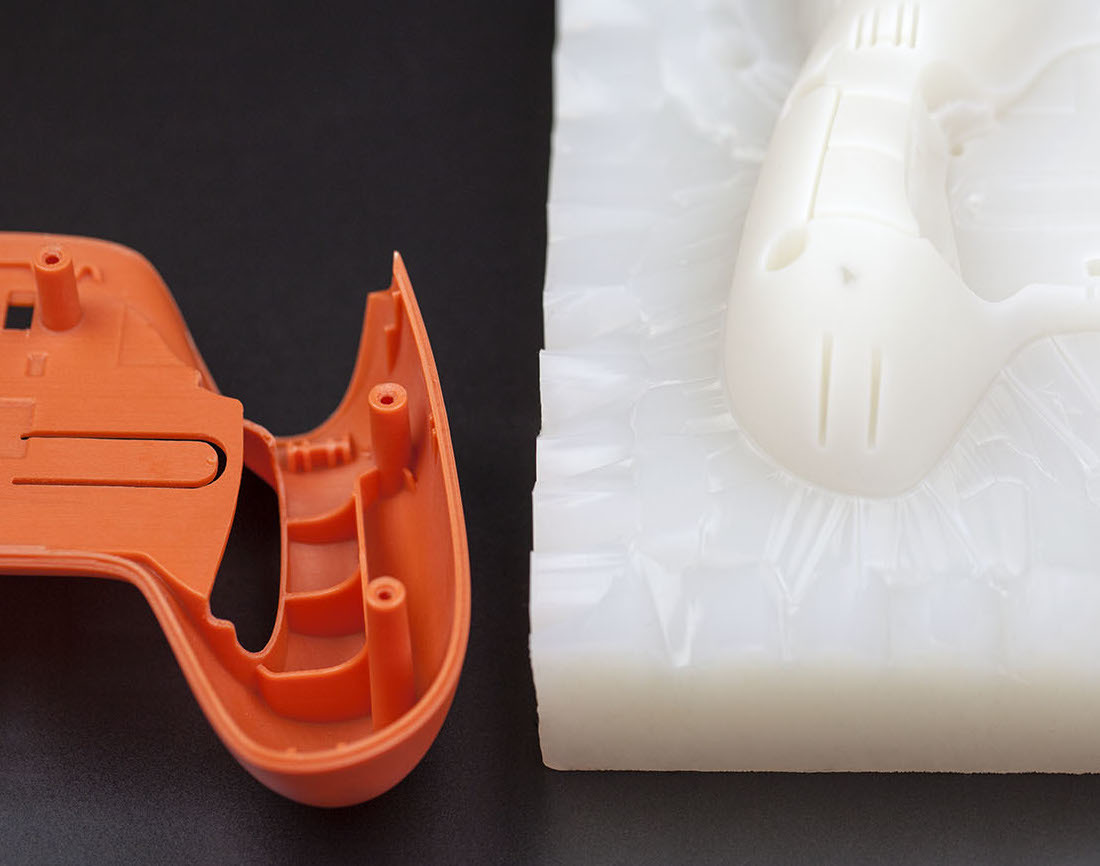
Urethane Casting – All You Need to KnowAlex Haysler
Urethane casting (UC) is a manufacturing technique allowing for low- to mid-range volume production. It successfully bridges the gap between alternative low-cost methods, which lack scalability, and injection molding. This method allows creation of production-like parts with high-quality, detailed features and cosmetic similarity both quickly and inexpensively.
UC is primarily aimed towards situations where the cost of hard tooling in aluminum or steel, such as for injection-molded parts, would prevent manufacture. UC can also be referred to as room temperature vulcanization (RTV), where the silicone mold is cured in ambient conditions.
https://all3dp.com/2/urethane-casting-all-you-need-to-know/

Há Materiais Transparentes, mas aqui aprendem com aperfeiçoar a Impressão para o melhor possível:
Transparent 3D Printing – 4 Ways to Create Transparent PartsBenjamin Goldschmidt
As you might have guessed, transparent 3D printing is printing a plastic part that you can see through. Applications of this technique vary from see-through vases to optical elements like prisms, art, or decorative pieces. While this might seem simple to achieve (buy transparent filament and print it), the reality is a bit more complicated. Before going into methods, we’ll need to learn about some of the science behind what makes something transparent: What is transparency?
Transparency, or the ability to see through an object, is controlled by how light passes through it. If light passes through an object without being redirected in a significant way (i.e. through a pane of glass), the object will appear to be transparent. In glass, the material is homogenous and clear, meaning that you can easily see through it. To mimic this property in a 3D printed object, we must adhere to the following rules:
Plastic material must be transparent to start with
Printing must limit the introduction of air bubbles into the part
The part should have a smooth surface in the desired transparent area
https://all3dp.com/2/transparent-3d-printing-create-transparent-parts/
...E se vos faltam as Ideias sobre o que imprimir, cá vão 607 nLinks para seguirem!

https://www.pinterest.pt/fgunawanc3po/3d-printer-printing/
Podem seguir estes planos Open Source, para criarem a vossa Fresa CNC, e sigam o Site, com atenção, que tem muito mais:

The LowRider2 CNC
V1ENGINEER
The LowRider2 CNC is my revised version of a CNC router that can handle full sheet material! Of course you can go smaller. If the MPCNC is not big enough for you this picks up where that left off.
Thingiverse Printed parts files – Links 25.4mm, 25mm version. Hardware list – Parts.This CNC router can handle any length (within reason), the Y direction is only bound by your table length.Width (X direction on rails) should always be the shorter axis and is recommended to keep the work area no larger than 4′ on this axis.The Z direction (height) is best kept to a 3-4″ maximum for wood, with that being said, you can make the usable z length as much as you want you will be working from the bottom up, so go to town.
Eis como tratarem de terem Impressores perfeitas, com 10 ajustes avançados, que vos ensinam na Pinshape:

10 Advanced 3D Slicer Settings That Will Save Your Prints!Accurate 3d slicer settings are one of the most important factors to achieve a successful 3d print. Even the most experienced makers often go through trial and error to find the 3d slicer settings that give them a beautiful print. In our last article Slicer Settings for Beginners – 8 Things you Need to Know, we went over the basic settings and how each one affects your print. Now we’re going to go over some of the more advanced settings that give you more detailed control over how your print comes out so you can take your 3d printing to the next level. An overwhelming number of you voted for Simplify3D as Top 3D Slicing Software in our 2015 Pinshape Awards which is one of the reasons we chose to use them as our example software for this post. There are a lot of settings in this slicer program that give you a ton of control and provide faster, better quality prints. In one review, Simplify3D sliced a file in 55 seconds that took over 40 minutes to slice in another program!
Sem comentários:
Enviar um comentário