Blog Posts

Mostrar mensagens com a etiqueta atiny. Mostrar todas as mensagens

terça-feira, 19 de abril de 2016

Woodpeckers, a Madeira feita Lego! e Digispark, o Micro Arduino, Micro-Câmeras FPV ao vivo, uma Caixa de Ferramentas Séc XXI, e uma Marreta!

Dica do nosso amigo José Carlos, eis um conjunto de Ferrementas que tornam a Madeira tão fácil de ser trabalhada, que parece Lego!
Aparecendo nesta fantástica Página do Facebook a seguir de perto, a Contruindoo, é uma linha de Ferramentas que facilita bastante a vida, quando se trata de cortar e colar Madeira para se fazerem Caixas que podem bem ser a vossa próxima Engenhoca, Protótipo, ou a Estrutura da vossa próxima Impressora 3D...


WHO'S WOODPECKERS…  
Woodpeckers was established in September of 1988. Our focus has always been woodworking tools. Up until 2004 we focused on demonstrating tools at woodworking shows throughout the U.S. Since 1993 we've been manufacturing router tables and router mounting plates. Starting with little more than a few routers we've grown into a full fledge manufacturer of router lifts, router fences, measuring & layout tools and many useful clamping accessories. We do our own machining, engraving, assembly and packing. We take pride in the fact that our tools are truly made in the U.S.A. 


Outra fonte fantástica de Informação é a Artilharia Digital, que nos traz este micro-Arduino, o Digispark, da Digistump.

Here's the English intro of this awesome thinghy,  featured in Artilharia Digital:

Digispark USB Development Board 
The Digispark is an Attiny85 based microcontroller development board similar to the Arduino line, only cheaper, smaller, and a bit less powerful. With a whole host of shields to extend its functionality and the ability to use the familiar Arduino IDE the Digispark is a great way to jump into electronics, or perfect for when an Arduino is too big or too much.
The Digispark is shipped fully assembled except for the two included and easy to solder headers. 


Digispark.
O Digispark é uma placa USB de desenvolvimento, baseada no microcontrolador Attiny85 e com design que lembra um "pendrive". O Digispark é semelhante ao Arduino, porém é muito mais barato, compacto e fácil de usar. Basta plugar em uma entrada USB e programá-lo!
O Digisparkt usa a mesma IDE do Arduino, onde é possível escrever seu código ou usar os exemplos prontos, testar e depois enviar para o Digispark, exatamente como em qualquer Arduino. No entanto, é necessário baixar outro pacote com a IDE do Arduino já com as funcionalidades para o microcontrolador Attiny85 ou instalar manualmente essas funcionalidades em sua IDE já instalada. 


Aqui vêem um par se sessões de Live Stream deste Entusiasta, Benedikt, sobre as Micro-Câmeras FPV, por isso inteirem-se das possibilidades abertas aos Engenhocas por estas pequenas maravilhas:

Learn about FPV Cameras,  in this pair of Videos, from Benedikt: 
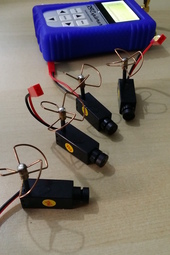


micro FPV cameras 


Quem já andou à toa, em Exposições, Conferências, Apresentações, ou a testar Protótipos, vai reconhecer de imediato a utilidade da Coolbox, uma Caixa de Ferramentas para toda a classe de Enhgenhocas!
Com uma Fonte de Alimentação, Holofote LED, portas USB, Altifalantes, um Relógio Digital, um Quadro Branco, um suporte para a Tablet, uma placa magnética para as peçinhas, rodas, e até um Abridor de Garrafas, para além do espaço para as ferramentas, claro está, longe de casa, e com pouco tempo para montar o vosso Stand, vão valorizar MUITO, esta ajuda...


Coolbox reinvents the toolbox with gadgets and gizmos
Dave Parrack 
 
A toolbox isn't something you'd ever think of as being "cool." After all, it's designed to be a simple repository for your tools, nothing more, nothing less. Unless, that is, we're talking about Coolbox, a toolbox with more than a few tricks up its sleeve.
... 
 Coolbox features, in no particular order, a magnetic lid to help prevent lost nuts and screws, a tablet stand, an LED floodlight, a whiteboard, a power bar, USB ports, Bluetooth speakers, a digital clock, and a bottle opener. It also comes with suitcase-style wheels and dual handles, both designed to make it easier to maneuver.


A ideia principal desta Marreta, é a de usar a cola das Pistolas de Cola, para fazer uma Marreta...
Mas essa ideia, pode ser expandida para Acessórios e Ferramentas especializadas,  como Martelos e Alicates em que se queira preservar a superfície do que trabalhamos, Manípulos, peças partidas que se tem de substituír, Etc. 
Mãos à obra! 


Make Your Own Hot-Glue Mallet! (Rubber Hammer) | DIY Woodworking Tools #4
Yonatan24 
Why would I buy a Rubber Mallet? Why should I pay almost $10 for a small piece of rubber and a handle?Well, I can make one with several sticks of Hot-Glue!
In my experiments, A Rubber Mallet is even BETTER than a Wooden Mallet for Chisel-work. Keep this in mind, Fellow Woodworkers! ;)
This project was originally inspired by Chitlange Sahas' Rubber Mallet using Hot glue Instructable. His method didn't work very well for me, So I thought of a different method. Also way funner!
It was a super fun project to make, And I'll keep the intro short. Let's not keep you waiting ;)
Let's get started! 


quarta-feira, 24 de fevereiro de 2016

Um Anel-Relógio! E Visão Nocturna, como vender Modelos 3D, controle com Pi, e Dobrem Tubo.

Ora aqui está uma pequena maravilha, um Anel-relógio, coisas que eram dos Filmes de  Ficção-Científica, há uns anos, agora, vocês fazem em casa, é só seguir as Instrucções!
Fenomenal. 


ATtiny85 Ring Watch

陳亮 
Based on the previous Instructables - ATtiny Watch Core and more, I have made a real gadget, an ATtiny85 Ring Watch.
MCU
Today core subject, ATtiny85. Someone suggest me to use SOIC version to reduce the watch size and I found the coin cell mAh calculation method will count the battery voltage down to 2.0 V, so this watch require a low voltage version MCU to keep it stable. So I have ordered an ATTINY85V-10SU. (much expensive $_$) 


Querem ver no escuro? 
Já podem, agora, com este Visor de Infravermelhos, que constróem em casa:


DIY Infrared Night Vision Device

eyebot117

 I've been involved with airsoft for about two years being affiliated with a large local group of people in our community who meet regularly and have scheduled games, ops, and events. Airsoft is a great sport and hobby that encourages teamwork, honor, respect, communication, and discipline (as well as how to wisely make purchases). I recently played a game at night and realized how cool it would be if I could utilize some form of night vision. The more I researched it, the more I wanted to see in the dark somehow.
Unfortunately, true night vision in even the lowest quality can cost hundreds of dollars just for the optic alone, excluding hardware necessary to mount the optic to a helmet or airsoft rifle. It's expensive technology. However, there are alternative methods for seeing in the dark. There are several versions of educational night vision viewers and toy spy binoculars available on the market for kids and...um...well, geeks like me. They utilize low-lux cameras, infrared illumination, and a display for a more affordable $50-$80 system that can still see in the dark. This is the system I chose to utilize.
Being inspired by DIY'ers like Kipkay, and reading books like 50 Spy Gadgets for the Evil Genius, I chose to invest the money to build my own infrared night vision viewer. Besides, both of those night vision builds use parts that can only be scavenged, not purchased individually. I wanted to show how to build a unit from stuff you can buy online easily or at the store. 
http://www.instructables.com/id/DIY-Infrared-Night-Vision-Device/


Eis uma data de Dicas sobre como desenhar, e vender os vossos Objectos 3D, que fazem sempre falta, juntamente com uma lista de Programas, e façam favor de aprender, que é de borla, uma oferta da Pinshape!


Pinshape 3D Printing Design Guide: Learn How to Sell Your Models

Bridget Butler Millsaps  
Sometimes the world of 3D printing still feels a bit like the wild, wild west. The rules are being made up as we go, and it’s still a fairly lawless frontier, as well as one where you, well, sometimes just have no idea how to pull off a particular concept, or no earthly idea why something went wrong when you were in the throes of creativity, bringing a supposedly great design to fruition. And of course, when things do go stupendously, we want to share. Thank goodness now for the talented—and generous—souls in the Pinshape community, who have offered up all of their tips, now compiled in their ­­­­­­­­­­­­­­­­Pinshape 3D Printing Design Guide. 


Podem controlar o que quizerem, lá em casa, com um Raspebby Pi!
Sim, controlam uma série de Relays, assim, e ligam e desligam tudo o que tiverem para ligar e desligar. 
Vejam agora como: 


Controlling any device using a Raspberry Pi and a relay module

julienrl 
The goal of this ible is to show how to get started with setting up a relay module on your pi and controlling it. My goal is to add scripts to my octopi to turn on and off LED lights, but anyway you decide to eventually control the GPIO commands, the setup is the same. 


Sem serem o Bender, já podem agora dobrar Tubo à vontade, o que abre toda uma nova Gama de possibilidades, para Estruturas de toda a ordem...
Um Achado! 


Tube bender

lecgo 
I would have liked it to make a new seat for my recumbent bicycle and for it was necessary some aluminium tubes and to bend those on proper shape. In our town I have not found a place to bend some tubes and I have decided to make my own tube bender for this work. 


quinta-feira, 13 de junho de 2013

Robots à brava!

Começa por dois Robots feitos com Arduino:


Um para Principiantes, e atenção, feito por um Professor, que ensina Robótica a alunos de Liceu, isto é que é categoria:


James - Your first Arduino Robot

chickenparmi
So you want to make a robot? Don't know where to start? How about you learn how to make a robot with me and make James!
James was made as part of a Robotics Class I teach to a few high school students.

I called him James in memory of my late Grandfather James Henry Edwards who passed away 14-3-2013. He loved teaching and helping kids and died doing what he loved, hopefully this James will carry on that legacy.

http://www.instructables.com/id/James-Your-first-Arduino-Robot/


Neste exemplo, vai-se mais longe, com um Robot Plantador!
Robótica e Jardinagem, isto antes, era Ficção Científica...


Seed Spreading Robot

randofo


Last summer it was brought to my attention that you could buy nearly everything you needed for automated lawn care but a seed spreading robot. This intrigued me. For starters, why on Earth would anyone make lawn care robots in the first place? There are countless reasons this seems like a bad idea. Secondly, a seed spreading robot sounded like a bizarre robotic cross between Wall-E, and Johnny Appleseed. The idea clearly had potential.

So, when asked if I wanted to actually take on the challenge of building one, I obviously responded with a definitive yes. Even though I personally don't own a lawn (my backyard is concrete and weeds), it seemed like an opportunity too good to pass up. In terms of actually using it, I found a willing victim in Glenn Derene of Popular Mechanics. He was more than happy to let this thing loose on his lawn (along with a slew of other robotic lawn care contraptions). So one fateful day last summer, I tightened the last bolt, wrote the last line of code, packed it up safely, and shipped it cross country to meet whatever fate lie in store.


Ficamos a saber duas coisas com o Robot a seguir, a primeira, que existe uma placa bem mais pequena que o Arduino, a Atiny, e a segunda, que, coberto com uma carapaça hemisférica, isto dava um Brinquedo para Gatos fenomenal...


Artoo [R2] (ATtiny2313 Wall Avoiding Robot)

vishalapr

Since I had a lot of ATtiny2313s lying around I wanted to do something cool with them, I thought for a while and then decided to make a simple wall avoiding robot with the ATtiny2313, an ultrasonic sensor and 2 motors.

Its an easy to make and simple robot which runs on a very small amount of code so as to support and work with the ATtiny2313.

For those of you out there who want to make a small robot with the Arduino processing, but you are not able to as the Arduino is too big for a small robot, then this is the perfect robot for you!

Since the ATtiny2313 chip is much smaller compared to the Arduino, it fits in almost anywhere, which allows you to make a small simple robot which evades walls.


Voltando aos Arduinos, não será um Robot, mas serve para muita coisa, desde pesquisa científica a protecção florestal, passando pela monitorização de habitações, um Colector de Dados Ambientais:


Mini Arduino enviroment monitor

johnag

This is an Example of how you can use the Arduino to monitor various environmental parameters And display them on a LCD screen.