Aproveitem todo aquele plástico rijo das embalagens, reciclando-o com esta máquina de Molde a vácuo:
Milk Jug Vacuum Forming - Recycled HPDE PlasticHey Jude
This Instructables shows you how to reclaim / re-use / re-cycle HDPE plastic, from waste milk jugs - and use them for Vacuum Forming. It saves using virgin plastic, (say for prototyping), is food safe, is flexible once moulded (good for concrete mini moulds), and does not give off harmful fumes upon careful heating (Easter Eggs Treasure!).
(Please consider voting in Trash to Treasure contest, if you liked it! Thanks.)
You may have access to an industrial grade Vacuum Former in your workshop or maker space, but if you are using a hobby Vac Former, like a Mayku*, you do need to avoid draughts to keep the plastic extra warm. I made a heat shroud here (LINK to Instructable) to Fix It...so do take inspiration from it if it helps with thicker HPDE containers, etc. (though at your own risk).
https://www.instructables.com/id/Milk-Jug-Vacuum-Forming-Recycled-HPDE-Plastic/
Neste Blog há muito para explorar, Sofware, Mecânica, Manuais, e este manual é um deles:
Welding processes handbook
Klas Weman
Mecha Source
Production of this guide to welding was prompted originally by a wish for an up-to-date reference on applications in the field. The content has been chosen so that it can be used as a textbook for European welding courses in accordance with guidelines from the European Welding Federation. Over the last few years, an equivalent Swedish guide has been used for courses on welding processes and equipment. The author hopes that this guide will serve as a useful reference book for those involved in welding. In writing the book, there has been a conscious effort to ensure that both text and illustrative material is clear, concentrating particularly on interesting and important aspects.
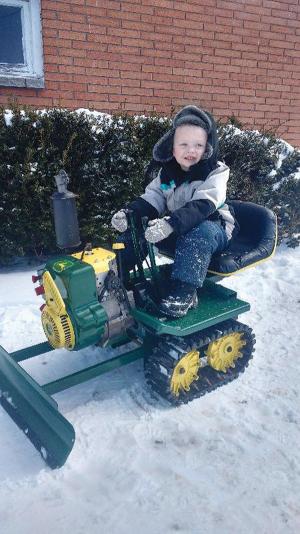
Eis um exemplo de criatividade, para a Criançada, um soprador de neve que virou um Bulldozer!
Snowblower Converted To Mini Tracked BulldozerFarm Show
“My 4-year-old son Matthew loves to drive it. I’m really happy with how it turned out,” says Randy Brancheau, Lachine, Mich., who converted a tracked walk-behind snowblower into a kid-size, ride-on bulldozer.
The mini tracked bulldozer is equipped with a 27-in. blade and the seat off a riding mower. It’s painted Deere green and yellow.
Brancheau built it last winter and says his son has already had a lot of fun operating it. “I hear from Matthew every day how much he likes to plow snow with it, and I made a video of him at work. He raises or lowers the blade by pulling on a lever and steers by maneuvering a pair of levers. It has 4 forward gears and one reverse. I didn’t modify the snowblower’s original friction disc drive system at all.”
Brancheau says he got the idea a long time ago but was only recently able to make it happen.
https://www.farmshow.com/a_article.php?aid=33214
How I Made the Most Advanced Flashlight Ever
Julie
PCB design is my weak spot. I often get a simple idea and decide to realize it as complex and perfect as possible.So I once looked an old "military" 4.5V flashlight with regular bulb that was collecting dust a. The light output from that bulb was pretty miserable and the batteries were non rechargeable, battery life was non existent. But its case was nice.So I decided to give it a new high-tech heart.So I asked myself: "How many functionalities do I want to build in?"and I said: "Yes. All of them.":)
...E por hoje é tudo, mas não sem antes divulgar este Instructable para os Audiófilos, um Sistema de Som:
DIY 5.1 Surround speakers - a learning opportunity!
Thomas Sanladerer
3D printing parts that are more complex than what we usually make can be daunting - especially when it also needs look good! Making my own 5.1 surround satellite speakers was a project I started over two years ago and today we're finally finishing it. There were plenty of hiccups and mistakes - I'll show you all of them so that you don't have to make them yourself!The speakers were modeled with Onshape, unfortunately I don't have the models anymore or I'd gladly share them with you.


Sem comentários:
Enviar um comentário